The real performance of a wall isn’t just its R-value; it’s how effectively the framing system defeats heat loss through thermal bridging and air leakage.
- Traditional framing creates “thermal highways” of solid wood that bypass your insulation, making ghost lines on ceilings and chilling exterior walls.
- Advanced framing is a system of intentional details—like California corners and insulated headers—that replaces unnecessary lumber with continuous insulation.
Recommendation: Stop thinking about framing and insulation as separate jobs. Adopt a “building-as-a-system” mindset where every stud and joint is designed to maximize the integrity of the entire thermal envelope.
As a framer, you take pride in a structure that’s plumb, square, and strong. But in Canada, the game has changed. You’ve seen it: homes with thick batts of insulation that still feel drafty, or worse, dark “ghosting” lines appearing on a brand-new ceiling in the dead of winter. The old way of thinking—that more wood equals a better house—is the very thing creating the problem. The real enemy isn’t the cold; it’s the pathway we give it through our own framing.
This isn’t about simply meeting new energy codes. It’s about mastering the craft of high-performance building. The standard advice to “add more insulation” or “use a good vapour barrier” misses the point if the skeleton of the house itself is a massive thermal bridge. Solid wood studs, headers, and corners act as thermal highways, conducting heat right out of the building and chilling interior surfaces to the point of condensation and mold.
The solution lies in a fundamental shift in thinking. Advanced framing isn’t a radical new invention; it’s a smarter, more intentional system where every piece of lumber has a purpose, and every possible thermal bridge is systematically eliminated. It’s about designing an envelope where the insulation can do its job without interruption. It’s about building a structure that performs as well in reality as it does on paper.
This guide breaks down the core techniques that are no longer optional for any serious Canadian builder. We’ll move from foundational principles to the specific details that separate a standard build from a high-performance one, showing you not just the “how,” but the critical “why” behind each method.
This article details the essential, interconnected techniques that form a complete high-performance framing system. The following summary outlines how each detail contributes to a superior thermal envelope, from the overall wall assembly down to the critical junctions.
Summary: Why California Corners Are Mandatory for High-Performance Framing?
- Advanced Framing: How 24-Inch Spacing Saves Money and Boosts R-Value?
- How to Insulate the Rough Opening Gap Before Installing the Window?
- Double Stud Walls: How to Build a Thermal Bridge-Free Envelope?
- The Insulated Header Trick That Stops Mold Above Your Patio Door
- Service Cavities: How to Run Wiring Without Penetrating the Vapor Barrier?
- Advanced Framing: How California Corners Allow Insulation in Dead Space?
- How to Seal the Mud Sill: The Critical Junction Between Concrete and Wood?
- Why Do You See Ghost Lines on Your Ceiling in Winter?
Advanced Framing: How 24-Inch Spacing Saves Money and Boosts R-Value?
The first and most fundamental shift in advanced framing is moving from 16-inch to 24-inch on-center (O.C.) stud spacing. For generations, 16″ O.C. has been the unquestioned standard, but it creates a dense grid of lumber that actively works against your insulation. Each one of those studs is a thermal bridge—a highway for heat to escape. By simply widening that spacing to 24 inches, you reduce the amount of wood in the wall and create wider, more effective cavities for insulation. This isn’t just theory; you’re literally swapping a poor insulator (wood) for a great one (insulation).
The benefits are immediate and measurable. First, the reduction in lumber is significant. According to the U.S. Department of Energy, advanced framing can result in $500-$1,000 in materials savings per home, a figure that resonates on any job site. But the real win is in thermal performance. A 2×6 wall at 24″ O.C. not only uses less wood than a 2×4 wall at 16″ O.C., but it also allows for thicker R-20+ insulation, dramatically improving the whole-wall R-value by minimizing thermal bridging.
This table from APA – The Engineered Wood Association shows a stark comparison. The move to 24″ O.C. isn’t just a minor tweak; it’s a foundational change that yields savings in materials, labor, and long-term energy costs.
| Aspect | 16″ O.C. (2×4) | 24″ O.C. (2×6) |
|---|---|---|
| Lumber Usage | Standard baseline | 30% reduction |
| Cavity Insulation Space | R-13 typical | R-20+ achievable |
| Thermal Bridging | Every 16 inches | Every 24 inches |
| Labor Savings | Baseline | 3-5% reduction |
| Annual Energy Savings | Baseline | Up to 5% |
Of course, this requires proper planning. Wider spacing often necessitates the use of 2×6 lumber and properly sized headers to meet structural loads, especially in regions with heavy Canadian snow loads. But the result is a stronger, lighter, and vastly more efficient envelope—the first step in building a true high-performance system.
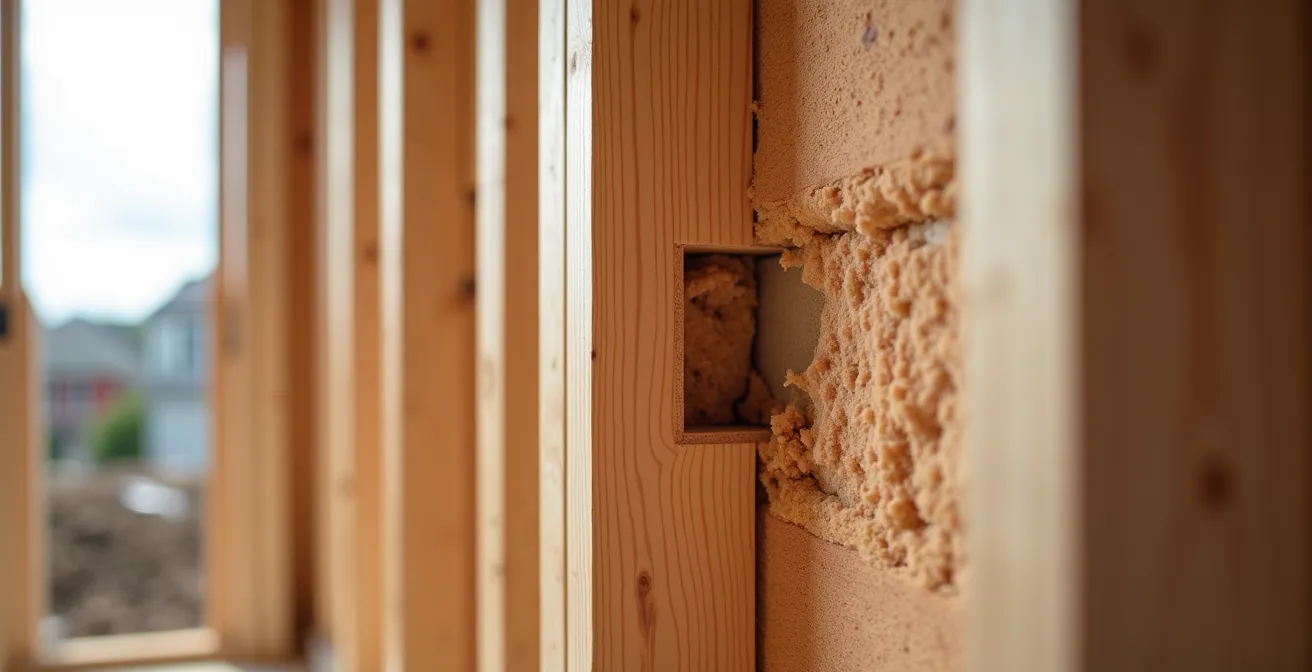
How to Insulate the Rough Opening Gap Before Installing the Window?
Once you’ve optimized the wall cavities, the next major battleground against heat loss is at every opening: windows and doors. The gap between the window frame and the rough opening is a notorious source of air leakage and thermal bridging. Simply stuffing this gap with fiberglass batts is an old-school mistake. Fiberglass loses its insulating properties when compressed and does nothing to stop air movement. In a Canadian winter, this small gap can lead to significant drafts, heat loss, and even condensation that rots the framing.
The professional standard is to create a continuous, insulated air seal. The best tool for this job is low-expansion spray foam. Unlike high-expansion foams that can bow window frames and cause operational issues, a low-expansion, window-and-door-specific formula fills the entire void without exerting damaging pressure. This method transforms the gap from a liability into a fully insulated part of the wall assembly. The foam adheres to both the window and the framing, creating a monolithic seal that blocks air and insulates simultaneously.
The illustration below details the correct application. It’s not just about squirting foam into a hole; it’s about creating a meticulous, continuous bead that connects the interior air barrier to the exterior weather-resistive barrier, with the foam acting as the critical insulating link in the chain.
As confirmed by Natural Resources Canada’s best practices, low expansion foam insulation is ideal for sealing gaps between a window frame and an insulated exterior wall. This single step is one of the highest-return details in a build. It takes only a few extra minutes per window but pays dividends for the life of the building by eliminating a primary source of drafts and improving occupant comfort.
Double Stud Walls: How to Build a Thermal Bridge-Free Envelope?
For projects demanding the highest level of thermal performance, such as Passive House or Net-Zero builds, the double-stud wall is the ultimate solution. This method takes the principle of eliminating thermal bridging to its logical conclusion. Instead of a single wall of 2x6s, you build two parallel, offset walls of 2x4s—one for the exterior sheathing and one for the interior drywall. The key is the significant gap between them, which creates a massive, uninterrupted cavity for insulation.
This design completely severs the thermal highway. There is no continuous path for heat to travel through solid wood from the inside to the outside. The result is a wall that performs at its true R-value. As Edmonton-based net-zero builder Peter Amerongen of Habitat Studio explains, it’s a strategy that delivers maximum performance economically:
We like the double 2×4 wall because it gives us the most economical high R-value. With our double 2×4 wall, we’ve got a space between our two studs that gets filled with insulation to stop that heat flow.
– Peter Amerongen, Habitat Studio, Edmonton Net-Zero Builder
The performance gains are staggering. While a standard 2×6 wall might be labeled “R-20,” thermal bridging through the studs can reduce its effective performance to R-15 or less. In contrast, double 2×4 walls achieve a true energy performance of about R-40, effectively doubling the wall’s resistance to heat loss. This is the secret behind how a net-zero home can maintain comfortable temperatures with minimal energy input, even in the harshest climates.
Building a double-stud wall requires careful planning, especially around openings and at the top and bottom plates, to ensure structural integrity and a continuous air seal. Plywood gussets are typically used to tie the two walls together. While it involves more upfront labor and planning than a single wall, the double-stud assembly creates a super-insulated envelope that is the gold standard for energy-efficient construction in Canada.
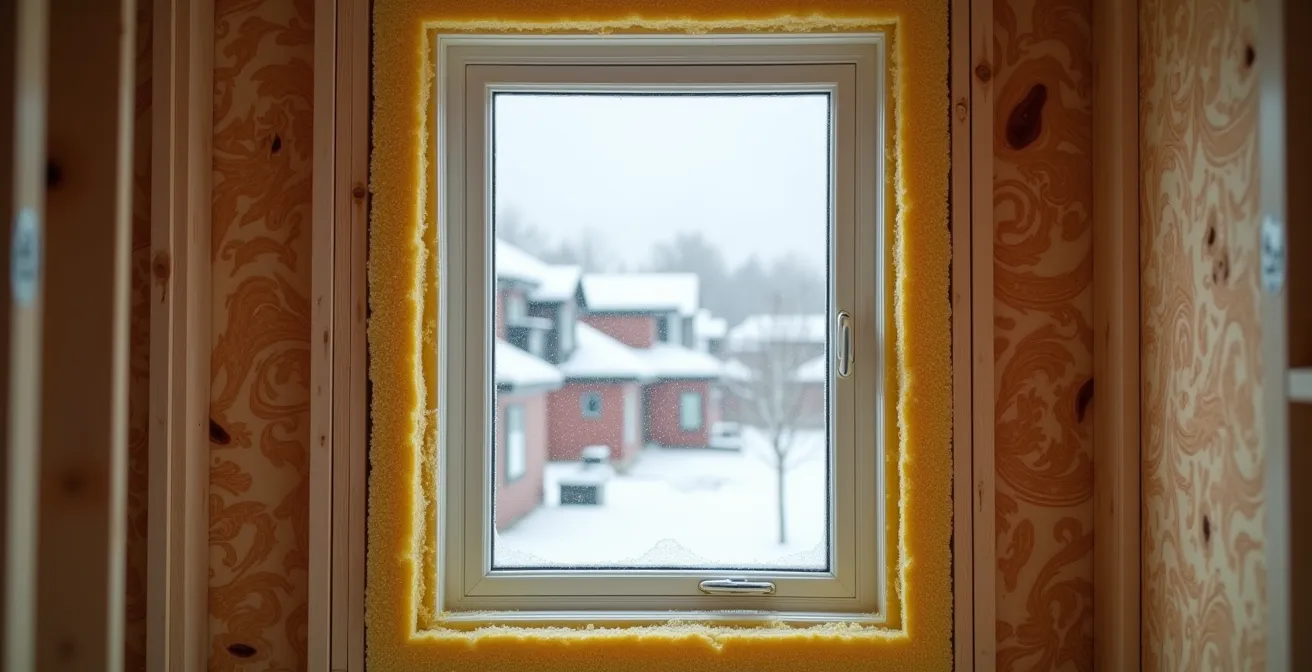
The Insulated Header Trick That Stops Mold Above Your Patio Door
Headers above windows and doors are one of the biggest, most overlooked thermal bridges in a conventional frame. A traditional header made of two or three solid 2x10s or 2x12s is a massive block of wood that acts like a thermal superhighway. In winter, this cold header chills the interior drywall surface above the opening, creating a prime location for condensation to form. That moisture feeds mold and can lead to significant rot and costly callbacks. The solution is the insulated “box” header.
Instead of a solid mass of lumber, a box header uses a combination of structural members and rigid insulation to create a thermally broken assembly. For many spans, a single piece of engineered lumber (like an LSL) on the exterior face provides all the necessary structural support. This leaves a large cavity on the interior side that can be filled with rigid foam insulation (XPS or polyiso). The result is a header that is just as strong but has a continuous layer of insulation, dramatically reducing heat loss.
This visual comparison shows the stark reality. The cold, solid header on the left is a recipe for moisture problems, while the warm, insulated header on the right maintains a stable interior surface temperature, eliminating the risk of condensation.
Building a proper insulated header requires careful execution to ensure it meets structural requirements while maximizing thermal performance. It’s a non-negotiable detail for any high-performance build, especially over large openings like patio doors where the potential for heat loss is greatest.
Action Plan: Building an Insulated Box Header for Canadian Snow Loads
- Calculate the required header size based on the span and your local snow load requirements, consulting an engineer if necessary.
- For non-load-bearing applications or smaller spans, consider using a single lumber header to maximize the insulation cavity.
- Create the cavity by using structural lumber or engineered lumber (LSL) on the exterior face, with plywood or OSB forming the “box”.
- Fill the cavity completely with rigid foam insulation (XPS or polyiso), cutting it to fit snugly to eliminate air gaps.
- Ensure the air barrier and vapor barrier are continuously sealed around the entire header assembly to prevent air leakage into the insulated cavity.
Service Cavities: How to Run Wiring Without Penetrating the Vapor Barrier?
You can build the most perfectly insulated, thermally broken wall in the world, but its performance is destroyed the moment an electrician drills dozens of holes through the vapor barrier to run wires and install outlet boxes. Every single penetration is a potential air leak, and the cumulative effect of these leaks can completely undermine the home’s airtightness. This is where the service cavity, also known as a “strapping wall,” becomes an essential part of the system.
A service cavity is a shallow, non-structural space created on the interior side of the main wall assembly. It’s typically made by running 1×3 or 1×4 strapping horizontally across the studs before the drywall is installed. This creates a gap—usually ¾ to 1.5 inches deep—that serves as a dedicated chase for all your services: electrical wiring, plumbing, and data cables. The beauty of this approach is that the primary air and vapor barrier remains completely untouched behind the strapping.
Electricians can run wires and install shallow boxes within the service cavity without ever needing to perforate the critical airtight layer of the envelope. This strategy recognizes a fundamental truth of high-performance building: air tightness is as important as insulation. A leaky house loses a massive amount of energy, no matter how high its R-value. By creating a service cavity, you are proactively protecting the integrity of the air barrier from day one.
This method is so effective that it’s recognized in building codes. The Airtight Drywall Approach (ADA), where the drywall itself is treated as the primary air barrier, relies on this principle. In Canada, this approach is accepted as a primary air barrier strategy, providing a robust alternative to a single sheet of polyethylene. The small cost of adding strapping is paid back instantly by eliminating the painstaking and often imperfect task of sealing hundreds of individual penetrations later.
Advanced Framing: How California Corners Allow Insulation in Dead Space?
Corners are another critical junction where traditional framing fails thermally. A standard corner is built with three or even four studs packed together, creating a solid block of wood with zero space for insulation. This “dead space” is a massive thermal bridge, a cold spot that runs the full height of the wall. The California corner, also known as a three-stud corner, is the elegant solution to this problem.
Instead of packing the corner solid, a California corner uses two studs to form the corner and adds a third stud or drywall clips on the interior as a backer for the drywall. This simple change in configuration leaves the corner cavity open and accessible for insulation. You transform a thermal liability into a fully insulated part of the building envelope, ensuring the R-value is continuous from wall to wall. As LDA Architects succinctly put it:
Three stud corners, also known as California corners, are an easy way to reduce lumber used in a building project while allowing more insulation in the exterior envelope, which reduces thermal transmittance.
– LDA Architects, What the heck is a California Corner?
The performance difference is not subtle. The table below illustrates how a California corner dramatically outperforms a traditional corner by simply making space for insulation where there was once only solid, heat-conducting wood.
| Corner Type | Number of Studs | R-Value at Corner | Insulation Cavity |
|---|---|---|---|
| Traditional 4-Stud | 4 studs | R-4.38 (wood only) | No cavity space |
| California Corner | 3 studs | R-15+ with insulation | Open cavity for insulation |
| Heat Transfer Rate | 3x faster than insulated wall | Matches wall assembly | – |
Framing a California corner is straightforward. You simply need to ensure the configuration leaves the cavity open and provides adequate backing for the interior finish. It uses less wood, is faster to build, and dramatically improves the thermal integrity of the building. In the context of high-performance framing, it’s not a “trick”—it’s the only logical way to build a corner.
How to Seal the Mud Sill: The Critical Junction Between Concrete and Wood?
The entire performance of your advanced-framed wall system rests on its connection to the foundation. The mud sill—the pressure-treated plate that sits directly on the concrete—is one of the most critical and vulnerable air leakage points in the entire building. Concrete is never perfectly flat, and without a proper seal, a continuous gap exists under the sill plate, allowing cold air to be sucked into the wall assembly from the outside. This single point of failure can undermine all the meticulous work you do above it.
A “belt-and-suspenders” approach is the only way to guarantee an airtight seal at this junction. This involves two key components: a sill gasket and acoustical sealant. The sill gasket is a roll of compressible foam that is laid on the concrete before the mud sill is placed. As the plate is bolted down, the gasket compresses into the imperfections of the concrete, creating the first line of defense against air movement. It also serves as a capillary break, preventing moisture from wicking up from the concrete into the wood framing.
But the gasket alone isn’t enough for a truly airtight seal. The second step is to apply a continuous bead of high-quality acoustical sealant along the interior joint where the bottom of the wall sheathing meets the sill plate, and where the sill plate meets the foundation wall. This flexible, non-hardening sealant remains pliable for decades, adhering to both the wood and the concrete to create a permanent, robust air barrier. This meticulous sealing prevents air from bypassing your insulation system right at its base, ensuring the building-as-a-system philosophy starts from the ground up.
Key Takeaways
- Wood Is the Enemy: Every piece of unnecessary lumber is a thermal bridge that undermines insulation. The goal is to replace wood with insulation wherever structurally possible.
- Intentional Gaps Are Your Friend: Advanced framing creates deliberate cavities in corners, headers, and walls that must be filled with insulation to create a continuous thermal barrier.
- Airtightness Is Non-Negotiable: A high R-value is meaningless if the envelope leaks. Every junction, from the mud sill to the roof, must be meticulously air-sealed.
Why Do You See Ghost Lines on Your Ceiling in Winter?
Those faint, dark lines that perfectly map out the joists or studs on your walls and ceilings are the most visible evidence of thermal bridging at work. This phenomenon, known as “ghosting” or “thermal tracking,” is a direct result of heat loss through the framing members. It’s the building telling you exactly where your insulation is being bypassed. It’s not just a cosmetic issue; it’s a symptom of a poorly performing thermal envelope.
Here’s what happens: in winter, the wood studs and joists are much colder than the insulated cavities between them because you lose heat through wood at a rate about five times that of insulation. These cold spots on the interior drywall surface attract airborne dust, dirt, and moisture particles through a process called thermophoresis. Over time, these particles accumulate on the colder surfaces, creating the distinct dark lines that reveal the skeleton of your house.
Seeing ghost lines is definitive proof that your framing is acting as a massive thermal highway. Every line represents energy and money being lost directly to the outside. This is precisely the problem that the entire system of advanced framing—from 24-inch spacing and insulated headers to California corners—is designed to solve. By minimizing lumber and ensuring insulation is continuous, you raise the temperature of the interior surfaces over the framing, preventing the temperature differential that causes ghosting.
Ultimately, ghosting is the physical manifestation of a flawed system. When you see it, you’re not just seeing dirt on a wall; you’re seeing the ghost of wasted energy. A properly framed high-performance home will never have this problem, because every thermal bridge has been intentionally designed out of the system from the start.
Frequently Asked Questions About Why Do You See Ghost Lines on Your Ceiling in Winter?
Why is ghosting more common in Canadian homes?
In our cold climate, the temperature difference between inside and outside is extreme. Because of this, we lose significant heat through our 2x6s, steel beams and concrete in homes. This process is called thermal bridging, and the cold spots it creates on interior surfaces attract the dust that causes ghosting.
How do California corners prevent ghosting?
By eliminating solid wood corners and allowing insulation to fill the cavity, California corners ensure the corner surface temperature stays close to the rest of the wall. This minimizes the cold spots that cause dust and moisture to accumulate, effectively preventing ghosting at the corners.
Is my ghosting from thermal bridging or air leakage?
The pattern tells the story. Regular, grid-like patterns that perfectly match the spacing of your studs or joists (e.g., every 16 or 24 inches) are a clear sign of thermal bridging. Irregular, streaky, or fan-shaped dark patterns, especially around electrical outlets, trim, or wall junctions, suggest air leakage is carrying dust through gaps in the envelope.
To build homes that truly perform, mastering these details isn’t an extra—it’s the job. Start integrating these advanced framing techniques on your next project and build an envelope that stands the test of a Canadian winter, delivering the comfort, durability, and efficiency your clients deserve.