Contrary to common belief, the primary benefit of exterior insulation isn’t just energy savings; it’s the strategic control of physics to create a wall assembly that is inherently resilient and durable.
- It keeps the entire wooden structure warm and dry by physically moving the condensation point outside the sheathing, eliminating the primary driver of rot and mould.
- It wraps the frame in a thermal blanket, drastically reducing thermal stress and extending the building’s structural lifespan by decades.
Recommendation: For any new build or deep energy retrofit in Canada, adopting the ‘Perfect Wall’ methodology with 100% exterior insulation isn’t an option—it’s a long-term necessity for performance and durability.
For decades, the conversation around residential construction in Canada has orbited around a central theme: how to build walls that are both energy-efficient and durable in our punishing climate. The standard approach involves filling stud cavities with batt insulation, a method so common it’s rarely questioned. Yet, this conventional assembly contains a fundamental, physics-based flaw. It leaves the building’s structure exposed to massive temperature swings and, critically, places the condensation plane—the point where moisture can form—deep within the wall cavity, right next to the wood sheathing and framing.
The common solutions often involve meticulous air sealing and complex interior vapour barriers, treating the symptoms rather than the root cause. We talk about higher R-values and better windows, but we often fail to address the underlying hygrothermal dynamics of the wall itself. This leads to a delicate balancing act where a small construction error or a change in interior humidity can lead to catastrophic moisture issues. But what if the entire premise of insulating from the inside is flawed? What if the most robust, resilient, and scientifically sound solution involves turning the wall assembly “inside-out”?
This is the principle of the “Perfect Wall,” a concept that places all insulation on the exterior of the structure. This article will deconstruct this strategy from a building physicist’s perspective. We will move beyond the superficial benefit of “stopping thermal bridging” and delve into the core physics that make this approach superior. We will analyze how it keeps the structure warm and dry, how it dramatically extends the building’s lifespan, and the practical considerations for implementing it, from material selection to attaching heavy cladding. This is not about a minor improvement; it’s about a fundamental shift in creating buildings that are truly built to last a century in the Canadian climate.
To fully grasp the technical and practical implications of this superior building strategy, this article is structured to guide you through the core principles, from the physics of moisture control to the on-site realities of construction. The following sections will provide a comprehensive breakdown for builders and designers ready to adopt the ‘Perfect Wall’ methodology.
Summary: A Physicist’s Guide to the Perfect Wall in Canada
- How Exterior Insulation Keeps Your Sheathing Warm and Dry?
- Why Wrapping the Frame Extends the Life of Your House by 50 Years?
- How to Connect Exterior Wall Foam to Roof Insulation for a Continuous Shell?
- How to Hang Heavy Siding Through 4 Inches of Exterior Foam?
- The “Chain Saw Retrofit”: Is Cutting Off Overhangs Worth It for a Perfect Shell?
- XPS vs. EPS vs. Polyiso: Which Board Belongs Under Your Siding?
- Air Barrier vs. Vapor Barrier: What is the Difference and Where Do They Go?
- How Rigid Foam Boards Stop the Cold That Studs Transmit?
How Exterior Insulation Keeps Your Sheathing Warm and Dry?
The single most critical function of a wall assembly in a cold climate is moisture management. The failure to control moisture is the root cause of rot, mould, and structural degradation. Conventional wall assemblies fight a losing battle by placing the vulnerable wooden structure on the cold side of the insulation. Exterior insulation fundamentally solves this problem by altering the wall’s hygrothermal dynamics. By placing all the insulation outside the sheathing, the entire wood structure—studs and sheathing included—is kept at or near the interior’s conditioned temperature. This is the game-changer.
The key mechanism at play is the location of the condensation plane, or dew point. In a Canadian winter, warm, moist air from the interior migrates outward. In a traditional wall, it hits the cold sheathing and condenses, creating liquid water where it can be absorbed by the wood. With exterior insulation, that condensation plane is physically moved into the foam insulation itself, far away from any moisture-sensitive materials. The sheathing stays warm, well above the dew point temperature, and therefore remains dry all winter long. The CMHC explicitly states that the key to controlling mould is moisture control, and keeping the structure warm is the most effective way to control condensation moisture.
This strategy also significantly enhances the performance of the air barrier. By protecting the air barrier membrane from extreme temperature fluctuations, its lifespan and effectiveness are increased. In fact, data from Canada’s own natural resources database shows that exterior insulation retrofits contribute to a significant improvement in airtightness. This creates a robust, dry, and warm structure that is inherently resistant to the primary forces that seek to destroy it.
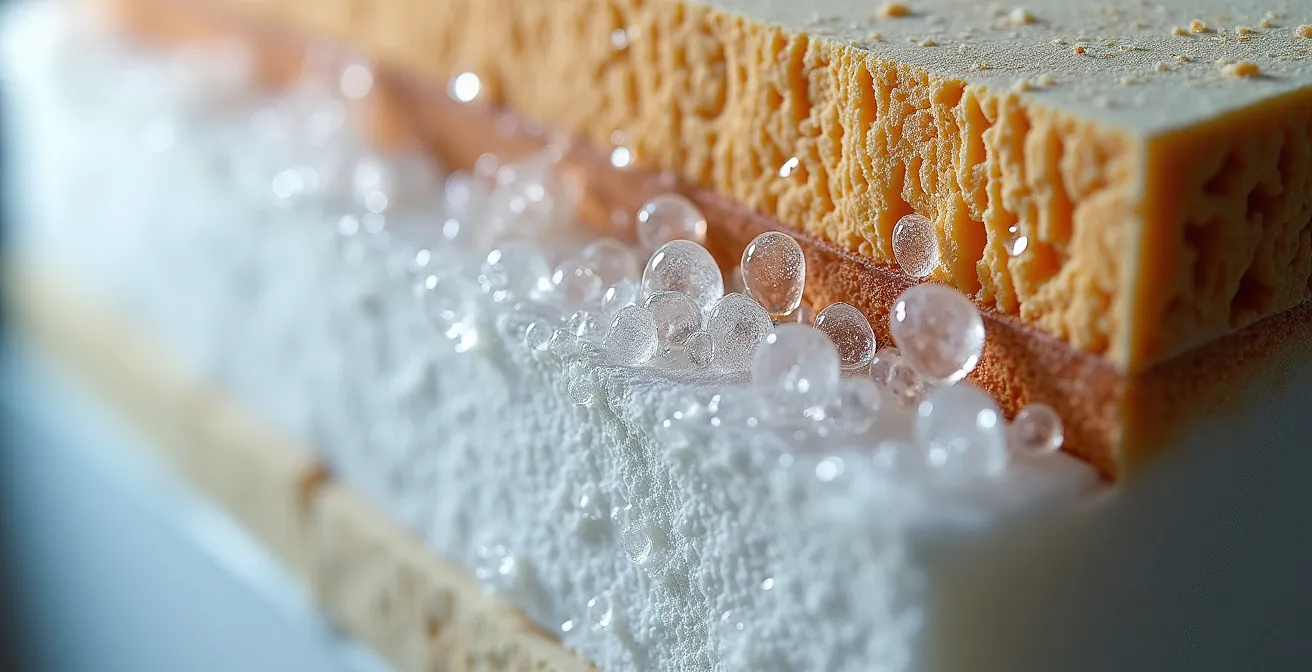
As this cross-section illustrates, the critical zone for moisture is kept entirely within the moisture-impervious foam, protecting the organic, structural materials. This isn’t just a marginal improvement; it’s a complete re-engineering of the wall to work with physics, not against it. This approach ensures the long-term health of the building by design, not by chance.
Why Wrapping the Frame Extends the Life of Your House by 50 Years?
Beyond moisture control, the second greatest enemy of a building’s structure is thermal stress. Wood, like any material, expands and contracts with changes in temperature. In a conventionally framed wall in a location like Winnipeg or Edmonton, the exterior side of a 2×6 stud can see temperatures of -30°C while the interior side is at +21°C. This constant, significant thermal stress delta across the material causes micro-movements and fatigue in the wood and fasteners over decades, slowly weakening the structure.
Placing all insulation on the exterior effectively “wraps the frame in a blanket.” The entire wood structure now lives in a stable, room-temperature environment, regardless of the outdoor weather. The temperature difference across a stud might be less than a single degree, virtually eliminating the expansion and contraction cycles that cause material fatigue. As experts at Okanagan Insulation Services note, a well-insulated exterior wall is protected from thermal stress and moisture damage, which directly extends the life of the building. This single act of thermal protection is a primary contributor to radical lifespan extension.
Exterior wall insulation helps protect the structure of your walls from thermal stress, moisture damage, and even pests. A well-insulated exterior wall is less likely to suffer from damage caused by temperature fluctuations or condensation, which extends the life of your building and reduces the need for repairs.
– Okanagan Insulation Services, Best Insulation for Exterior Walls in Canada: A Comprehensive Guide
While the focus for a building physicist is durability, the financial benefits are also substantial. Though the upfront cost of an exterior insulation retrofit is higher, the long-term value is undeniable. By eliminating thermal bridging through the studs, these retrofits can achieve up to a 30% reduction in annual energy costs. When you combine decades of energy savings with the avoidance of major structural repairs due to moisture or thermal stress, the 50-year lifespan extension becomes a conservative estimate, not a marketing claim.
How to Connect Exterior Wall Foam to Roof Insulation for a Continuous Shell?
The “Perfect Wall” is only as effective as its weakest link. A perfectly insulated wall is rendered ineffective if heat can bypass it at the connections, particularly the critical wall-to-roof transition. The ultimate goal is to create a monolithic thermal envelope—an unbroken, continuous layer of insulation that wraps the entire building, from the foundation, up the walls, and over the roof. For builders and designers, this detail is where theory meets reality and where many projects fail.
Achieving this continuity requires careful planning, especially in retrofits. According to Natural Resources Canada, a key strategy is to extend the new exterior wall insulation down past the rim joist area to seal this notorious air leakage zone. At the top, the eaves must be designed or modified with flashing to prevent any water intrusion behind the new, thicker wall assembly. The principle is simple: the R-value must be continuous. The exterior insulation on the walls must meet and, ideally, overlap with the insulation in the attic or roof assembly. This often requires innovative framing solutions, especially in a country with varied and demanding climate zones.
The specific method for creating this thermal continuity depends heavily on the Canadian climate zone and the desired R-value, which can range from R-35 in Toronto to over R-50 in Yellowknife. The choice of truss type or framing extension is a critical design decision to ensure there are no thermal bridges at the top plate of the wall.
This table from Building Science Corporation outlines robust connection methods tailored to different Canadian climates, providing a clear roadmap for designers. It underscores the importance of a systems-based approach, where the connection detail is as important as the insulation itself.
| Climate Zone | Connection Method | Ice Dam Prevention | R-Value Required |
|---|---|---|---|
| Zone 6 (Toronto) | Structural box extension | Continuous insulation over top plate | R-35 minimum |
| Zone 7 (Winnipeg) | Raised heel truss | Full depth insulation at eaves | R-40 minimum |
| Zone 8 (Yellowknife) | Double layer system | Vented over-roof | R-50 minimum |
How to Hang Heavy Siding Through 4 Inches of Exterior Foam?
One of the most frequent and valid concerns from builders is a practical one: once you’ve wrapped a house in 4, 6, or even 8 inches of rigid foam, how do you securely attach heavy cladding like fibre cement or wood siding? The foam itself has minimal structural capacity. The answer lies in creating a secondary structural system outside the insulation: a rainscreen built with structural redundancy.
You cannot simply use long screws through the siding and foam and hope to hit a stud. The load of the cladding must be transferred directly back to the building’s framing, bypassing the foam. This is achieved by installing vertical wood strapping (or furring strips) over the foam. These strips are attached with specialized, long structural fasteners that are engineered to go through the strapping, through the foam, and deep into the wall studs. This creates a solid nailer base for the siding and, just as importantly, a drainage and ventilation cavity behind it.
Case Study: Best Practices for Attaching Cladding Over Thick Insulation
Canadian renovators at Blue Jay Renos emphasize that for thick insulation layers, the installation of wood strapping is non-negotiable. They recommend using pressure-treated 1×4 lumber at a minimum, as smaller dimensions are prone to splitting. The strapping must be fastened to the house’s framing with appropriately spaced structural screws capable of handling the full weight of the siding. This layer of lumber and its fasteners carry the entire cladding load, making the choice of materials and the fastening schedule a critical structural decision, not a finishing detail.
This method requires careful engineering. The length and spacing of the structural screws depend on the thickness of the foam, the weight of the cladding, and local wind load requirements. This is not a place for guesswork. A detailed fastening schedule must be followed to ensure the cladding remains secure for the life of the building.

Given the structural importance of this step, vetting a contractor’s experience becomes paramount. A contractor unfamiliar with these systems can create a catastrophic failure. The following checklist provides a framework for ensuring your contractor has the requisite expertise.
Your Contractor Vetting Checklist for Thick Exterior Insulation
- Verify direct experience with insulation thickness over 2 inches by requesting at least three recent project references with photos and contact information.
- Confirm their knowledge of your specific provincial wind load requirements and local building codes for exterior assemblies.
- Ask for the specific, engineered fastening schedule documentation they will use for your chosen siding material and weight.
- Request proof of current WCB coverage and liability insurance that specifically covers exterior insulation and cladding work.
- Inquire about their supplier relationships and ability to source the required specialized long fasteners and drainage components without delay.
The “Chain Saw Retrofit”: Is Cutting Off Overhangs Worth It for a Perfect Shell?
For the purist, achieving a truly monolithic thermal envelope on an existing Canadian home can lead to a radical—and often intimidating—procedure known as the “chain saw retrofit.” This involves cutting off the existing roof overhangs (eaves and rakes) flush with the wall sheathing. Why? Because existing overhangs create a massive thermal bridge and a complex, often impossible, intersection to properly air seal and insulate when adding thick exterior insulation. By removing them, you create a simple, flat plane where the wall insulation can be seamlessly connected to a new, fully insulated roof assembly or an “over-roof” built on top of the old one.
Is this extreme measure worth it? From a pure building physics perspective, the answer is often yes. It is the most robust way to guarantee a perfect thermal and air barrier connection. However, it represents a significant commitment in cost and complexity. It’s a hallmark of deep energy retrofits aiming for Net-Zero or Passive House standards. These are not your average projects; NRCan’s EnerGuide database shows that of the tens of thousands of retrofits documented, very few reach this level of intervention.
Net-Zero Retrofit: Proof of Concept in Canada
A prime example of this approach’s success is the first home in Canada labeled under the CHBA Net-Zero Renovation Pilot Program. This project demonstrates the potential of a deep energy retrofit. The house’s energy consumption for heating and hot water started at a typical 167 gigajoules per year. After a comprehensive retrofit, which included creating a perfect thermal shell, it dropped to zero, supported by a cold climate air source heat pump and a 15.6 kW solar PV array. This level of performance is only achievable when thermal bridges, like those at the eaves, are ruthlessly eliminated.
The decision to perform a “chain saw retrofit” is a balance of budget, goals, and architectural integrity. While it may seem drastic, it is the most direct path to a perfect envelope. For projects with the highest performance targets, it moves from being a crazy idea to a logical necessity. It embodies the core principle of the Perfect Wall: simplify the geometry to perfect the physics. The data shows that while 40,000 documented exterior retrofits exist over 23 years, the ones achieving top-tier performance are those that don’t compromise on continuity.
XPS vs. EPS vs. Polyiso: Which Board Belongs Under Your Siding?
Once the decision is made to use exterior rigid foam insulation, the next critical choice is the material itself. The three primary types of foam board available in Canada are Expanded Polystyrene (EPS), Extruded Polystyrene (XPS), and Polyisocyanurate (Polyiso). While they may seem similar, their properties make them suitable for different applications, climates, and performance goals. Choosing the right one is a key design decision.
Expanded Polystyrene (EPS) is often the most cost-effective option. It offers a good R-value (around R-4 per inch) and, crucially, has a higher vapour permeance than XPS. This “breathability” can be an advantage in certain wall assemblies, allowing for more drying potential. It’s a workhorse material, particularly in the dry prairie climates.
Extruded Polystyrene (XPS) provides a higher R-value (around R-5 per inch) and has superior moisture resistance, making it the standard choice for below-grade applications. However, its low permeance means it acts as a vapour barrier, which must be accounted for in the wall assembly design. Furthermore, the blowing agents used in its manufacturing have a higher Global Warming Potential (GWP), an increasing concern for environmentally conscious projects.
Polyisocyanurate (Polyiso) boasts the highest R-value per inch (around R-6), making it ideal for situations where maximum thermal resistance is needed in a limited space. However, its thermal performance can degrade in very cold temperatures, a significant consideration for much of Canada. It’s often foil-faced, which makes it an excellent air and vapour barrier but requires careful seam treatment.
The best choice is not universal; it is context-dependent. The following table provides a comparative overview to guide selection based on specific Canadian conditions.
| Material | R-Value per inch | Best Use Case | Climate Zone | Environmental Impact |
|---|---|---|---|---|
| EPS | R-4 | Vapour-open walls, cost-effective builds | Zones 6-7 (Prairies) | Lower GWP |
| XPS | R-5 | Below-grade, high moisture areas | Coastal BC | Higher GWP |
| Polyiso | R-6 | Maximum R-value where space is tight | Zones 4-5 (S. Ontario) | Moderate GWP |
| Mineral Wool | R-4 | Fire resistance, acoustic needs | All zones | Low environmental impact |
Air Barrier vs. Vapor Barrier: What is the Difference and Where Do They Go?
In conventional construction, the terms “air barrier” and “vapor barrier” (or vapour retarder) are often used interchangeably, leading to critical design and installation errors. In a ‘Perfect Wall’ assembly, the distinction and proper placement of these layers are not just important; they are fundamental to its success. An air barrier’s job is to stop air movement, while a vapour barrier’s job is to slow the diffusion of water vapour.
In a ‘Perfect Wall’, the hierarchy is clear and simple. The air barrier is placed against the exterior sheathing. This can be a self-adhered membrane, a fluid-applied product, or even meticulously taped sheathing seams. Its location on the warm side of the insulation protects it from temperature extremes and makes it highly durable. Its primary function is to prevent conditioned (and moist) indoor air from leaking into the wall assembly and unconditioned outdoor air from infiltrating the home.
The Physics of the Perfect Wall’s Layers
As explained by building science experts, the ‘Perfect Wall’ is so effective because it works in every climate zone and handles moisture exceptionally well. By locating all thermal insulation on the exterior of the structure, it keeps the wall framing and sheathing warm. This warmth prevents condensation and allows the wall to dry towards the interior. Because the structure is always warm and can dry inward, no interior polyethylene vapor barrier is required or desired. In fact, adding one can trap moisture and create a problem where none existed.
So, where does the vapour control layer go? The foam insulation itself often serves this role. Low-permeability foams like XPS or foil-faced Polyiso act as the exterior vapour barrier. Even more permeable EPS foam provides sufficient vapour resistance for most applications. According to NRCan, any vapour barrier must be on the warm side of the insulation. In a ‘Perfect Wall’, the entire structure is on the warm side, so the logic is completely inverted from traditional building. The system is designed to be vapour-open to the inside, allowing any incidental moisture to dry safely into the conditioned space.
Key Takeaways
- The ‘Perfect Wall’ strategy moves all insulation to the exterior to keep the building’s structure warm and dry, fundamentally preventing moisture-related damage.
- By wrapping the frame, you eliminate thermal stress, drastically extending the structural lifespan and justifying the upfront investment through long-term durability and energy savings.
- Achieving a truly continuous thermal envelope requires meticulous detailing at wall-to-roof and wall-to-foundation junctions, which is the hallmark of a high-performance build.
How Rigid Foam Boards Stop the Cold That Studs Transmit?
The most cited benefit of exterior insulation is its ability to stop thermal bridging, but the sheer magnitude of this effect is often underestimated. A “thermal bridge” is any component that cuts through insulation, allowing heat to find a more conductive path. In a standard Canadian 2×6 wall, the wood studs are the primary thermal bridges. Wood has an R-value of about R-1.2 per inch, while the batt insulation in the cavity is around R-3.7 per inch. Every 16 or 24 inches, you have a thermal “superhighway” for heat to escape.
This has a devastating impact on the wall’s real-world performance. A 2×6 wall nominally filled with R-22 batt insulation does not perform as an R-22 wall. Once you account for the thermal bridging of the studs, top plates, and bottom plates (the framing factor), the “whole-wall” or “effective” R-value plummets. In many cases, a standard 2×6 wall with R-22 batts only delivers an effective R-value of around R-14 to R-16. Nearly a third of the insulation’s potential is lost through the wood framing.
Exterior rigid foam insulation solves this problem elegantly and completely. By wrapping the entire exterior in a continuous layer of foam, you place a thermal break over every single stud and framing member. Heat leaving the stud now hits a layer of R-10 or R-20 insulation instead of the cold outside air. The thermal bridge is effectively cut. As explained by the InsulWall system, this separation of the wood framing from the exterior surface is what eliminates this major cause of heat loss.
Adding just 2 inches of exterior foam (R-10) to that same R-22 wall can boost its effective R-value to R-24 or more. The exterior foam not only adds its own R-value but, more importantly, it allows the batt insulation in the stud cavity to perform at its full potential. This is the synthesis of the ‘Perfect Wall’ concept: it is not just about adding insulation; it is about making the entire system work as intended by controlling the physics of heat flow.
For any builder or designer working in Canada, embracing the ‘Perfect Wall’ concept is the logical next step in high-performance construction. The science is clear, and the long-term benefits to the building’s durability and efficiency are undeniable. For your next project, specify a wall assembly with 100% exterior insulation. It is the only scientifically sound choice for the Canadian climate.
Frequently Asked Questions on The Perfect Wall Strategy
Where should the vapor barrier be placed with exterior insulation?
With exterior insulation, the entire structure is on the warm side of the assembly. According to NRCan, the vapour barrier must be on the warm third of the finished wall. In a ‘Perfect Wall’, this means the vapour control layer is typically the exterior rigid foam itself, and the interior is left vapour-open to allow for drying.
What about existing vapor barriers when adding exterior insulation?
This is a critical consideration in a retrofit. An existing interior polyethylene vapour barrier can trap moisture between it and the new, low-permeability exterior foam. You must consider the location and condition of the old vapour barrier. In some cases, old plaster with many coats of paint can act as a vapour retarder and may need to be perforated or removed to increase drying potential to the interior.
Do I need a vapor barrier with spray foam exterior insulation?
No. If you are using closed-cell, high-density spray foam on the exterior, it acts as the insulation, air barrier, and vapour barrier all in one. In this case, the wall does not need an additional polyethylene vapour barrier. Instead, you can use a “smart” vapour retarder on the interior or use the Airtight Drywall Approach (ADA) for a fully breathable interior finish.