Those faint, dark lines on your ceiling that trace your home’s framing are not a sign of a leak or simple dust accumulation. They are a diagnostic symptom of a phenomenon called “thermal bridging,” where heat bypasses your insulation through the wooden or metal structure of your house. This article explains the science behind this energy-wasting issue and details the structural solutions required to properly cure it, particularly in the context of Canadian climates.
As a homeowner, noticing faint, grid-like stains appearing on your ceiling or walls during the cold Canadian winter can be alarming. The first assumption is often a water leak, poor paint, or simply dust. While dust is involved, the root cause is a far more fundamental issue within your home’s structure. These “ghost lines” are the visible evidence of a hidden thermal flaw: heat is escaping your home not through your insulation, but directly through the framing members like joists and studs. This phenomenon is known as thermal bridging.
The process is simple science. The wood or steel in your walls and ceiling is a much better conductor of heat than the insulation surrounding it. In winter, these framing members become cold pathways, creating colder stripes on the interior surface of your drywall. These cool surfaces attract more dust particles from the air, often through minute differences in air pressure and condensation, leading to the dark “ghosting” stains. This is a clear signal that your home’s thermal envelope is compromised, wasting energy and money, regardless of how much insulation you have packed between the studs.
This article acts as a diagnostic guide. We will move beyond simply identifying the symptom and delve into the pathology of thermal bridging. We will explore how to locate these energy leaks, analyze the structural components that cause them—from wall studs to concrete balconies—and detail the advanced framing techniques and materials that can cure the problem at its source. Understanding this is the first step toward creating a truly high-performance, energy-efficient home.
To fully grasp the causes and solutions for these thermal leaks, this guide is structured to walk you through the diagnostic and treatment process. The following sections cover everything from identifying hidden leaks to implementing advanced construction methods.
Summary: A Pathologist’s Guide to Eliminating Thermal Bridging
- How to Use a Thermal Camera to Find Hidden Energy Leaks?
- How Thermal Break Strips on Studs Can Boost Effective R-Value by 20%?
- The Concrete Balcony Problem: How to Stop It from Cooling Your Living Room?
- Advanced Framing: How California Corners Allow Insulation in Dead Space?
- Is Thermal Bridging Costing You More Than Poor Insulation?
- Double Stud Walls: How to Build a Thermal Bridge-Free Envelope?
- XPS vs. EPS vs. Polyiso: Which Board Belongs Under Your Siding?
- Why California Corners Are Mandatory for High-Performance Framing?
How to Use a Thermal Camera to Find Hidden Energy Leaks?
A thermal imaging camera is a building pathologist’s most crucial diagnostic tool. It translates surface temperatures into a visual spectrum, making invisible heat flow patterns starkly visible. Where the naked eye sees only a clean drywall surface, a thermal camera can reveal the cold signature of every stud, joist, and uninsulated gap. This technology is invaluable for pinpointing the exact locations of thermal bridges and air leaks that cause ghosting and energy loss, as was discovered by a homeowner in Winnipeg who used thermography to find entire sections of missing wall insulation.
For an effective diagnosis, a significant temperature difference between the inside and outside of the house is required. A delta of at least 6°C (about 11°F) is recommended, which is easily achieved during a typical Canadian winter. By systematically scanning the building envelope—starting with common culprits like attic hatches and ceilings—you can create a thermal map of your home’s performance. The camera will show cold blue or purple lines tracing the framing, confirming that the studs themselves are the thermal bridges responsible for heat loss and the resulting ghost lines.
While professional audits offer high-resolution analysis, DIY-friendly thermal cameras that attach to smartphones have become accessible. Though they have lower resolution, they are more than capable of identifying major issues like missing insulation batts or significant air leaks around windows. The key is a methodical approach: let your HVAC system run, create a temperature differential, and document any anomalies. This provides the concrete evidence needed to move from diagnosis to treatment, confirming exactly where your building’s thermal performance is failing.
To ensure a thorough self-assessment, following a structured process is key. The following checklist outlines the essential steps for a DIY thermal audit. This methodical approach helps ensure you don’t miss common problem areas and can accurately document your findings for future repairs, turning a simple visual tool into a powerful diagnostic instrument.
Your Action Plan: Conducting a DIY Thermal Camera Energy Audit
- Establish a Baseline: Turn on your HVAC system and let it run for at least 10 minutes to achieve a steady interior temperature before you begin the inspection.
- Create Temperature Contrast: Ensure there is at least a 20°F (approximately 11°C, though 6°C is a minimum) temperature difference between the interior and exterior for clear and reliable thermal readings.
- Start from the Top: Begin your inspection with attic access panels and ceiling areas, as these are locations where insulation is most often compromised or missing.
- Check HVAC Components: While the system is running, inspect all heat registers and vents to verify proper airflow and check for leaks or blockages indicated by unusual thermal patterns.
- Document and Analyze: Methodically scan walls, corners, and junctions, documenting any thermal anomalies that show partial heating or cooling, which can indicate insulation gaps, air leaks, or structural thermal bridges.
How Thermal Break Strips on Studs Can Boost Effective R-Value by 20%?
Once thermal bridging through studs is diagnosed, the most direct treatment is to create a “thermal break.” This involves installing a layer of insulating material directly onto the framing members to physically separate them from the interior or exterior sheathing. This simple intervention disrupts the path of least resistance for heat flow. Materials like foam strips, cork, or thin rigid insulation boards are applied to the face of the studs before the drywall or exterior sheathing is attached. This creates a continuous insulating layer that mitigates the conductive properties of wood or steel.
The impact of this procedure is significant. Framing typically constitutes about 25% of a wall’s surface area. When this portion is uninsulated, it dramatically lowers the overall thermal performance of the entire assembly. This is the difference between “nominal R-value” (the rating of the insulation itself) and “effective R-value” (the real-world performance of the whole wall). In fact, studies have shown that in some cases, thermal bridging can reduce a wall’s effective R-value by more than 50%.
Installing a thermal break is a direct countermeasure. Even a thin layer of rigid foam, like a 1/2-inch strip of XPS, can add R-2.5 to R-3 directly over the framing members. This small addition drastically reduces the heat flow through the studs, bringing the effective R-value of the entire wall system much closer to the nominal value of the insulation in the cavities. For a typical 2×6 wall, this can easily translate to a 20% or greater improvement in overall thermal performance, directly combating the cause of ghosting and reducing heating costs.
The image below provides a clear visualization of this concept, showing how these strips physically interrupt the direct connection between the stud and the wall sheathing, forcing heat to take a much more difficult path.
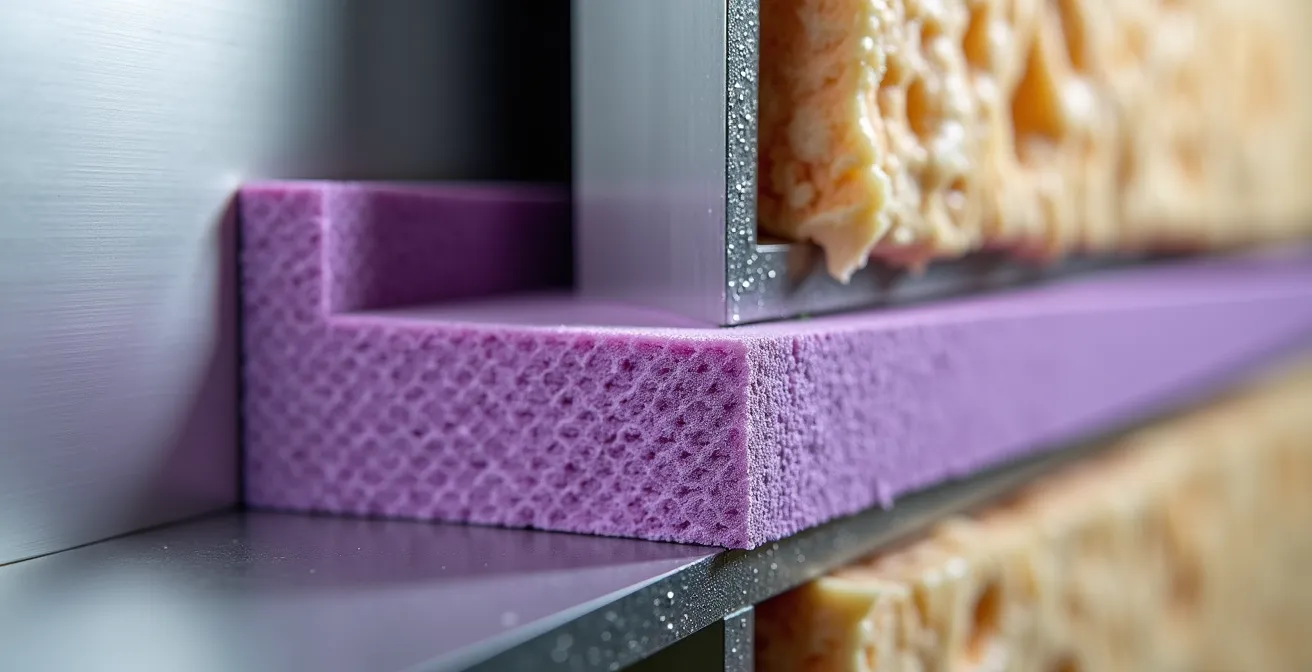
As you can see, the strip acts as a buffer. This is a foundational technique in high-performance construction and is one of the most cost-effective ways to enhance the thermal integrity of a standard framed wall without fundamentally changing its structure. It is a targeted treatment for a diagnosed problem.
The Concrete Balcony Problem: How to Stop It from Cooling Your Living Room?
While wood and steel studs are common thermal bridges, one of the most severe and often overlooked culprits is the cantilevered concrete balcony, a frequent feature in Canadian condos and apartment buildings. When a concrete slab extends from the interior floor, through the wall assembly, and out to form a balcony, it creates a massive, uninterrupted thermal highway. This slab acts like a cooling fin in winter, drawing heat directly out of the living space and chilling the interior floor nearby. This is a primary cause of discomfort and extreme energy loss.
The effect is so pronounced that it can lead to condensation and moisture issues on the interior floor and wall surfaces near the balcony slab. As seen in a Toronto condo case, this moisture accumulation can cause severe ghosting, where the cool, damp surfaces attract dust and can even lead to mould growth. The problem stems from a design where the structural element and the thermal envelope are not properly separated. As a building science expert, it’s crucial to identify and address these major structural flaws.
As Jonathan Smegal of RDH Building Science Laboratories explains, this is a textbook example of a structural failure in the building envelope:
A thermal bridge is an area of the building enclosure—whether it be the walls, roof, or foundation—that has significantly higher heat flow than intended.
– Jonathan Smegal, RDH Building Science Laboratories
Solving this problem in existing buildings is challenging. The ideal solution is implemented during construction, where structural thermal breaks—specialized load-bearing insulation modules—are installed within the slab to isolate the exterior balcony from the interior floor. For retrofits, the solutions are more invasive, often involving cutting the balcony away from the building and supporting it with new, independent posts or wrapping the exterior portion of the slab with a thick layer of rigid insulation. Both approaches aim to do the same thing: sever the thermal bridge and restore the integrity of the building’s envelope.
Advanced Framing: How California Corners Allow Insulation in Dead Space?
The ghost lines on your ceiling are a symptom of a systemic issue rooted in traditional construction practices. Advanced framing, also known as Optimum Value Engineering (OVE), is a building philosophy designed to correct these inherent flaws by using lumber more efficiently. Its primary goal is to reduce the amount of wood in the wall assembly, which in turn minimizes thermal bridging and maximizes the space available for insulation. One of the most fundamental techniques in advanced framing is the “California corner.”
A traditional exterior corner is built with three or even four studs, creating a solid, uninsulated column of wood. This is a significant thermal bridge and a common location for ghosting and heat loss. A California corner, by contrast, uses only two studs, creating an open corner cavity that can be fully insulated. This simple change eliminates the cold spot and ensures the building’s thermal envelope is continuous, even at the corners. This technique alone significantly boosts the effective R-value of the wall assembly.
This principle of material reduction extends beyond corners. Advanced framing also calls for switching from 16-inch to 24-inch stud spacing where structurally permissible, using single top plates instead of double plates, and employing right-sized, insulated headers over windows and doors. Each of these steps removes unnecessary wood from the wall, replacing it with high-performance insulation. The material and performance differences are striking, as shown in the table below.
This comparative data highlights how advanced framing techniques not only save on material costs but also yield a substantial improvement in the building’s thermal performance.
| Component | Standard Framing | Advanced Framing | Material Savings |
|---|---|---|---|
| Stud Spacing | 16″ on center | 24″ on center | 25% less lumber |
| Corner Assembly | 3-4 studs | 2 studs | 50% reduction |
| Headers | Full-width solid | Right-sized insulated | Up to 70% reduction |
| Effective Wall R-Value | R-13 (with R-20 batts) | R-17 (with R-20 batts) | 30% improvement |
Is Thermal Bridging Costing You More Than Poor Insulation?
Many homeowners invest heavily in high R-value insulation, believing they are fully protecting their homes from energy loss. However, they often overlook the silent saboteur: thermal bridging. The crucial point to understand is that the final thermal performance of your wall is not determined by the insulation alone, but by the entire system, including the framing. The heat loss through studs and joists can be so significant that it effectively negates a large portion of your insulation’s value. This is a costly misunderstanding.
Consider a standard 2×6 wood stud wall filled with R-20 insulation batts. On paper, this sounds excellent. However, the wood studs themselves only have an R-value of about R-6. Because heat always follows the path of least resistance, a disproportionate amount of energy will flow through the studs. As a result, the real-world performance, or “effective R-value,” of that entire wall assembly can be much lower. It’s common that in a wood stud wall with R-20 batts, the effective R-value can be as low as R-15. This means you are losing 25% of the thermal resistance you paid for simply due to the framing.

This performance gap is precisely why modern building codes in Canada are increasingly targeting thermal bridging. For instance, the evolution of codes has led to a greater emphasis on continuous exterior insulation. As highlighted in analyses of Canadian building standards, applying a layer of rigid board insulation around the entire perimeter of a building creates a monolithic, unbroken thermal shield. This exterior insulation covers the framing members, effectively eliminating them as thermal bridges and ensuring the home’s performance aligns with the specified R-values. This approach treats the building as a complete system, acknowledging that thermal bridging can indeed be a more significant source of energy loss than the quality of the insulation within the cavities.
Double Stud Walls: How to Build a Thermal Bridge-Free Envelope?
For homeowners committed to achieving the highest level of thermal performance and completely eliminating ghosting, the double-stud wall is the definitive solution. This advanced framing technique is the architectural cure for thermal bridging. The concept involves building two separate, parallel walls—typically with 2x4s—with a significant gap in between. The inner wall is the load-bearing structure, while the outer wall simply holds the siding and exterior finishes. Crucially, the studs in the two walls are staggered so that no single piece of wood extends from the inside to the outside.
This staggering is the key. It completely severs all thermal bridges through the framing. The large cavity created between the two walls, often ranging from 5 to 12 inches wide, is then densely filled with insulation, such as blown-in cellulose or wool. Because there is no direct conductive path for heat to escape, the effective R-value of the wall assembly is almost identical to the nominal R-value of the insulation itself. This is the holy grail of high-performance building envelopes.
The performance gains are extraordinary. For example, a 12-inch thick double-stud wall can achieve an exceptionally high thermal resistance. When properly constructed, you can achieve R-52 if you fill double stud walls with high-performing insulation like blown-in wool. This level of performance is virtually impossible to reach with a standard single-stud wall, no matter how much exterior insulation is added. It creates a super-insulated envelope that dramatically reduces heating and cooling costs and ensures uniform interior surface temperatures, completely preventing the conditions that lead to ghosting.
Your Action Plan: Key Steps in Double-Stud Wall Construction
- Build the Structural Wall: Construct the inner 2×4 load-bearing wall, placing it on the edge of the foundation.
- Install the Roof System: Install roof trusses directly onto the top plates of this inner, structural wall.
- Frame the Exterior Wall: Frame the outer, non-load-bearing wall (using 2x4s or 2x3s) with a specified gap (e.g., 3.5 inches) from the inner wall.
- Offset the Studs: Ensure the studs of the outer wall are offset from the studs of the inner wall to completely eliminate any thermal bridging pathways.
- Install the Vapor Barrier: Carefully install the vapor barrier on the warm side of the insulation, considering the dew point location within the thick wall cavity.
- Insulate the Cavity: Fill the entire cavity with a high-performance insulation like mineral wool (Roxul) or cellulose, often applied in multiple layers to prevent settling and ensure full coverage.
XPS vs. EPS vs. Polyiso: Which Board Belongs Under Your Siding?
Applying a layer of continuous exterior rigid foam insulation is one of the most effective ways to combat thermal bridging in both new construction and retrofits. However, not all foam boards are created equal, and choosing the right type is critical, especially in the varied and often harsh Canadian climate. The three main types—Extruded Polystyrene (XPS), Expanded Polystyrene (EPS), and Polyisocyanurate (Polyiso)—have distinct properties that make them suitable for different applications.
Polyisocyanurate (Polyiso) boasts the highest R-value per inch (R-6 to R-8) but comes with a significant caveat: its performance degrades in very cold temperatures. Below approximately -5°C, its R-value can drop significantly, making it a poor choice for exterior applications in most of Canada. Its very low moisture permeability also means it can trap moisture if not detailed correctly. For these reasons, Polyiso is best reserved for interior applications. An expert from a Canadian Building Code analysis noted that for continuous exterior insulation in cold regions like the Prairies, XPS is a more reliable choice.
Extruded Polystyrene (XPS), typically blue or pink, offers a stable R-value of R-5 per inch and performs well in extreme cold. Its low moisture permeability makes it an effective air and moisture barrier, which is ideal for below-grade applications or in regions with harsh winters like the Prairies and Northern Ontario. Expanded Polystyrene (EPS), the white beaded foam, has a slightly lower R-value (R-3.6 to R-4.2 per inch) but is more permeable to moisture vapour. This “breathability” can be an advantage in milder, wetter climates like Coastal BC and the Maritimes, as it allows the wall assembly to dry out if moisture gets in.
The selection of the appropriate rigid foam insulation is highly dependent on the specific climate zone within Canada. The following table breaks down the key characteristics to guide your decision-making process for exterior applications.
| Type | R-Value/inch | Cold Weather Performance | Moisture Permeability | Best Canadian Application |
|---|---|---|---|---|
| XPS | R-5 | Stable in extreme cold | Low (1.1 perm) | Prairie provinces, Northern Ontario |
| EPS | R-3.6 to R-4.2 | Stable performance | Moderate (2-5 perms) | Coastal BC, Maritimes |
| Polyiso | R-6 to R-8 | Degrades below -5°C | Very low (0.03 perm) | Interior applications only |
Key Takeaways
- Ghost lines are caused by thermal bridging, where heat escapes through your home’s framing, not just gaps in insulation.
- Advanced framing techniques like California corners and 24-inch stud spacing are designed to minimize wood and maximize insulation, directly combating thermal bridging.
- For a truly high-performance envelope, continuous exterior insulation or a double-stud wall design are the most effective solutions to create a thermal bridge-free structure.
Why California Corners Are Mandatory for High-Performance Framing?
The shift toward high-performance and Net Zero homes in Canada has moved advanced framing techniques from a niche “best practice” to a near-mandatory requirement. Techniques like the California corner are no longer just about saving a few pieces of lumber; they are fundamental to meeting the increasingly stringent thermal performance targets set by modern building codes. The core reason is simple: you cannot achieve a high effective R-value if your building’s corners are uninsulated cold spots.
In high-performance building, every part of the envelope must contribute to the thermal barrier. A traditional three-stud corner is a thermal black hole, a weak point that undermines the performance of the entire wall. By adopting the two-stud California corner, builders can carry the insulation blanket fully into the corner, ensuring the thermal envelope is continuous and robust. As seen in Canadian Net Zero home projects, this commitment to eliminating thermal breaks is non-negotiable for achieving whole-wall R-values that are close to the nominal R-value of the insulation used.
Canadian building codes reflect this reality. For example, to meet thermal resistance requirements for above-grade walls in many jurisdictions, a baseline of R-24 with stud spacing at 16 inches on-centre is required without an HRV system. Achieving this effective R-24 performance with standard framing is difficult and inefficient. Advanced framing, with its reduced lumber and maximized insulation, makes hitting these targets more feasible and cost-effective. The California corner is a cornerstone of this philosophy, representing a simple, intelligent design change that delivers a significant and measurable improvement in building performance.
Ultimately, painting over ghost lines is a temporary cosmetic fix. The lines will reappear as long as the underlying thermal bridge exists. The only true cure is architectural and structural. By adopting these smarter framing techniques, we treat the disease, not just the symptom, creating homes that are more comfortable, durable, and energy-efficient for the long term.
To put these diagnostic principles into practice, the next logical step is to assess your own home’s performance with a thermal audit or consult with a building science professional to identify the most effective structural cures for your specific situation.