The cracks in your drywall and sticking doors appearing each spring are not random signs of aging; they are predictable outcomes of immense physical forces attacking your home’s structure.
- Thermal shock from 40°C temperature swings degrades siding and masonry, creating entry points for water.
- Hydrostatic pressure from melting snow exerts incredible force on foundations, while frost heave physically lifts the structure from below.
- Upgrading one component, like windows, can unbalance the entire building envelope, trapping moisture and causing mold.
Recommendation: Proactively assess your home as a complete, interconnected system, focusing on managing water, air, and thermal pressures, rather than just reacting to isolated symptoms.
For many homeowners in Ontario and Quebec, the arrival of spring is marked by a familiar set of unsettling symptoms: a newly appeared crack in the drywall, a bedroom door that suddenly sticks, or a damp, musty smell in the basement. The common response is to treat these as isolated repair jobs—patch the crack, plane the door, run a dehumidifier. This approach, however, addresses the symptom, not the root cause. It ignores the powerful, underlying physics of the annual freeze-thaw cycle that wage war on your home’s structure.
The reality is that your house is not a static object; it is a dynamic system under constant environmental stress. The advice to “check your gutters” or “look for foundation cracks” is valid but fundamentally incomplete. It fails to explain the *why*—the forces of thermal shock, the mechanics of soil expansion, and the delicate balance of air and moisture pressure within your building envelope. Understanding these forces is the difference between perpetual, costly repairs and building long-term resilience.
This guide moves beyond the typical maintenance checklist. We will adopt the perspective of a structural engineer to deconstruct the specific ways the Canadian spring thaw damages your home. Instead of just listing problems, we will analyze the mechanisms of failure. You will learn not only what to look for but why it happens, empowering you to make strategic decisions that protect your most significant investment for decades to come.
This article provides a detailed analysis of the critical stress points in your home, from the exterior cladding down to the soil beneath your foundation. By exploring each component’s role within the larger system, you will gain a comprehensive understanding of how to prepare your property for the unique challenges of a Canadian spring.
Summary: Decoding Structural Stress in Canadian Homes During the Thaw
- How Thermal Shock Damages Siding and Brickwork Over 10 Years?
- How to Waterproof Your Foundation Before the Spring Melt Begins?
- Vinyl vs. Engineered Wood: Which Siding Survives 40°C Swings Better?
- The Ventilation Mistake That Causes Mold Behind Drywall in April
- When to Inspect Caulking: The Critical Window Before Winter Hits
- Clay vs. Sand: Which Soil Type is Most Prone to Frost Heave?
- Which Climate Zone Are You In: 5, 6, or 7?
- Why Changing Windows Can Cause Mold if You Don’t Fix Ventilation?
How Thermal Shock Damages Siding and Brickwork Over 10 Years?
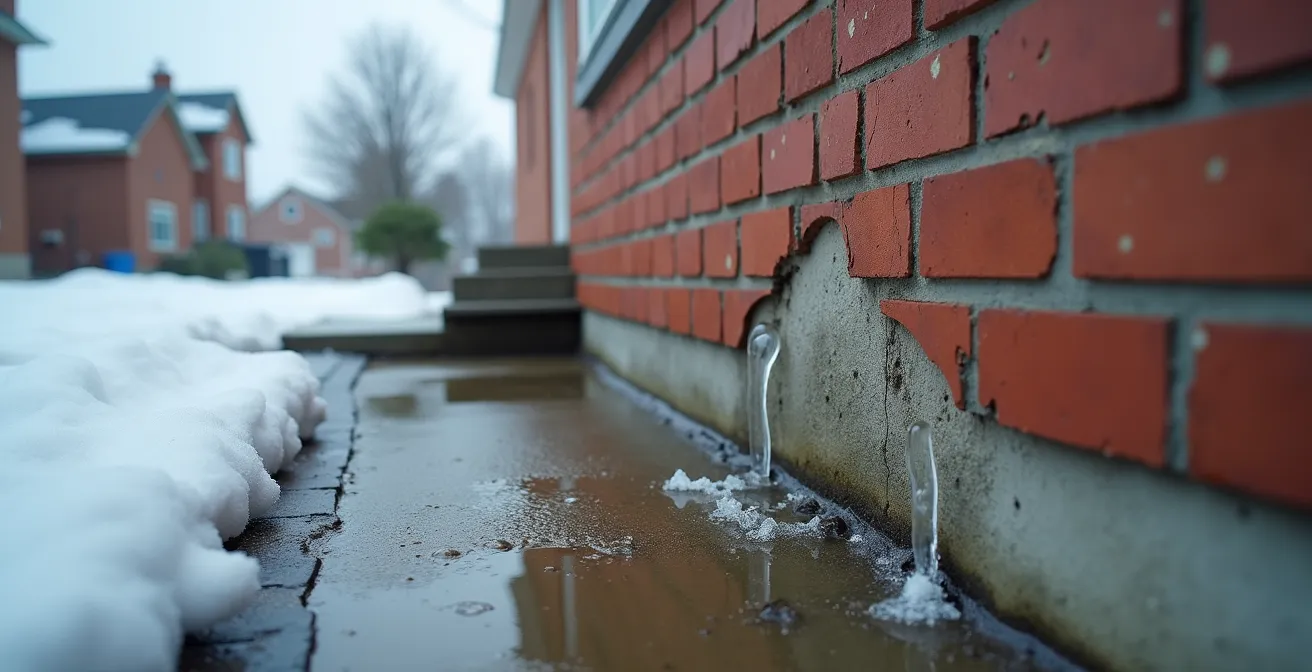
The most visible part of your home, its cladding, is the first line of defense against the elements. However, it’s also the most exposed to thermal shock. In many parts of Canada, it’s not uncommon for temperatures to swing from -15°C overnight to +10°C in the afternoon sun. This constant expansion and contraction exerts immense stress on materials. For brick and masonry, the primary danger is water infiltration into tiny, often invisible, cracks. When this trapped water freezes, it expands by up to 9%, creating colossal forces. It’s a slow, insidious process, but a single freeze can generate pressures of 25,000 to 114,000 PSI, enough to flake the face off a brick (a phenomenon known as spalling) or pulverize mortar joints from the inside out.
Over a decade, thousands of these micro-events accumulate, leading to significant degradation. What begins as a hairline crack becomes a pathway for bulk water entry, compromising the structure behind it. For siding materials like vinyl and wood, the stress manifests as warping, buckling, and opened seams. These gaps not only look unsightly but also become superhighways for wind-driven rain and pests, defeating the purpose of the weather-resistant barrier beneath. The damage is rarely dramatic in a single season; it’s a patient, cumulative assault that compromises the integrity of your entire building envelope over time.
Your Action Plan: Spring Inspection for Exterior Damage
- Visual Brickwork Scan: After the last snow melts, walk the perimeter of your home specifically looking for signs of winter damage like new cracks, spalling (flaked surfaces), or crumbling mortar joints.
- Gutter and Downspout Integrity: Clear all gutters of winter debris and ensure downspouts are securely attached, directing all water at least two meters away from the foundation.
- Water Repellent Application: Consider applying a professional-grade, breathable water repellent to masonry surfaces to prevent moisture absorption during heavy spring rains.
- Efflorescence and Mold Check: Look for white, chalky deposits (efflorescence) or dark stains on brick, which indicate persistent moisture issues that need to be addressed.
- Mortar Joint Repointing: Identify any deteriorated mortar joints. Plan to have them repointed by a professional during the drier summer months, well before the next winter freeze sets in.
How to Waterproof Your Foundation Before the Spring Melt Begins?
As snowpack melts, the ground around your home becomes saturated. This creates immense hydrostatic pressure—the force exerted by standing water against your foundation walls. Concrete, while strong, is porous. Without a proper waterproofing barrier, this pressure will force moisture directly through the concrete, leading to a damp basement, mold growth, and eventual structural decay. In Canada, the financial stakes are enormous. Water damage has surpassed fire damage as the leading cause of home insurance claims, costing homeowners billions annually. Preparing your foundation *before* the melt is a critical, preventive investment.
Effective foundation waterproofing is a multi-layered defense system. The process typically involves excavating the soil around the foundation to expose the concrete walls. First, any existing cracks are identified and repaired. Then, a primary waterproofing membrane—often a liquid-applied elastomeric coating or a self-adhering rubberized asphalt sheet—is applied. This creates the main waterproof barrier. This is then protected by a crucial secondary layer: a dimpled drainage mat.
This dimpled mat is a key piece of engineering. It creates a physical air gap between the saturated soil and the foundation wall. Any water that makes it past the soil column hits the mat and is channeled down by gravity to the weeping tile system at the base of the foundation footing. This system actively relieves hydrostatic pressure, moving water away from the wall before it has a chance to exert force. It is the combination of a sealed barrier and an active drainage path that provides true, long-term protection against the spring melt.
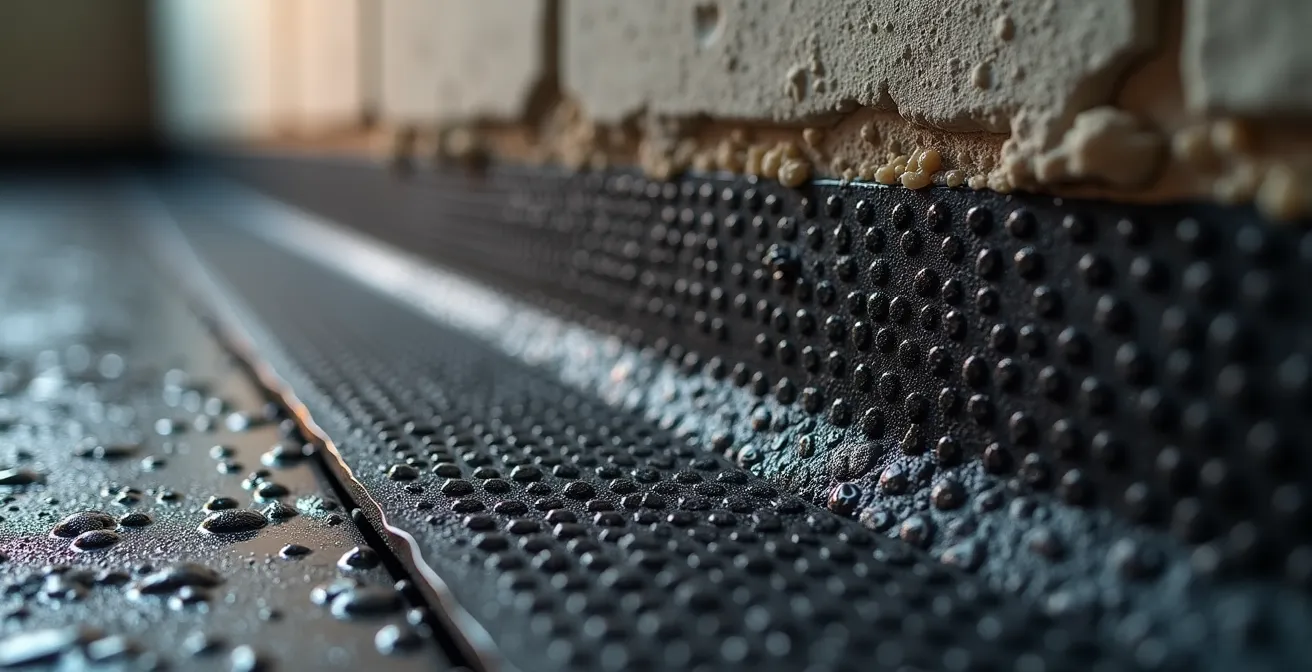
As seen in the installation process, the dimpled membrane is the critical final layer that protects the primary waterproof coating and provides a clear channel for water to reach the weeping tiles. This system ensures that even if the soil is completely waterlogged, the foundation wall itself remains dry and free from pressure. When combined with proper exterior insulation, this approach also helps manage thermal stresses on the concrete, contributing to a more stable and durable structure.
Vinyl vs. Engineered Wood: Which Siding Survives 40°C Swings Better?
Choosing a siding material in Canada is an engineering decision, not just an aesthetic one. The material must withstand a potential 40-degree Celsius swing in a single day, from a frigid morning to a sun-baked afternoon. This causes significant thermal expansion and contraction, and different materials handle this stress in vastly different ways. Vinyl siding, a popular and cost-effective option, is particularly susceptible. A standard 12-foot panel of vinyl can expand and contract by as much as half an inch. The rate of thermal expansion for vinyl siding is a known engineering parameter that dictates installation methods. This is why installers leave a gap at the end of each panel and nail them loosely; the siding must be free to “float” as it changes size.
If installed too tightly, vinyl will buckle and warp on a hot day. If the gaps are too small, the expanding panels will push against each other, causing distortion. In contrast, materials like engineered wood and fiber cement offer greater dimensional stability. They expand and contract far less than vinyl, allowing for tighter joints and a more robust installation that is less prone to opening up and allowing water intrusion. While vinyl is effective in moderate climate zones, its performance can be compromised in regions with extreme temperature fluctuations, such as the Prairies or Northern Ontario.
The following table, based on material science and climate data, provides a clear comparison of how different siding materials perform under the stress of Canadian temperature swings. This data is essential for making an informed choice based on your home’s specific location and climate zone.
| Material | Expansion Rate | Temperature Resistance | Best Climate Zone |
|---|---|---|---|
| Vinyl Siding | High (1/2 inch per 12 ft) | Poor in extreme cold | Zones 4-5 |
| Fiber Cement | Minimal | Excellent stability | All zones |
| Engineered Wood | Moderate | Good with treatment | Zones 3-6 |
| Metal Siding | Low-Moderate | Excellent | Prairie provinces |
As the table from an analysis of siding for extreme temperatures illustrates, there is no single “best” material; there is only the best material for a specific application. A homeowner in southern Ontario (Zone 5) might find vinyl perfectly adequate, while someone in Edmonton (Zone 6) would be better served by the superior stability of fiber cement or engineered wood to prevent long-term issues with gaps and water intrusion.
The Ventilation Mistake That Causes Mold Behind Drywall in April
One of the most common and damaging mistakes a homeowner can make involves a misunderstanding of ventilation, particularly in basements and crawl spaces. During the cold winter, warm, moist air from the living areas of your house naturally migrates downwards. Homeowners often seal up crawl space vents in the fall to prevent cold air from entering, which is the correct practice for winter. The critical error occurs in the spring. As the ground thaws and outdoor air becomes humid, many people forget to unseal these vents. This traps the winter’s accumulated moisture inside the crawl space, creating a perfect breeding ground for mold as temperatures rise.
The air in the sealed crawl space becomes saturated. This moisture then condenses on the cooler surfaces of the floor joists and the back of the subfloor. The result is a hidden mold factory that can go unnoticed for years, potentially causing respiratory issues and significant structural rot. Proper spring ventilation is not just about “airing it out”; it’s about actively managing moisture levels at a critical time of year. As a guiding principle, Natural Resources Canada provides clear, engineering-based advice on this very topic.
Make sure that the crawl space is adequately ventilated in the spring. Vents should be installed at a ratio of 1 to 500 (vent area to floor area). Do not ventilate in winter; the vents should be plugged and insulated.
– Natural Resources Canada, Keeping The Heat In – Section 6: Basement insulation
This 1:500 ratio is a crucial engineering guideline. It ensures sufficient cross-flow to exhaust moist air and replace it with drier outdoor air. Failing to unblock these vents in April is a direct invitation for mold to grow behind your walls and under your floors. This simple act of seasonal maintenance is one of the most effective preventive measures against moisture-related damage during the spring thaw.
When to Inspect Caulking: The Critical Window Before Winter Hits
The seams around windows, doors, and material transitions are the weakest points in your home’s building envelope. The flexible sealant, or caulking, used in these joints is designed to absorb the movement from thermal expansion and contraction while keeping out water and air. However, caulking has a finite lifespan. Under constant assault from UV radiation and extreme Canadian temperature swings, it becomes brittle, cracks, and pulls away from the surfaces it’s meant to protect. A failed caulking joint is a primary entry point for water, which can lead to rot, mold, and insect infestations within your wall assemblies.
The timing of your inspection is critical. While a spring check is good for identifying winter damage, the most important inspection window is in the late summer or early fall. This is when temperatures are moderate (typically 10-20°C), allowing for optimal conditions to apply new sealant if needed. Repairing failed caulking before winter is paramount. A small, open joint in September can allow gallons of water from melting snow to pour into your wall cavity in March. The ideal time varies by region—from late August in Alberta to late September in Southern Ontario—but the principle is the same: seal the envelope before the freeze-thaw cycles begin.

A simple but effective way to test caulking is the credit card test. Gently try to slide the corner of a credit card under the edge of the sealant. If it slides in easily, the adhesion has failed, and the joint is no longer waterproof. This indicates that the old caulking needs to be completely removed and replaced. Performing this simple, tactile check on all major seams annually is a proactive measure that can prevent thousands of dollars in hidden water damage.
Clay vs. Sand: Which Soil Type is Most Prone to Frost Heave?
The most dramatic and powerful force exerted on your home during the thaw is frost heave. This is not simply water freezing and expanding; it’s a far more complex and destructive process. Frost heave occurs when moisture in the soil freezes into “ice lenses”—layers of ice that grow and expand upwards, physically lifting everything above them, including your foundation, deck footings, and walkways. However, the potential for frost heave is almost entirely dependent on your soil type. Sandy or gravelly soils drain well, meaning there is little water available to form ice lenses. They are low-risk.
The real danger lies in silt and clay soils, which are common throughout the populated regions of Ontario and Quebec. These soils have poor drainage and a strong capillary action, meaning they can wick water up from deeper in the ground towards the freezing front near the surface. This provides a continuous supply of water to feed the growing ice lenses, resulting in significant upward pressure that can lift sections of a foundation by several centimeters. This differential movement is what causes drywall to crack, doors to jam, and in severe cases, structural damage to the foundation itself. Keeping the soil around the foundation from freezing deeply is a key preventative strategy. It is no coincidence that basements can account for about 25 percent of a home’s total heat loss; this lost heat helps keep the adjacent soil warmer.
Case Study: The Challenge of Leda Clay in the Ottawa-St. Lawrence Valley
Natural Resources Canada specifically highlights the unique risks associated with Leda Clay, a type of marine clay found in the Ottawa-St. Lawrence Valley. This “quick clay” is notorious for its instability. During the spring thaw, it can rapidly lose its structural integrity and almost liquefy when saturated. This soil type is extremely susceptible to frost heave. For homes built on the expansive clay belts of Southern Ontario and Quebec, robust drainage systems like French drains and weeping tiles are not optional upgrades; they are considered non-negotiable engineering requirements to mitigate the severe risk of foundation damage from frost heave.
Understanding your property’s soil is therefore the first step in assessing your risk. In high-risk clay areas, ensuring your weeping tile system is functional and that your property is graded to direct all surface water far away from the foundation is absolutely critical. These measures work to deny the frost heave process its essential fuel: water.
Which Climate Zone Are You In: 5, 6, or 7?
All building science principles—from material selection to insulation levels—must be applied within the context of your specific location. Canada is divided into several climate zones based on “Heating Degree Days” (HDD), a metric that quantifies the severity and duration of cold weather. A home in Vancouver (Zone 4) has vastly different requirements than a home in Winnipeg (Zone 7a). Applying the wrong standard for your zone can lead to underperformance, high energy bills, and moisture problems. For instance, the National Building Code of Canada sets minimum R-values for insulation based on these zones.
The R-value measures a material’s resistance to heat flow. The higher the R-value, the better it insulates. In colder climate zones with higher HDD values, much higher R-values are required to keep the home comfortable and prevent issues like condensation inside wall cavities. As a general target, most Canadian homes should aim for R-50 to R-60 in the attic, as this is where the majority of heat loss occurs. However, wall and basement insulation requirements are just as important for creating a balanced, high-performance building envelope.
The table below, based on consensus from organizations like NAIMA Canada, outlines the recommended R-values for new construction across different climate zones. While older homes may not meet these standards, this table serves as an excellent target for homeowners planning renovations or upgrades. Knowing your zone is the first step to making informed decisions.
This table summarizes the insulation targets for different parts of a home across Canada’s primary climate zones, as detailed in building standards from sources like NAIMA Canada.
| Climate Zone | Heating Degree Days | Attic R-Value | Wall R-Value | Basement R-Value |
|---|---|---|---|---|
| Zone 4 | 3000-3999 HDD | R-49 | R-20 | R-15 |
| Zone 5 | 4000-4999 HDD | R-49 | R-20 | R-20 |
| Zone 6 | 5000-5999 HDD | R-60 | R-22 | R-20 |
| Zone 7a | 6000-6999 HDD | R-60 | R-24 | R-28 |
Identifying your zone—for example, Toronto is in Zone 5, Ottawa is in Zone 6, and Calgary is in Zone 7a—allows you to set realistic and effective goals for improving your home’s thermal performance. This not only saves on energy costs but also contributes to a more durable structure by better managing heat and moisture flow.
Key Takeaways
- Structural stress from spring thaw is caused by predictable physical forces: thermal shock, hydrostatic pressure, and frost heave.
- Your home is an interconnected system; a weakness or change in one area (like siding or windows) affects the performance of the whole building.
- Managing water is the single most important principle: directing it away from the foundation and preventing it from entering the building envelope.
Why Changing Windows Can Cause Mold if You Don’t Fix Ventilation?
This final point brings together the central thesis of this guide: your home is a complete, interconnected system. A common and well-intentioned upgrade—replacing old, drafty windows with new, high-efficiency, airtight ones—can inadvertently create a serious moisture problem. Older homes were “leaky” by nature. They allowed for a constant, uncontrolled exchange of air with the outside, which, while inefficient, also allowed moisture to escape. When you install perfectly sealed windows, you dramatically reduce this natural air leakage. If you don’t simultaneously address ventilation, you effectively trap all the moisture generated inside the house (from cooking, showers, breathing) within the building envelope.
Come spring, this effect is amplified. The indoor relative humidity can rise significantly. This moist air will find the coldest surfaces to condense upon, which are often the inside of exterior wall cavities or attics. This creates the ideal conditions for mold and rot. The problem wasn’t the new windows; it was the failure to treat the house as a system. By tightening up one part of the envelope, you changed the air pressure and moisture balance of the entire structure. The solution is to introduce controlled, mechanical ventilation, such as a Heat Recovery Ventilator (HRV), which exhausts stale, moist air while bringing in fresh air and transferring the heat in the process. Another critical component in this system is the vapour barrier.
The vapour barrier is an important component of the house envelope because it protects the structure and insulation from moisture damage. The vapour barrier must resist the flow of water vapour from the interior, be durable and be located on the warm side of the insulation.
– Natural Resources Canada, Keeping The Heat In – Section 3: Materials
A properly installed vapour barrier works in concert with insulation and ventilation to manage moisture. It stops water vapour from your home’s interior from migrating into the wall cavity where it could condense. When you tighten the building envelope with new windows, you increase the importance of every other component in this system. This example proves that a holistic, engineering-based approach is the only way to ensure that one improvement doesn’t create a new, more dangerous problem elsewhere.
By viewing your home not as a collection of parts but as a single system designed to manage heat, air, and moisture, you can move from a reactive cycle of repairs to a proactive strategy of resilience. This understanding is your best defense against the annual structural stresses of the Canadian spring.
Frequently Asked Questions About Seasonal Home Maintenance in Canada
When is the ideal time to inspect caulking in Canada?
Late August in Alberta before first frosts, late September in Southern Ontario, when ambient temperatures are between 10-20°C for optimal inspection and repair conditions.
How often should Canadian homeowners check their caulking?
Annual inspection is recommended, ideally in fall before winter weather. Spring inspection after thaw is also valuable to catch any winter damage.
What temperature is best for applying new caulking?
Most sealants cure properly between 5°C and 30°C. Avoid application during extreme temperature swings or when frost is expected within 24 hours.