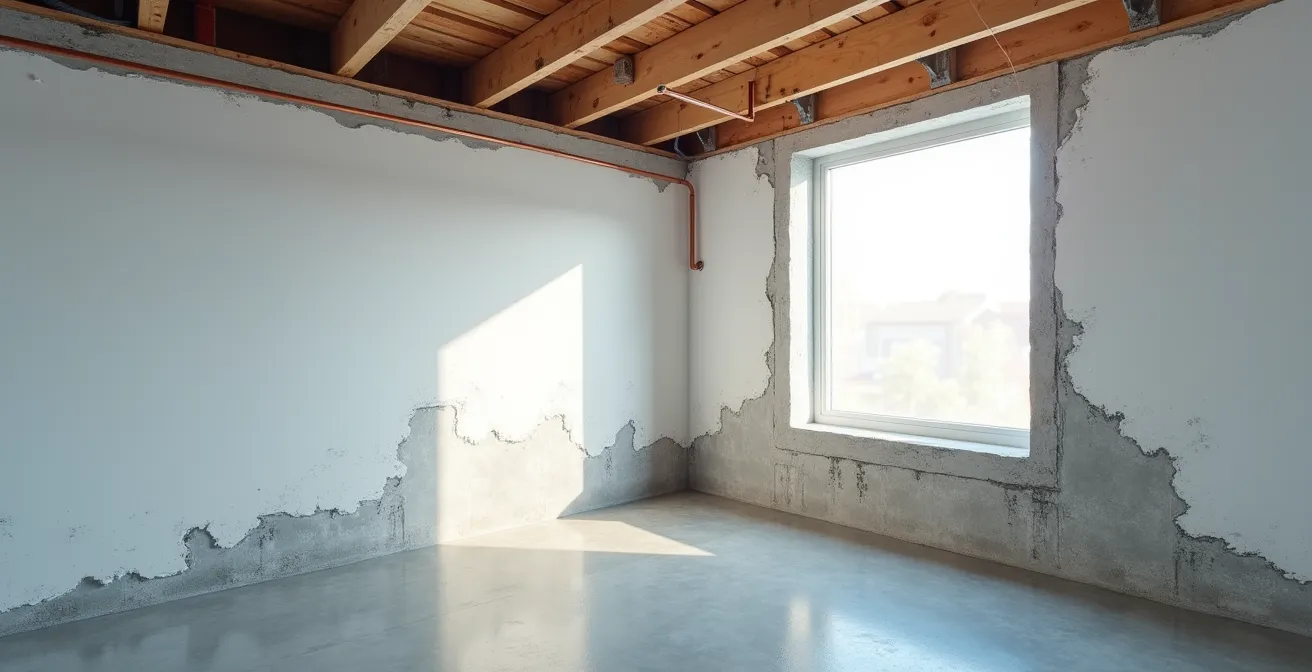
The musty smell in your new basement isn’t a failure of the drywall; it’s a symptom of a hidden “moisture sandwich” trapping dampness in the wall assembly behind it.
- Absorbent insulation, like fibreglass, placed directly against a cool concrete foundation creates a condensing surface where moisture accumulates.
- Conventional polyethylene vapour barriers, often installed incorrectly, trap this moisture, preventing the wall from drying and promoting rot and mould.
Recommendation: The key to a dry, healthy basement is a “breathable” wall system that uses hydrophobic (water-repellent) insulation and smart vapour retarders designed for the Canadian climate.
You followed the rules. You tore out the old, damp panelling, framed a new wall, and installed fresh, clean drywall. Yet, weeks later, that unmistakable musty, earthy odour creeps back into your finished basement. It’s a frustrating and common problem for Canadian homeowners, leading many to believe they have a persistent leak or faulty drywall. The investigation, however, must go deeper than what you can see on the surface. The smell is not a sign that your new materials have failed; it’s a critical warning that a fundamental battle of physics is being lost inside your walls.
The real culprit is almost always a hidden “moisture sandwich”—a disastrous layering of materials that traps water vapour. This vapour moves from the warm, moist interior of your home towards the cold, massive concrete foundation, a process known as vapour drive. When this moisture hits a cold surface inside the wall cavity, it condenses into liquid water. If the wall assembly has no way to dry out, this trapped dampness becomes a breeding ground for mould, mildew, and wood rot, producing the very odour you’re trying to eliminate. Standard construction practices often create this exact scenario.
But what if the solution wasn’t about blocking moisture entirely, but about managing it intelligently? The secret to a permanently fresh and healthy basement lies in understanding building science and constructing a wall assembly with high drying potential. This means choosing materials that don’t absorb water, creating proper air gaps, and using “smart” barriers that let the wall breathe when it needs to.
This guide will take you behind the drywall to conduct a forensic investigation of your basement walls. We will dissect common construction errors, compare critical materials, and provide a clear roadmap for building a resilient, mould-resistant basement that protects both your investment and your family’s health.
To fully understand how to solve this hidden moisture problem, this article breaks down the core building science principles you need to master. Follow along as we explore each critical component, from insulation choices to the complex roles of air and vapour barriers.
Summary: Why Do Basements Smell Musty Even After Installing New Drywall?
- Why “Breathable” Insulation Saves Wood Frames from Rotting?
- How to Prevent Moisture from Trapping Behind Bathroom Tiles?
- Rock Wool vs. Cellulose: Which One Must Be Trashed After a Pipe Burst?
- The Paint Peeling Sign That Indicates Wet Insulation Inside Your Walls
- When to Install a Dehumidifier to Protect Your Insulation Investment?
- Why Putting Fiberglass Against Concrete is a Recipe for Mold?
- Air Barrier vs. Vapor Barrier: What is the Difference and Where Do They Go?
- Why You Headache in the Morning: The Case for Heat Recovery Ventilators
Why “Breathable” Insulation Saves Wood Frames from Rotting?
The concept of a “breathable” wall is central to preventing musty odours and structural decay. It doesn’t mean the wall is leaky; it means the assembly has the capacity to dry out when it inevitably gets wet. In a Canadian basement, where foundation walls are constantly cool, this drying potential is paramount. Wood framing that stays wet will rot, and damp insulation feeds mould. A breathable design ensures that any moisture that gets into the wall assembly—either from the interior or exterior—has a path to escape.
This is achieved by choosing materials that are hydrophobic (water-repellent) instead of hygroscopic (water-absorbing). Mineral wool (rock wool) insulation is a prime example. It does not wick or hold moisture, so even if it gets damp, it retains its insulating properties and dries quickly, starving mould of the water it needs to grow. This is a stark contrast to materials like fibreglass or cellulose, which can act like a sponge. With uninsulated basements responsible for up to 25% of a home’s total heat loss according to Natural Resources Canada, choosing the right insulation is critical for both energy efficiency and moisture management.
The key to a breathable assembly is layering materials correctly. The process starts with rigid foam insulation directly against the concrete, which stops warm, moist indoor air from condensing on the cold foundation. Then, a wood stud wall is built, leaving a small air gap. This cavity is filled with a breathable insulation like mineral wool. Finally, the interior is finished with drywall, which itself is vapour-permeable, allowing the wall to dry towards the inside. This system manages moisture instead of trying to block it with an impermeable plastic barrier, which often creates more problems than it solves.
How to Prevent Moisture from Trapping Behind Bathroom Tiles?
Basement bathrooms are a super-concentrated source of moisture, posing a unique challenge. The intense vapour drive from hot showers can force a tremendous amount of moisture into the wall cavities. Many homeowners mistakenly believe that using “green board” or moisture-resistant drywall is sufficient protection. However, these products are only moisture-resistant, not waterproof. Over time, vapour will pass through them and the tile grout, condensing on the cooler structures behind.
The only foolproof method is to create a continuous, impenetrable waterproof layer directly behind the tiles. Modern waterproofing systems, such as sheet membranes (like Schluter-KERDI) or liquid-applied membranes, are installed over a stable substrate like cement board. This creates a seal that completely isolates the wall structure from any water or vapour, ensuring the stud bay and insulation remain bone-dry. The tile and grout may get wet, but the critical structure behind is fully protected.
Case Study: The Failed Long Island Basement Bathroom
A homeowner’s basement bathroom renovation in an 80-year-old home became a cautionary tale. As detailed in an analysis by This is Drywall, despite using moisture-resistant green board, the homeowner discovered significant mould growth behind the walls. The root cause was the absence of a true waterproofing membrane. The intense vapour from showers penetrated the assembly, leading to condensation and mould. The expensive fix required a complete tear-out to install a proper moisture barrier, proving that moisture-resistant drywall alone is not enough for the high-humidity environment of a basement bathroom.
The image below illustrates the correct layering for a resilient basement shower wall, with the critical orange waterproofing membrane visible behind the tile. This layer is the true hero in preventing moisture from becoming trapped.
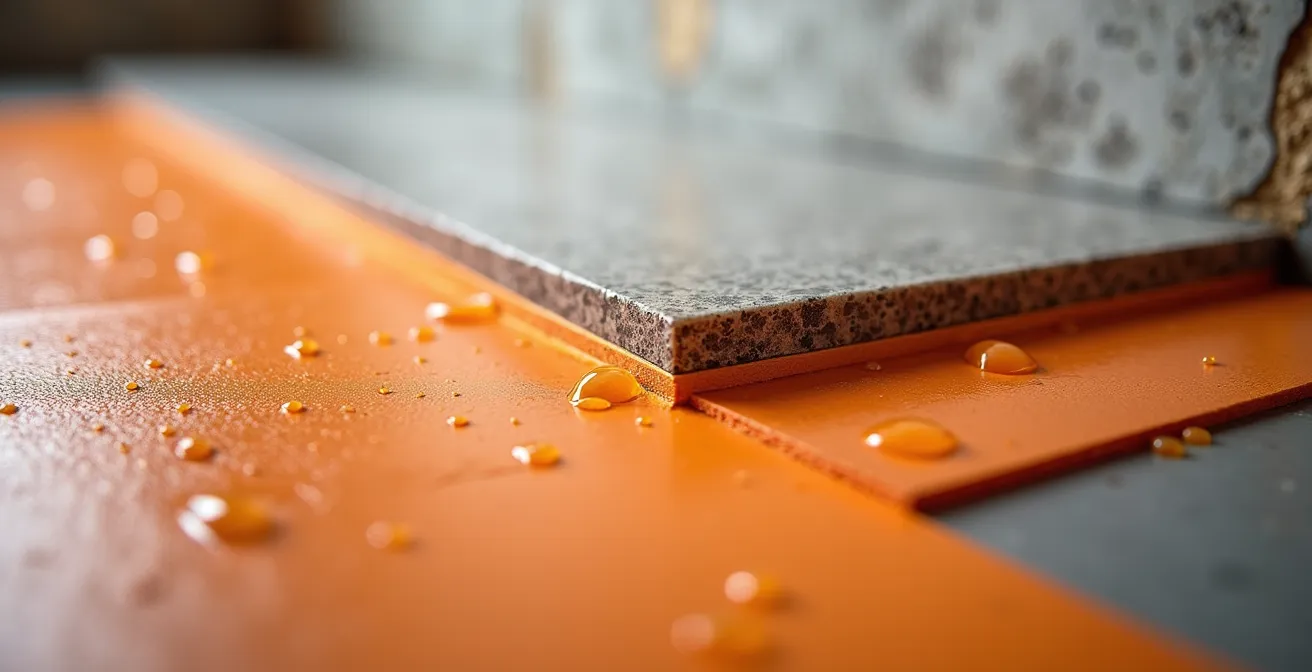
By implementing a dedicated waterproofing system, you move the moisture-control layer to the surface, directly behind the tile. This stops vapour before it ever has a chance to enter the wall cavity, eliminating the risk of creating a hidden moisture problem within your beautifully tiled bathroom.
Rock Wool vs. Cellulose: Which One Must Be Trashed After a Pipe Burst?
While we focus on preventing chronic moisture issues, acute events like a burst pipe or a sump pump failure are a harsh reality for many Canadian basements. In these scenarios, the type of insulation in your walls determines whether you’re facing a manageable cleanup or a catastrophic tear-out and replacement. This is where the difference between hydrophobic and hygroscopic materials becomes a matter of thousands of dollars.
Cellulose insulation, made from treated, recycled paper, is highly hygroscopic. When it gets wet, it absorbs and holds a large amount of water, compacts under its own weight, and loses all of its insulating R-value. Worse, being an organic material, it becomes an ideal food source for mould, which can begin to grow within 24-48 hours. Once saturated, cellulose is nearly impossible to dry in place and must be completely removed and replaced—a costly and disruptive process.
In contrast, rock wool (a type of mineral wool) is hydrophobic. It is made from basalt rock and slag, which are naturally water-repellent. If a wall cavity with rock wool floods, the water will drain through it rather than being absorbed. The insulation itself does not support mould growth. After the source of the leak is fixed, the wall can often be opened at the bottom, and fans can be used to dry the insulation in place, allowing it to be reused without loss of performance. The fact that mineral wool insulation typically contains 75% post-industrial recycled content is an added environmental benefit.
The following table, based on industry data for Canadian basement conditions, clearly outlines the performance differences after water exposure.
| Insulation Type | Water Resistance | Mold Risk | Recovery After Flooding | Cost Impact |
|---|---|---|---|---|
| Rock Wool (Mineral) | Hydrophobic – repels water | Low – inorganic material | Can be dried and reused | Higher initial cost, lower replacement risk |
| Cellulose | Hygroscopic – absorbs water | High – organic material | Must be completely replaced | Lower initial cost, high replacement risk |
| Closed-Cell Spray Foam | Water impermeable | Very Low | No damage, but hides leaks | Highest cost, detection issues |
While closed-cell spray foam also offers excellent water resistance, its impermeable nature can hide slow leaks until significant structural damage has occurred. For a balance of moisture resilience, drying potential, and visibility, rock wool presents a superior choice for below-grade applications where the risk of water events is always present.
The Paint Peeling Sign That Indicates Wet Insulation Inside Your Walls
Your walls can’t talk, but they do send clear signals when something is wrong. Peeling, bubbling, or flaking paint on a finished basement wall is one of the most definitive signs of a moisture problem hidden within the assembly. It is the external symptom of the “moisture sandwich” we’ve been investigating. This happens when moisture trapped behind the drywall is driven inward, soaking the paper facing and the drywall core, and pushing the paint layer off the surface.
Simply scraping and repainting is a futile exercise that only hides the symptom. To solve the problem, you must become a forensic investigator and determine the source and pathway of the moisture. The location of the peeling is your first clue. If it’s low on the wall, it often suggests hydrostatic pressure or wicking from the concrete slab. If it’s higher up, it could be related to air leakage at the rim joist or an issue with exterior grade. The timing also provides evidence: peeling that worsens in winter often points to interior air condensation, while summer peeling suggests moisture being driven inward from damp soil.
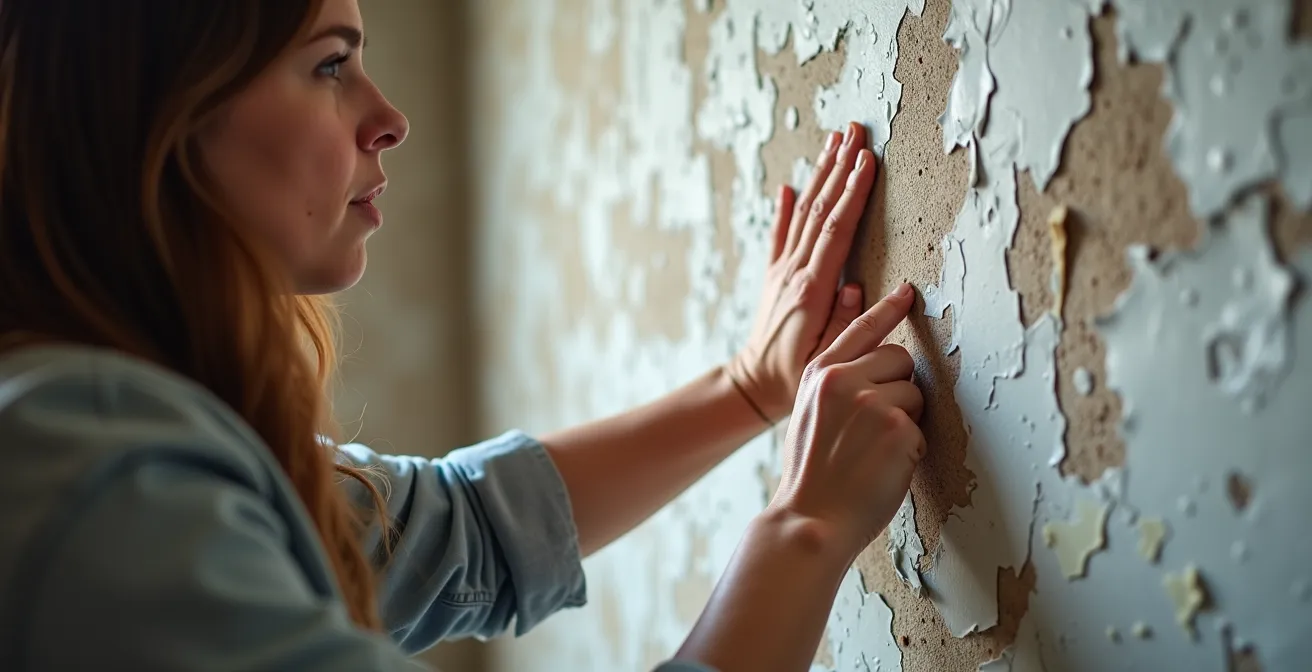
Another tell-tale sign that often accompanies peeling paint is efflorescence. These are the fuzzy, white mineral deposits left behind as moisture migrates through the concrete foundation and evaporates on the surface. If you see this on unfinished concrete, you have confirmation that a moisture pathway exists, which will almost certainly cause problems once you cover it with an insulated wall.
Your Action Plan: Diagnosing Peeling Paint in a Canadian Basement
- Note the Location: Pinpoint where the peeling occurs. Low on the wall suggests groundwater or slab moisture, while peeling high on the wall points towards issues at the rim joist or from exterior grading.
- Check the Timing: Correlate the problem with the season. Worsening conditions in winter indicate interior condensation, whereas summer problems often signal moisture being driven in from the outside.
- Perform a Plastic Sheet Test: Tape a 1-foot by 1-foot square of plastic sheeting securely to the bare concrete wall. After 48 hours, check for condensation on the inside of the plastic, which confirms moisture is migrating through the foundation.
- Measure Humidity Levels: Use a hygrometer to monitor your basement’s relative humidity. As per Health Canada guidelines, you should aim to maintain levels between 30% and 50% year-round to inhibit mould growth.
- Inspect for Efflorescence: Look for white, salty, or crystalline deposits on any exposed concrete. The presence of these mineral deposits is a clear indicator of moisture migrating through the concrete.
By following these diagnostic steps, you can move from treating the symptom (peeling paint) to identifying the root cause, which is the first step toward building a wall assembly that can manage moisture effectively.
When to Install a Dehumidifier to Protect Your Insulation Investment?
Even with a perfectly constructed, breathable wall system, managing ambient humidity in a Canadian basement is a critical part of the overall strategy. Basements are naturally damp, and humid summer air that enters the cool, below-grade space will raise the relative humidity, potentially to levels that support mould growth on surfaces, regardless of what’s inside the walls. This is where a dehumidifier transitions from a simple appliance to a crucial piece of building maintenance equipment.
In many parts of Canada, the moisture load is significant. For example, Environment and Climate Change Canada reports southern Ontario receives 800-1,000 mm of precipitation annually, contributing to consistently damp soil conditions around foundations. A dehumidifier’s job is to act as the lungs of the basement, pulling this excess moisture out of the air to maintain a relative humidity level below 50%, the generally accepted threshold for inhibiting mould growth.
The question is not *if* you need a dehumidifier, but *when* it becomes an essential investment. The answer: a high-quality, whole-basement dehumidifier should be considered a non-negotiable component of any finished basement project in a humid climate. A small, portable unit that requires constant emptying is a temporary fix. A permanent solution involves a high-capacity unit, often integrated with your HVAC system or plumbed directly to a drain, that uses a humidistat to automatically maintain the desired humidity level. This “set it and forget it” approach provides constant protection for your insulation, wood framing, and furnishings.
Case Study: Proactive Moisture Management for Long-Term Protection
Basement finishing specialists across Canada emphasize the role of mechanical dehumidification as a core part of their system. In one representative case, a homeowner’s system was set to maintain humidity between 35-45% during the dry winter months and under 55% during the humid summer. This automated control, connected directly to a drainage line, provided effortless and continuous protection. The result was the successful prevention of any surface mould growth and the complete protection of the homeowner’s significant insulation and finishing investment, proving that proactive humidity control is essential for long-term basement health in Canada’s variable climate.
Think of it as an insurance policy. You’ve invested in the right wall materials and construction; the dehumidifier is the system that ensures the environment in which those walls live remains stable and dry, safeguarding your entire investment.
Why Putting Fiberglass Against Concrete is a Recipe for Mold?
This is perhaps the single most common and destructive mistake made in basement finishing. Placing fluffy, absorbent fibreglass batt insulation directly against a cold, damp concrete foundation wall is the perfect recipe for creating the “moisture sandwich” that leads to mould and rot. It’s an error rooted in a misunderstanding of how moisture and heat interact below grade.
Concrete foundations are perpetually cool and porous; they are a constant source of moisture vapour. When you place warm, fluffy insulation against this surface, you are creating an ideal condensing plane. As warm, relatively humid air from the basement interior works its way through the fibreglass, it hits the cold concrete and its temperature drops to the dew point. The moisture in the air condenses into liquid water, directly onto the concrete and the back of the insulation. The fibreglass batt acts like a paper towel, wicking up this moisture and holding it against the wood framing.
Once wet, fibreglass insulation loses a significant portion of its R-value and becomes a damp haven for mould. The paper or foil facing on many fibreglass batts acts as an additional food source for mould and can also trap moisture, exacerbating the problem. The issue is so well-known that building science experts are unequivocal in their warnings. As stated by insulation experts at Quik-Therm, the government of Canada claims it’s debatable whether fibreglass insulation has any insulating ability at all when it gets wet.
The government of Canada claims it’s debatable whether fibreglass insulation has any insulating ability at all when it gets wet.
– Quik-Therm Insulation, Insulating Basement Walls in Canada
The correct method, as mandated by modern building science, is to always use a layer of moisture-impermeable rigid foam insulation (like XPS or EPS) or closed-cell spray foam directly against the concrete. This foam layer serves two critical purposes: it insulates the concrete, keeping its surface temperature above the dew point, and it acts as a vapour barrier, preventing interior air from reaching the cold foundation. Only after this protective foam layer is in place and properly sealed can you build a stud wall and add additional, moisture-tolerant insulation like mineral wool.
Air Barrier vs. Vapor Barrier: What is the Difference and Where Do They Go?
The terms “air barrier” and “vapour barrier” are often used interchangeably, but they serve two distinct functions. Confusing them is a common source of the moisture problems that plague finished basements. Understanding their roles is essential for building a wall assembly that works with, not against, the laws of physics in a cold climate.
An air barrier’s job is to stop the movement of air. Think of it like a windbreaker jacket. It prevents cold drafts from entering and, more importantly, stops warm, moist indoor air from flowing into the wall cavity where it can condense. A significant amount of moisture is transported by air currents. The National Building Code of Canada (NBCC) requires a continuous air barrier in all construction. In a basement, this can be achieved with materials like taped rigid foam board, certain house wraps, or even carefully sealed drywall.
A vapour barrier (or more accurately, a vapour retarder) is designed to slow the diffusion of water vapour through a material. Think of it like a rain jacket. In a cold Canadian climate, the code traditionally required a vapour barrier (typically 6-mil polyethylene plastic) on the warm-in-winter side of the insulation—meaning on the interior. The goal was to stop water vapour from the living space from diffusing into the cold wall cavity. However, this approach is now considered problematic for basements.
Case Study: The 1990s Ontario Polyethylene Vapour Barrier Mistake
A 30-year-old Ontario home provided a stark lesson in outdated practices. The homeowner discovered massive moisture and mould damage trapped between the fibreglass insulation and the interior polyethylene vapour barrier. Building science experts analyzing the failure noted that the plastic sheet was doing its job of stopping interior vapour, but it was also preventing the wall from drying to the inside when it inevitably got wet from moisture wicking up from the foundation. The impermeable plastic created a “terrarium” for mould. The recommendation was to remove the polyethylene barrier entirely, highlighting a systemic issue in many Canadian homes built during that era.
The modern, science-based approach uses “smart” vapour retarders or simply painted drywall as the interior vapour control layer. These materials have variable permeability: they block vapour when the air is dry but become more permeable when humidity rises, allowing the wall assembly to dry inward if it gets wet. The following table clarifies the distinct roles and proper placement of these critical layers in a Canadian basement.
| Characteristic | Air Barrier | Vapour Barrier |
|---|---|---|
| Function | Stops air movement (like windbreaker) | Stops moisture diffusion (like rain jacket) |
| Location in Assembly | Can be anywhere as long as continuous | Must be on the warm side in winter (interior) |
| Materials | Taped drywall, rigid foam, membrane | Polyethylene, “smart” retarders, foil |
| Canadian Code Requirement | Always required by NBCC | Climate-specific requirements; poly discouraged in basements |
| Basement Application | Rigid foam against concrete OR sealed drywall | “Smart” vapour retarder or painted drywall only |
Key Takeaways
- The musty smell is not from the drywall itself, but from mould and rot occurring in a “moisture sandwich” trapped within the wall assembly.
- Never place absorbent insulation like fibreglass directly against a concrete foundation; always use a layer of moisture-impermeable rigid foam first.
- A “breathable” wall that can dry out is superior to one that tries to block all moisture. This means using hydrophobic insulation (like rock wool) and avoiding interior polyethylene vapour barriers.
Why You Headache in the Morning: The Case for Heat Recovery Ventilators
After you’ve successfully implemented building science principles to create a tight, well-insulated, and dry basement, you may have inadvertently created a new problem: poor indoor air quality. Modern homes, especially those with meticulously sealed basements, can become so airtight that they trap pollutants, CO2, and excess humidity inside. That persistent morning headache or lingering stuffiness might not be an allergy; it could be a sign that your house can no longer breathe.
This is where a Heat Recovery Ventilator (HRV) becomes a crucial part of the whole-house system. An HRV is a mechanical ventilation device that continuously exchanges stale indoor air with fresh outdoor air. Its genius lies in its core, where it transfers heat from the outgoing stale air to the incoming fresh air during the winter (and does the reverse in the summer). This means you get fresh air without a significant energy penalty. While the primary benefit of insulation is saving energy—the U.S. Department of Energy reports basement insulation can save homeowners 10-30% annually—that thermal efficiency necessitates mechanical ventilation.
For a finished basement, an HRV is particularly vital. It actively removes the moisture generated by occupants, showers, and laundry, providing a constant backstop against rising humidity. It also exhausts pollutants that can off-gas from new building materials, furnishings, and cleaning products. By constantly supplying fresh, filtered air, an HRV reduces levels of CO2, VOCs (Volatile Organic Compounds), and other contaminants that can lead to health issues ranging from headaches and fatigue to more serious respiratory problems. It transforms your basement from a potentially stagnant air trap into a healthy, comfortable, and actively managed part of your home’s living space.
Proper installation and balancing are key. The system must be correctly sized for your home’s volume and occupancy according to NBCC standards, and the intake/exhaust vents must be strategically placed. Once installed, an HRV works automatically in the background, ensuring the air you breathe is as healthy as your walls are dry.
You have now investigated every layer of your basement wall, from the concrete to the air you breathe. The evidence is clear: a musty smell is a symptom of a systemic failure, not a single faulty product. The solution lies in a holistic, science-based approach that prioritizes drying potential, intelligent material selection, and managed ventilation. By building a wall that can breathe, choosing insulation that repels water, and actively controlling humidity and air quality, you move beyond temporary fixes and create a truly permanent solution. Your investment in a finished basement should result in a comfortable, healthy living space, not a source of worry. Now that you are armed with this knowledge, you can ensure it does.