Upgrading your windows without addressing your home’s ventilation is a primary cause of new moisture and mold problems; you’ve plugged the leaks without giving moisture a new way to escape.
- Your house operates as a single, interconnected system where changing one component (windows) impacts the whole environment (air quality and moisture).
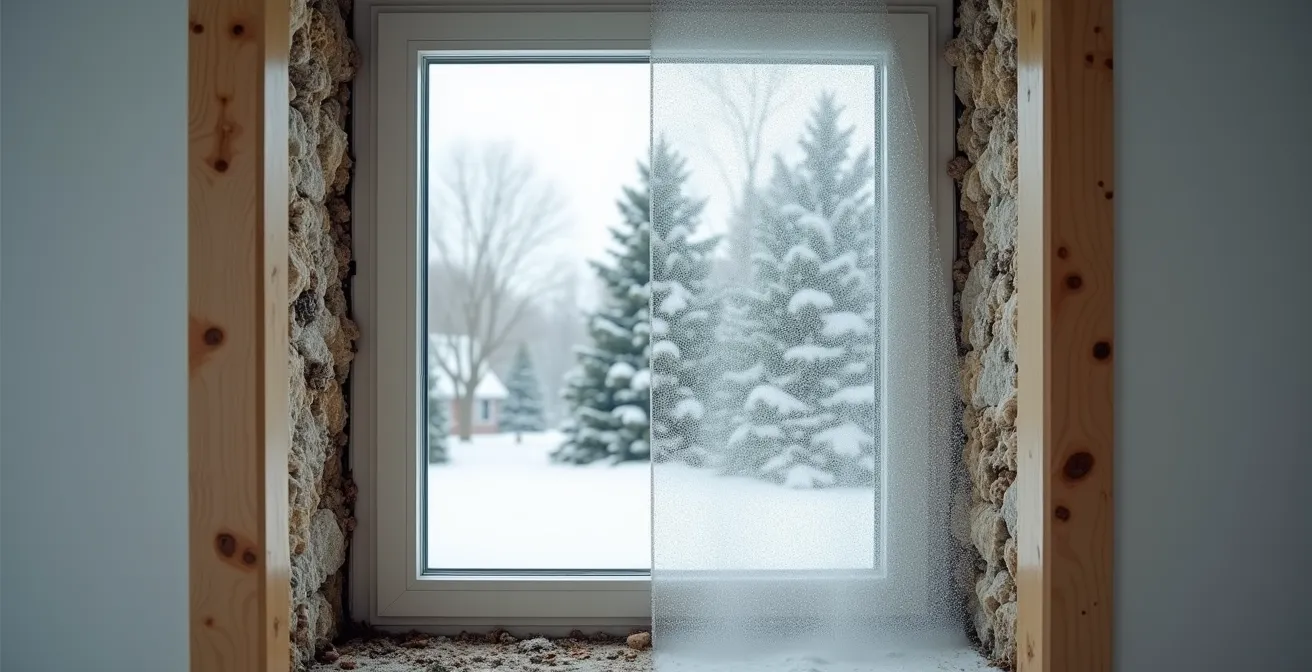
- Increased airtightness traps humidity from daily activities, which then condenses on the coldest surfaces, often leading to mold.
Recommendation: Treat your home like the system it is. Before or after an upgrade, an energy audit including a blower door test is the essential first step to creating a balanced, healthy home.
You invested thousands of dollars in new, energy-efficient windows, expecting a warmer, quieter, and more comfortable home. Instead, you’re greeted with condensation, a musty smell, and perhaps even the dreaded sight of black spots on your window frames or walls. This frustrating scenario is incredibly common for Canadian homeowners. The conventional wisdom suggests that new windows are simply “too good” and that you just need to run a dehumidifier. But this advice only treats a symptom, not the root cause.
The problem isn’t the windows; it’s the failure to see your house as a single, interconnected ecosystem. For decades, your old, drafty windows were an accidental part of your home’s ventilation system. By installing modern, airtight units, you’ve effectively corked the bottle, trapping all the moisture generated by cooking, showering, and even breathing. This isn’t a simple component failure; it’s a systemic imbalance.
The real key lies in understanding building science—treating your home as a complete environmental separator that manages heat, air, and moisture. Simply upgrading one part without rebalancing the others is a recipe for unintended consequences. This article moves beyond the platitudes and dives into the systemic reasons your upgrade may be causing problems. We will deconstruct the critical relationships between air barriers, vapour control, insulation, and mechanical ventilation to provide a clear roadmap for creating a healthy, durable, and truly efficient home.
This guide breaks down the science into actionable parts, explaining how each component of your home’s envelope interacts. The following sections will provide the clarity you need to diagnose your home’s health and make informed decisions.
Summary: Understanding Why New Windows Can Lead to Mold
- Air Barrier vs. Vapor Barrier: What is the Difference and Where Do They Go?
- What Does a Blower Door Test Score of 3.5 ACH Mean for Your Home?
- How to Seal the Mud Sill: The Critical Junction Between Concrete and Wood?
- The Soffit Mistake That Blows Heat Right Out of Your Attic Insulation?
- When Does a House Become “Too Tight” and Require Mechanical Ventilation?
- Why “Breathable” Insulation Saves Wood Frames from Rotting?
- Blower Door Test: Is It Worth $400 to Find Your Leaks?
- Why Putting All Insulation on the Outside is the Best Strategy for Canadian Homes?
Air Barrier vs. Vapor Barrier: What is the Difference and Where Do They Go?
Understanding the difference between an air barrier and a vapor barrier is fundamental to diagnosing moisture problems. They are not the same, and their incorrect placement is a primary source of building failure. An air barrier’s sole job is to stop air movement. Think of it as the windbreaker for your house. It can be made of many materials—house wrap, sealed drywall, or certain membranes—but its effectiveness depends on it being 100% continuous. A tiny hole can leak a surprising amount of air, carrying moisture with it.
A vapor barrier (or more accurately, a vapor retarder) is designed to stop or slow the diffusion of water vapor through a wall assembly. In cold Canadian climates, this is typically a polyethylene sheet placed on the warm-in-winter side of the insulation. Its purpose is to prevent warm, moist indoor air from reaching a cold surface inside the wall where it could condense and cause rot. The problem is, when you install a new window, you are punching a hole right through both of these critical layers.
Case Study: The Toronto Heritage Home Window Flaw
A classic case from Canadian Choice Windows and Doors highlights this perfectly. In a 1980s Ontario home, new airtight windows were installed. However, the installers failed to properly connect the new window frames to the home’s existing polyethylene vapor barrier. This created small, hidden gaps. Over the winter, warm, moist interior air was pushed into these gaps, condensing on the cold sheathing and leading to significant, hidden mold growth within the wall cavities. The issue only became apparent when the homeowner noticed a persistent musty odor, demonstrating how a window “upgrade” can expose flaws in the original building envelope.
Sealing these two layers to the new window frame is non-negotiable for a successful installation. The air barrier of the wall must connect to the air barrier of the window, and the vapor barrier must do the same. If this continuity is broken, you’ve created a hidden pathway for moisture and air, defeating the purpose of your high-performance windows.
Action Plan: Key Checks for Window-Vapor Barrier Integration
- Before installation, inspect the existing vapor barrier around the rough opening for any tears, gaps, or signs of deterioration.
- Ensure a continuous bead of acoustical sealant is applied between the new window frame and the existing vapor barrier for a complete air seal.
- Install a backer rod and apply a compatible, durable sealant at all junction points where the window meets the wall assembly.
- Use specialized, vapor-permeable tape to bridge any gaps between the window flange and the exterior house wrap or air barrier.
- Consider a post-installation blower door test to verify the continuity of the air barrier and pinpoint any remaining leakage points.
What Does a Blower Door Test Score of 3.5 ACH Mean for Your Home?
When an energy advisor performs a blower door test, the result is often given as “ACH@50Pa,” which stands for Air Changes per Hour at a pressure of 50 Pascals. This number quantifies your home’s leakiness. The fan pulls air out of your house, creating a pressure difference of 50 Pascals (equivalent to a 20 mph wind hitting all sides of the house at once). The machine then measures how much air flows through the fan to maintain that pressure. This airflow volume, divided by the house’s volume, gives the ACH@50 score.
So, what does a score of 3.5 ACH@50 actually mean? It means that under test conditions, the entire volume of air inside your house is replaced with outside air three and a half times every hour. For an older, unrenovated Canadian home, 3.5 would be a very good score, indicating a relatively tight structure. However, for a newly built home, it would be considered quite leaky. Modern building codes, like Step 3 of the BC Building Code, often require scores of 2.5 ACH or less. High-performance standards like Passive House demand an incredibly tight 0.6 ACH.
The score itself is a diagnostic. A high number points to significant energy loss and potential for moisture to be carried into your walls. A very low number, especially after installing new windows, is a red flag that your house may be “too tight” and unable to dilute indoor pollutants and moisture without mechanical assistance. The test pinpoints where the leaks are, allowing for targeted sealing.
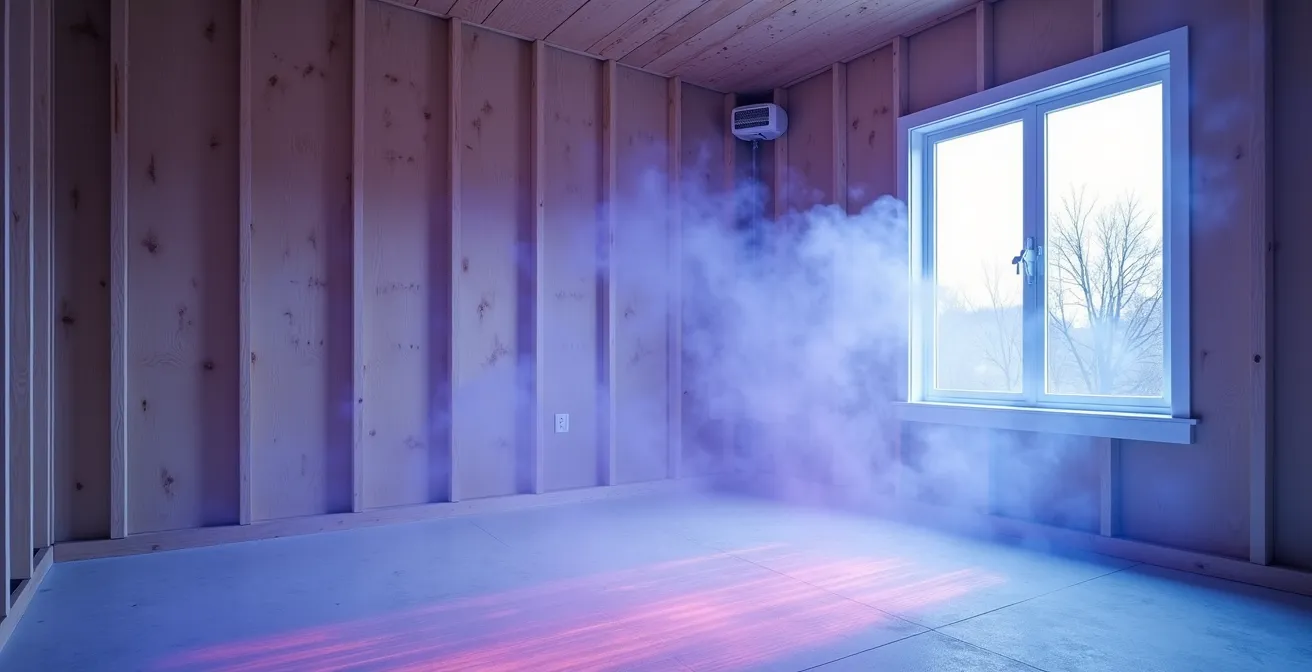
As the visualization shows, a blower door test combined with thermal imaging or a smoke pencil makes invisible air leaks visible. It transforms the abstract concept of “drafts” into a concrete map of where your home’s envelope is failing. These leaks are often concentrated at the top and bottom of the house—the attic hatch and the mud sill—not just at windows and doors.
How to Seal the Mud Sill: The Critical Junction Between Concrete and Wood?
Of all the hidden air leaks in a home, the joint between the concrete foundation and the wooden structure (the mud sill or sill plate) is often the largest. This single junction can account for a huge percentage of a home’s total air leakage. It’s a “superhighway” for cold air to enter your home, cool down your floors, and significantly increase your heating bills. From a building science perspective, sealing this area is one of the most effective retrofits you can perform.
The challenge is that this junction is inherently imperfect. Wood is never perfectly flat, and concrete is often rough. This creates a natural, continuous gap around the entire perimeter of your home. Over time, any original, low-quality sealant or foam gasket will compress and degrade, opening the gap even further. Cold winter air is then pulled in at the bottom of the house due to the stack effect (where warm air rises and exits at the top, creating negative pressure below), making your basement and main floor perpetually cold.
Properly sealing the mud sill is a multi-step process. First, the area must be thoroughly cleaned of dust and debris. For larger gaps (over 1/4 inch), closed-cell spray foam is the best solution, as it expands to fill every crack and serves as both an air and vapor barrier. For smaller gaps, a combination of compressible foam backer rod and a high-quality, flexible sealant like polyurethane is effective. In Canada, it’s critical to use a sealant rated for a wide temperature range (e.g., -40°C to +80°C) to ensure it doesn’t crack in the deep cold. This targeted air sealing is so effective that the Canada Greener Homes Grant offers up to $1,200 for homeowners who achieve specified air sealing targets, and the mud sill is a primary area of focus.
By sealing this critical foundation-to-frame connection, you are not just stopping drafts; you are fundamentally improving the performance of your entire house-as-a-system. You reduce the driving force of the stack effect, which in turn reduces air leakage at all other points in the building envelope, including around your newly installed windows.
The Soffit Mistake That Blows Heat Right Out of Your Attic Insulation?
You can have a thick blanket of R-60 insulation in your attic, but if it’s not protected from air movement, its effective R-value can be slashed to a fraction of its rating. This phenomenon is called “wind-washing,” and it’s a common and costly mistake in attic ventilation. It happens when cold outside air, entering through the soffit vents at the edge of your roof, is allowed to blow over or through your insulation instead of being properly channelled up towards the roof peak.
This bypasses the insulation entirely, essentially blowing heat right out of your home. It’s like wearing a thick wool sweater on a windy day without a windbreaker jacket—the wind cuts right through, and you get cold. In an attic, this not only wastes energy but also creates a major risk for moisture. When warm, moist air from the house leaks into the attic and hits the underside of the roof deck that has been super-cooled by wind-washing, it condenses instantly, leading to frost, rot, and mold.
The solution is simple but often poorly executed: attic baffles. These are rigid channels made of foam or plastic installed at the soffits. Their job is to maintain a clear, 2-inch air channel from the soffit vent up along the underside of the roof sheathing, ensuring air flows where it’s supposed to. Critically, these baffles must be sealed to the top plate of the exterior wall to prevent wind from getting underneath them and into the insulation. A properly installed baffle system protects the insulation and ensures a smooth, effective ventilation path from soffit to ridge.
Case Study: The Montreal Attic Wind-Washing Fix
Building Expert, a Canadian consulting firm, documented a project in Montreal where a home suffered from high heating costs and mold on the roof sheathing. A blower door test and thermal imaging revealed massive heat loss at the attic perimeter due to wind-washing where baffles were missing or improperly installed. After correcting the soffit ventilation by installing and sealing new baffles, the home’s measured heat loss was reduced by 35%, and the condensation-related mold was eliminated within a single winter season.
When Does a House Become “Too Tight” and Require Mechanical Ventilation?
The concept of a house being “too tight” can seem counterintuitive. After all, isn’t airtightness the goal of energy efficiency? The answer is yes, but only when it’s paired with intentional, controlled ventilation. A house becomes “too tight” when its natural air leakage rate is so low that it can no longer safely dilute indoor air pollutants and manage humidity generated by its occupants. Without a way out, contaminants like VOCs from furniture, particulates from cooking, and moisture from daily life build up, leading to poor indoor air quality and condensation problems.
Canadian building codes have established clear thresholds for this. For example, according to the Ontario Building Code, a house becomes officially “too tight” when its leakage rate drops below a certain level. While the exact number has evolved, a common benchmark is that homes with airtightness levels below 4.0 ACH@50 must have a mechanical ventilation system installed. For new construction, these systems are now mandatory, acknowledging that modern building practices create inherently tight envelopes.
The solution for a tight house is not to reintroduce random leaks but to install a Heat Recovery Ventilator (HRV) or an Energy Recovery Ventilator (ERV). These balanced systems continuously exhaust stale, polluted indoor air while supplying an equal amount of fresh, filtered outdoor air. The “recovery” part is key: in the winter, a core inside the unit transfers up to 80% of the heat from the outgoing stale air to the incoming fresh air, so you get fresh air without a major energy penalty. An ERV does the same thing but also transfers some moisture, which can be beneficial in overly dry or humid climates.
| Climate Zone | Winter Design Temp | Recommended System | Key Benefit |
|---|---|---|---|
| Zone 5 (Vancouver) | -5°C to -10°C | ERV preferred | Manages high humidity |
| Zone 6 (Toronto) | -15°C to -20°C | HRV or ERV | Balanced moisture control |
| Zone 7 (Edmonton) | -25°C to -30°C | HRV preferred | Maximum heat recovery |
| Zone 8 (Yellowknife) | Below -30°C | HRV required | Prevents frost buildup |
Choosing between an HRV and an ERV depends heavily on your specific Canadian climate, as shown in the table above. In the damp winters of Vancouver, an ERV can help by expelling excess humidity. In the dry, frigid cold of Edmonton or Yellowknife, a standard HRV is often preferred to maximize heat recovery and prevent excessive drying of the indoor air.
Why “Breathable” Insulation Saves Wood Frames from Rotting?
The term “breathable” can be misleading when it comes to insulation. It doesn’t mean the wall should be drafty. Instead, it refers to an insulation material’s ability to be vapor-permeable—allowing water vapor to pass through it. This property is crucial for the long-term health of wood-framed buildings, especially older ones, as it provides a drying potential for the wall assembly if it ever gets wet.
Moisture can get into walls in two main ways: from an exterior leak (like driving rain) or from an interior source (like vapor diffusion or air leakage carrying humidity). No matter how well a house is built, some moisture will eventually find its way in. The critical factor for durability is not just preventing moisture entry, but also allowing for its exit. If a wall can’t dry out, the trapped moisture will lead to rot and mold. This is where vapor-permeable, or “breathable,” insulation like mineral wool or cellulose shines. These materials resist air movement but allow water vapor to diffuse through them, letting the wall assembly dry either to the inside or the outside.
In contrast, using a vapor-impermeable insulation like closed-cell spray foam on the *interior* of an old brick or stone home in Canada can be a catastrophic mistake. The brick exterior is a moisture reservoir. If you block its ability to dry to the inside with impermeable foam, you trap moisture within the wall, leading to freeze-thaw damage in the masonry and rot in the wood structure. A successful retrofit on a historic home, like one documented by Mold Busters in Montreal, often involves using mineral wool insulation. This allowed the brick wall assembly to dry inward while still providing an excellent thermal and air barrier, preventing moisture accumulation and improving indoor air quality.
The choice of insulation must be systemic. It depends entirely on your climate, your wall assembly, and the location and condition of your air and vapor barriers. There is no single “best” insulation, only the “right” insulation for your specific system.
Blower Door Test: Is It Worth $400 to Find Your Leaks?
Spending $400-$500 on a test that doesn’t “fix” anything can seem like a hard sell. But viewing a blower door test as a mere expense is a mistake. It’s not a cost; it’s an investment in diagnostics. It is the single most important tool for understanding your home’s performance as a system. Without it, you are simply guessing where your energy is going and where your moisture risks are coming from. It’s the equivalent of a doctor ordering an X-ray before setting a broken bone.
The test provides three invaluable pieces of information. First, it gives you a quantifiable score of your home’s overall airtightness (the ACH@50 value). This number isn’t just for curiosity; in many parts of Canada, it’s a requirement for code compliance. For instance, the New Vancouver Building By-law requires homes to meet or exceed 2.5 ACH airtightness standards, which can only be verified with this test. Second, it allows the energy advisor to physically locate the leaks. By walking through the house with a smoke pencil or thermal camera while the fan is running, you can see exactly where the air is coming in—the hidden gaps you’d never find otherwise. Third, the results form the basis of a prioritized action plan, allowing you to spend your renovation budget on the fixes that will have the biggest impact.
The value is particularly high when done mid-construction. A case study of a British Columbia high-performance home showed it achieved an incredible 0.51 ACH at its mid-construction test. The builders used these results to fine-tune the air sealing around windows and service penetrations before the drywall went up, a fix that would have been impossible later. This proactive testing helped them avoid costly callbacks and potential moisture issues down the road.
| Building Standard | Maximum ACH@50Pa | Ventilation Requirement |
|---|---|---|
| Older Homes (pre-1970s) | 8-12 | Natural ventilation sufficient |
| BC Building Code Step 3 | 2.5 | HRV/ERV recommended |
| Net Zero Homes | 1.5 | HRV/ERV mandatory |
| Passive House | 0.6 | HRV/ERV with high efficiency mandatory |
As the table illustrates, achieving modern performance standards is impossible without measuring your progress. The blower door test is the measuring tape. For a few hundred dollars, it transforms your retrofit from a series of guesses into a data-driven strategy.
Key Takeaways
- Your house is an interconnected system; changing one part, like windows, affects the entire system’s balance of heat, air, and moisture.
- Airtightness is only half the solution. Without controlled mechanical ventilation (like an HRV/ERV), a tight house will trap moisture and pollutants.
- For Canadian climates, the most robust and durable solution is to move the thermal and air control layers to the exterior of the structure, keeping the building warm and dry.
Why Putting All Insulation on the Outside is the Best Strategy for Canadian Homes?
After exploring all the complex interactions inside a wall assembly—air barriers, vapor barriers, condensation points—a powerful, simplifying strategy emerges: move all the insulation to the exterior. This approach, known as an exterior insulation and finish system (EIFS) or simply “outsulation,” is widely considered by building scientists to be the most robust and effective way to build or retrofit a home in a cold climate like Canada’s.
The logic is simple and elegant. By wrapping the entire home in a continuous blanket of insulation, you move the primary condensation control layer outside of the structural components. The entire wood or steel frame of the house, including the sheathing, is kept warm and dry, well above the dew point temperature of the indoor air. This virtually eliminates the risk of condensation and mold growth within the wall cavities. It creates a perfect “storage” wall, where the structure is protected inside the thermal envelope.
This strategy also solves the problem of thermal bridging. In a traditionally insulated wall, every stud is a thermal bridge—a pathway for heat to bypass the insulation, reducing the wall’s overall performance. With exterior insulation, this continuous layer covers all structural elements, leading to a much higher effective R-value and a more comfortable interior with no cold spots. This is so effective that retrofitting exterior insulation is a key measure supported by government incentives. For instance, Natural Resources Canada offers significant grants towards the cost of these projects, often in the thousands of dollars, as part of a whole-home retrofit plan.
While installing exterior insulation is a major undertaking, often done when replacing siding and windows, it represents the ultimate systemic fix. It simplifies moisture management, maximizes thermal performance, and dramatically increases the durability of the structure. It stops treating the symptoms of a poorly performing wall and instead cures the underlying disease by fundamentally changing the physics of the assembly.
Your home’s health depends on a holistic approach. Instead of piecemeal fixes, the next logical step is to get a complete diagnosis. To create a data-driven plan for your home’s unique needs, consider engaging a certified energy advisor to perform a comprehensive home energy evaluation.