The highest real-world R-value in thin 2×4 walls comes from an engineered hybrid system, not just from choosing the single material with the highest nominal rating.
- Closed-cell spray foam offers the best R-value per inch combined with a crucial air and vapour barrier.
- Hybrid approaches like “flash-and-batt” or adding exterior rigid foam provide the most optimized balance of cost, performance, and moisture control.
Recommendation: To truly maximize warmth in an older Canadian home, stop focusing on the insulation material in isolation and start optimizing the entire wall assembly to defeat thermal bridging and air leakage.
For owners of older Canadian homes, the charm of 2×4 framing often comes with the harsh reality of high heating bills and drafty rooms. The challenge is clear: how do you add modern thermal performance into wall cavities that are only 3.5 inches deep without sacrificing precious interior floor space? The immediate answer seems to be finding the insulation with the highest possible R-value per inch. Materials like closed-cell spray foam and certain rigid foam boards are frequently cited as the top performers.
However, this focus on a single metric—the nominal R-value of a material—is a critical oversimplification. It overlooks the performance of the wall as a complete system. In the cold, unforgiving climate of Canada, factors like air leakage, thermal bridging through wood studs, and even the outdoor temperature itself can drastically reduce the “on-the-box” R-value to a much lower, less effective reality. True thermal optimization isn’t about picking a single champion material; it’s about smart engineering.
The key is to shift perspective from simply filling a cavity to designing a high-performance wall assembly. This involves understanding how different materials work together, how to create a perfect air and vapour seal, and how to mitigate the heat-sapping effects of the building’s structure. This approach recognizes that the insulation is just one part of a system that must work in concert to keep your home warm and durable.
This guide will deconstruct the common myths around R-value and provide an optimization framework for your 2×4 walls. We will explore why some top-rated materials underperform in the cold, how to properly calculate your needs, and why layered, hybrid systems consistently deliver the best results. We’ll examine the cost-benefit of different strategies and tackle the practical problems that arise when you transform an old wall into a modern thermal shield.
Summary: Optimizing Insulation in Constrained Wall Assemblies
- Why Does Nominal R-Value Drop When Temperatures Hit -20°C?
- How to Calculate the Exact R-Value Needed for a Cathedral Ceiling in Zone 6?
- Flash-and-Batt: How Combining Foam and Wool Boosts Wall Performance?
- Is Upgrading from R-40 to R-60 in the Attic Worth the $2,000 Cost?
- When Does Fiberglass Settling Reduce Your R-Value by 50%?
- Nominal vs. Effective R-Value: Why R-20 Batts Don’t Meet R-20 Code?
- The Window Jamb Problem: How to Handle Extra Thickness from Rigid Foam?
- Why Layering Batt and Foam Insulation Beats Single-Material Walls?
Why Does Nominal R-Value Drop When Temperatures Hit -20°C?
One of the most critical factors for Canadian homeowners to understand is that not all insulation performs as advertised in extreme cold. Polyisocyanurate (polyiso) rigid foam, often praised for its high nominal R-value of R-6.5 per inch, is a prime example. This impressive rating is typically measured at a room temperature of 24°C (75°F). However, as temperatures plummet, its performance can degrade significantly.
This phenomenon is known as thermal drift or derating. The blowing agents used to create the closed cells in polyiso can condense at low temperatures, which reduces the foam’s ability to resist heat flow. In the depths of a Canadian winter, this is a major problem. Research shows that in cold climates, Poly ISO’s thermal resistance plummets by 23% to R-5 or even lower. This means the R-26 you thought you were getting from four inches of polyiso might actually be performing closer to R-20 when you need it most.
In contrast, materials like Extruded Polystyrene (XPS), Graphite Polystyrene (GPS), and closed-cell spray polyurethane foam (ccSPF) maintain a much more stable R-value across a wide range of temperatures. For an optimization-focused consultant, this is a non-negotiable detail. Choosing an insulation based on its warm-weather performance is a fundamental error in a cold climate. The stability of the R-value at your local winter design temperature is a far more important metric than its nominal rating.
How to Calculate the Exact R-Value Needed for a Cathedral Ceiling in Zone 6?
Calculating the required R-value for a specific application like a cathedral ceiling in a cold region (e.g., Climate Zone 6 in Canada) goes beyond simply meeting code minimums. It requires a systems-based approach, especially when dealing with the limited depth of rafters. The goal is to create a compact, yet highly effective, assembly that controls heat loss, air movement, and moisture.
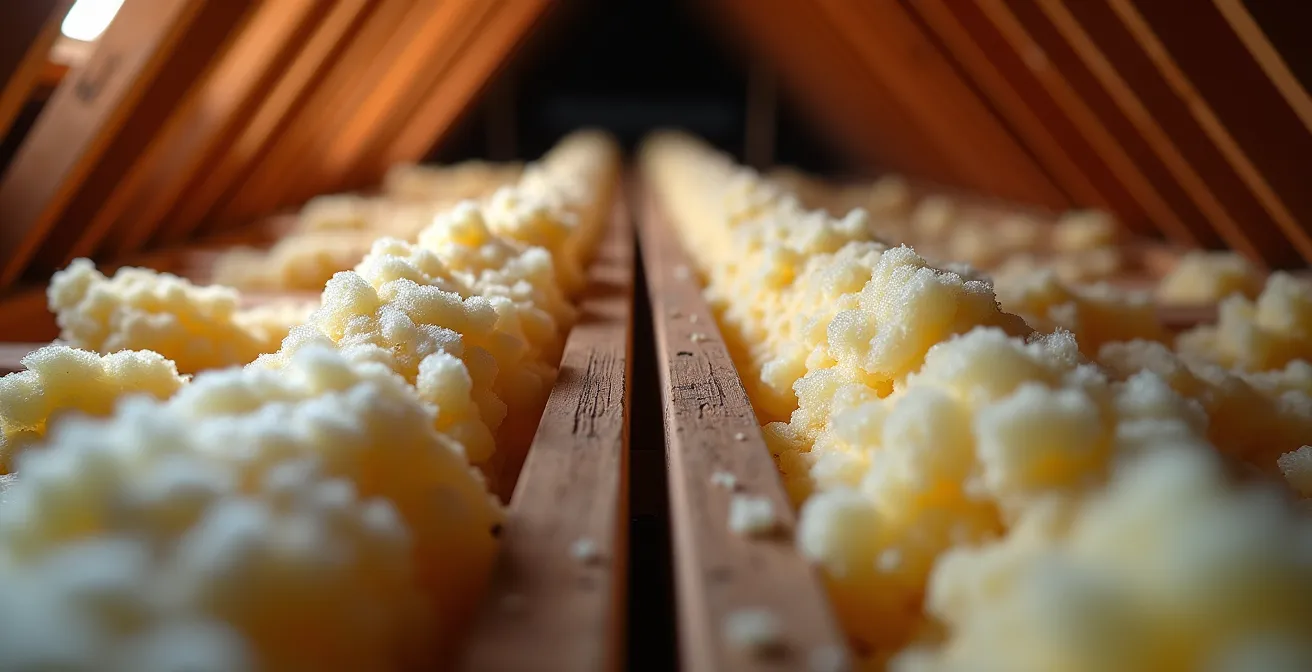
A cathedral ceiling is particularly vulnerable because it acts as both a ceiling and a roof, with significant potential for heat loss through convection and conduction. Simply filling the rafter bays with a single material is often insufficient. A high-performance strategy, like the “flash-and-batt” method, is required to achieve high R-values (like R-60) in a constrained space. This involves applying a layer of closed-cell spray foam directly against the roof sheathing to act as an air and vapour barrier, followed by filling the rest of the cavity with a fibrous insulation like mineral wool.
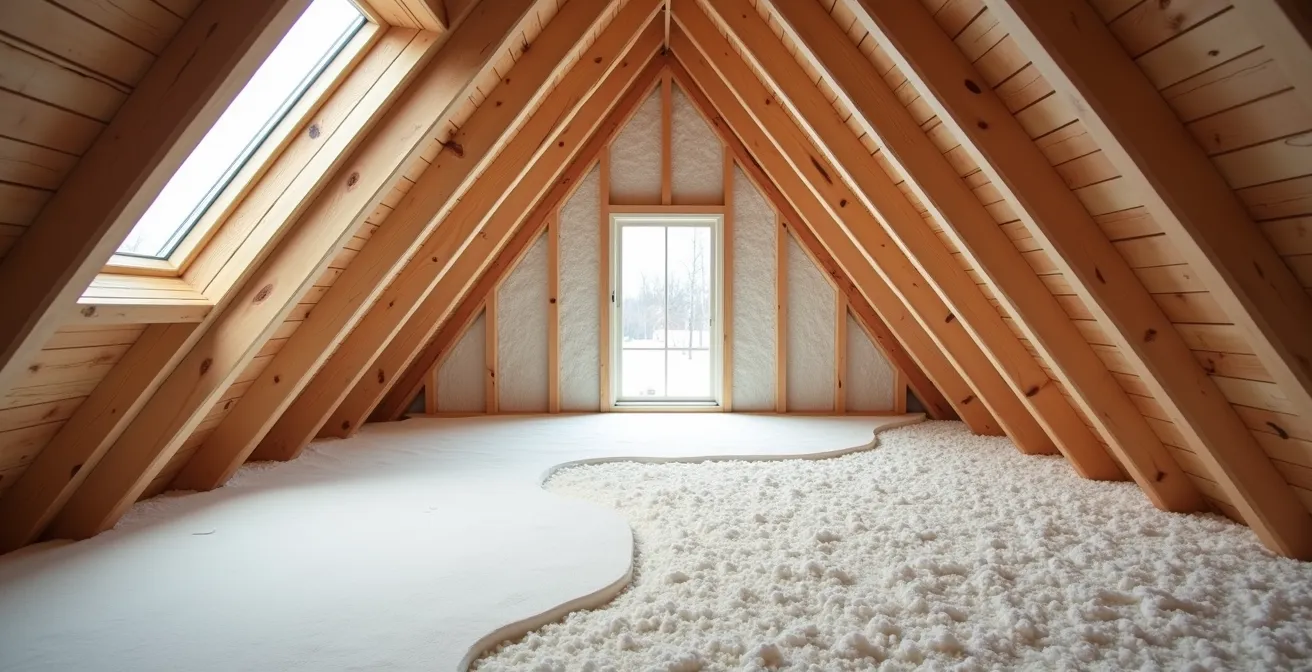
As the cross-section illustrates, this layered approach is more than the sum of its parts. The spray foam provides a high R-value per inch and, crucially, creates a monolithic air seal, preventing heat loss from air leakage. The mineral wool then adds significant R-value in a cost-effective manner. However, you must also account for the thermal bridging through the wood rafters, which reduces the overall effective R-value of the assembly. A true calculation involves determining the area-weighted average R-value of the insulated cavities and the framing members.
Your Action Plan: Achieving R-60 in Thin Cathedral Ceilings
- Determine Resistance: First, determine the insulation’s resistance to heat flow, measured in imperial R-value or metric RSI. The higher the value, the better the material resists heat transfer.
- Apply Flash Layer: Apply a “flash” layer of 3 inches of closed-cell spray foam (providing R-18 to R-21) directly against the underside of the roof deck.
- Add Batt Layer: Fill the remaining cavity space with high-density mineral wool batts to add the bulk of the insulation value (e.g., R-39 to R-42).
- Ensure Control Layers: Verify you have a continuous air barrier (provided by the foam) and an appropriate vapour control layer for your climate zone.
- Calculate Effective R-Value: Finally, calculate the true effective R-value of the entire assembly, accounting for the reduced R-value at the wooden rafters (thermal bridging).
Flash-and-Batt: How Combining Foam and Wool Boosts Wall Performance?
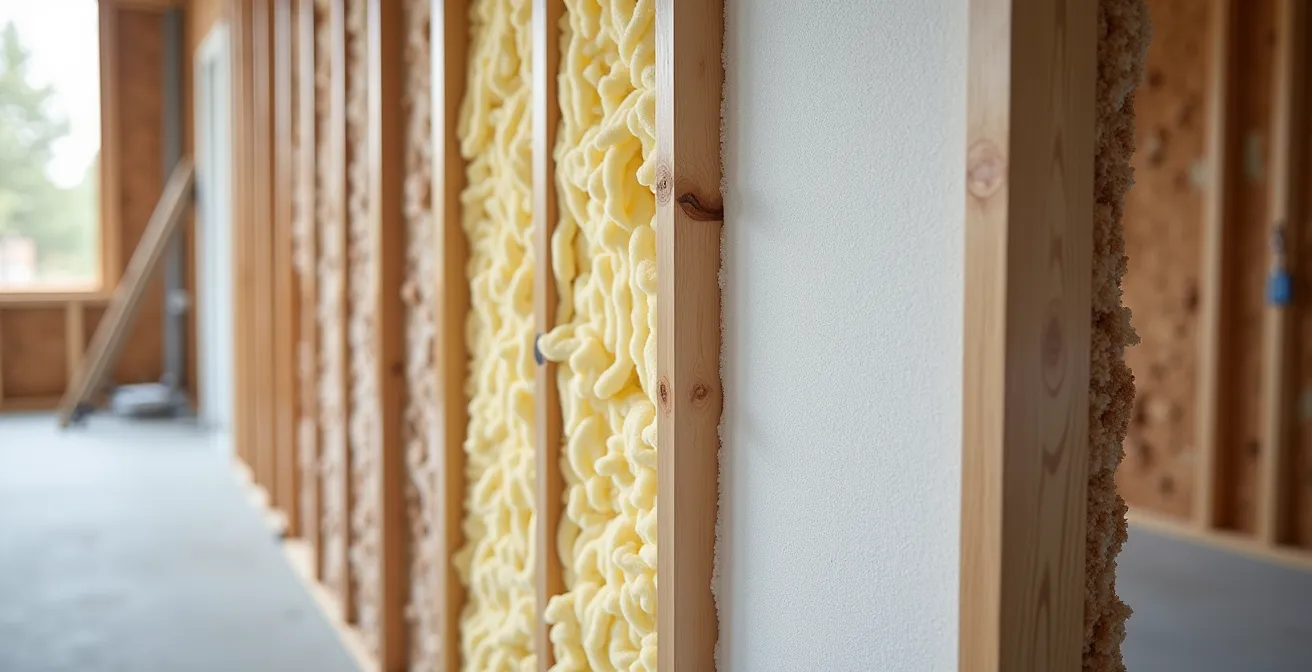
The “flash-and-batt” system is a hybrid insulation strategy that offers one of the best performance-to-cost ratios for retrofitting 2×4 walls. It combines the premium performance of spray foam with the cost-effectiveness of batt insulation (like mineral wool or fiberglass). The process involves applying a thin layer, or “flash,” of closed-cell spray foam (typically 1-2 inches) against the exterior sheathing inside the stud bay. The rest of the cavity is then filled with traditional batt insulation.
This combination is far superior to using batt insulation alone for several reasons. The spray foam layer creates a perfect air and vapour barrier. This is critical in an old house, where countless tiny cracks and gaps allow for massive energy loss through air leakage. The foam seals these imperfections, stopping drafts at their source. It also controls vapour drive, preventing moisture from entering the wall cavity from the warm interior and condensing on the cold sheathing—a major cause of rot and mould.
From an optimization standpoint, this system allows you to allocate your budget wisely. You use the more expensive, high-performance spray foam precisely where it delivers the most value: creating that critical air/vapour seal and providing a high initial R-value. You then use the less expensive batt insulation to fill the remaining space and achieve your total R-value target. This hybrid approach delivers performance that is very close to a full foam-filled wall but at a significantly lower cost.
This table outlines the trade-offs between common insulation systems, highlighting why the hybrid flash-and-batt method is often the sweet spot for retrofits.
| Insulation System | R-Value per inch | Cost per sq ft | Moisture Control | Installation Complexity |
|---|---|---|---|---|
| Full Spray Foam | R-6 to R-7 | High ($3-5) | Excellent | Professional required |
| Flash-and-Batt | R-4.5 to R-5 | Medium ($2-3) | Very Good | Professional + DIY possible |
| Batt Only | R-3.5 | Low ($1-2) | Poor | DIY friendly |
Is Upgrading from R-40 to R-60 in the Attic Worth the $2,000 Cost?
When considering an insulation upgrade, especially in an accessible area like an attic, homeowners often face the law of diminishing returns. Is it worth the extra cost to go from a “good” level of insulation (like R-40) to the current building code standard for new homes in many parts of Canada (R-60)? From a pure physics standpoint, each additional R-value point saves less energy than the one before it. However, in the context of Canadian winters and government incentives, the calculation becomes more compelling.
Let’s analyze a hypothetical $2,000 cost to top up attic insulation from R-40 to R-60. First, this cost can be significantly offset by government programs. For instance, funding is available through the Canada Greener Homes Grant program that can cover up to $1,800 for attic insulation upgrades. This immediately reduces the homeowner’s out-of-pocket expense to just a few hundred dollars in this scenario.
Second, the energy savings are tangible and ongoing. According to Natural Resources Canada, on average, a household participating in the Greener Homes Initiative saves $386 on energy costs every year. While this figure covers various retrofits, a significant portion is attributable to improved insulation. With the grant support, the payback period for an attic upgrade in a cold climate zone can be as short as 3-5 years. After that, the savings continue for the life of the home. Therefore, while the raw R-value gain seems incremental, the financial case, supported by Canadian federal grants, is exceptionally strong. It transforms the upgrade from a simple cost into a short-term, high-return investment.
When Does Fiberglass Settling Reduce Your R-Value by 50%?
Fiberglass batt insulation is one of the most common and affordable insulation materials. However, its real-world performance is highly dependent on proper installation, and it has a significant vulnerability over time: settling. When fiberglass batts are installed vertically in wall cavities, they can slowly compact and settle downwards due to gravity and vibrations within the building structure. This creates an uninsulated gap at the top of the wall cavity.
This gap, even if it’s only a few inches high, can lead to a catastrophic loss of performance. Heat doesn’t just conduct through materials; it also moves via convection. The air within the wall cavity will begin to circulate, with warm air rising and cooling against the cold exterior sheathing in the uninsulated gap. This cold, dense air then falls, creating a “convective loop” that effectively bypasses the insulation in the lower part of the bay. This single flaw can reduce the effective R-value of the entire wall section by as much as 50%. You may have an R-13 batt that is now performing at an effective R-6 or R-7.
Detecting this problem requires a careful inspection. Signs include visible gaps at the top of wall cavities when viewed from the attic, or the presence of ice dams on the roof in winter, which indicate significant heat loss at the top of the walls. In contrast, materials like mineral wool batts are much denser and are installed as a friction-fit, making them highly resistant to settling. Closed-cell spray foam, being a rigid and fully adhered product, does not settle at all. This highlights a key optimization principle: long-term performance stability is just as important as the initial R-value.
Nominal vs. Effective R-Value: Why R-20 Batts Don’t Meet R-20 Code?
The single most important concept in optimizing a wall assembly is the difference between nominal and effective R-value. Nominal R-value is the laboratory-tested thermal resistance of the insulation material itself, printed on the packaging. Effective R-value is the actual, real-world thermal performance of the entire wall assembly, including the insulation, studs, sheathing, and air films.
The primary culprit for the discrepancy between these two values is thermal bridging. In a standard 2×4 wall, the wood studs typically make up about 25% of the wall area. Wood has a much lower R-value (around R-1.2 per inch) than insulation. Heat will always follow the path of least resistance, meaning it bypasses the high-R insulation and flows directly through the wood studs. This effect significantly degrades the overall performance of the wall.
Because of this, an R-20 batt installed perfectly in a 2×6 wood-framed wall does not create an R-20 wall. Due to the thermal bridging of the studs, the effective R-value of that wall assembly might only be R-15. This is a staggering 25% reduction in effective R-value due to wood studs, a fact recognized by Canadian building codes. This is why codes are increasingly specifying effective R-values or requiring a layer of continuous exterior insulation to break the thermal bridge. For example, the evolution of the Ontario Building Code, which now requires R-60 in attics for new homes, demonstrates this shift in focus from what’s inside the cavity to how the entire system performs.
The Window Jamb Problem: How to Handle Extra Thickness from Rigid Foam?
A superior strategy for maximizing R-value in thin 2×4 walls involves adding a continuous layer of rigid foam insulation to the *exterior* of the sheathing. This breaks the thermal bridge of the studs and dramatically increases the wall’s effective R-value. However, this high-performance solution creates a new, practical challenge: it makes the walls thicker. This new thickness must be accounted for everywhere, but it becomes particularly complex around windows and doors.
When you add 2-4 inches of exterior foam, your window frames are now recessed deep inside the wall assembly. You can’t simply attach trim to bridge this gap; you need to properly extend the window jamb to meet the new exterior plane. This detail is critical for both aesthetics and, more importantly, for maintaining a continuous air and water control layer. A poorly executed jamb extension will leak air and water, completely undermining the benefits of the expensive exterior insulation.
Solving this “window jamb problem” requires professional techniques. The solution is to build or install a jamb extension or an insulated window buck that is structurally sound and can be perfectly integrated with the home’s weather-resistive barrier. This involves:
- Installing custom-built wood or composite jamb extensions to precisely match the new wall depth.
- Using pre-fabricated, thermally-broken window buck systems that provide an insulated and solid attachment point.
- Applying sequential layers of high-quality flashing tape (like Blueskin or Siga) to ensure a completely waterproof and airtight seal from the window frame, over the buck, and onto the wall’s weather barrier.
- Ensuring the sill extension has a proper slope to drain water away from the opening.
This is not a detail to overlook. It requires careful planning and coordination, often with Canadian suppliers who specialize in high-performance building components.
Key Takeaways
- True thermal performance comes from the “Effective R-Value” of the entire wall system, not the “Nominal R-Value” of the insulation alone.
- Hybrid systems like “flash-and-batt” or adding exterior rigid foam offer the best balance of cost, high R-value, and crucial air/moisture control for thin 2×4 walls.
- In Canada, material choice must account for cold-weather performance, as some insulations (like polyiso) lose significant R-value at low temperatures.
Why Layering Batt and Foam Insulation Beats Single-Material Walls?
After analyzing the pitfalls of nominal R-values, thermal bridging, and material degradation, the optimal strategy for thin 2×4 walls becomes clear. A layered, multi-material approach consistently outperforms any single-material solution. By combining the strengths of different insulation types, you can engineer a wall assembly that is not only highly insulated but also airtight, moisture-resistant, and cost-effective. This is the core principle of building science optimization.
Whether it’s a flash-and-batt system on the interior or adding continuous rigid foam on the exterior, the strategy is the same: use foam for what it does best, and use batt insulation for what it does best. Foam (spray or rigid) provides a high R-value per inch and, most critically, a robust air and vapour control layer. Fibrous batt insulation (like mineral wool) provides a very cost-effective way to add a large amount of R-value to the assembly. As the expert team at BuildwithHalo highlights when explaining the benefits of adding a foam board layer:
Optimized R-Value: A foam board layer enhances the thermal resistance of batt insulation. Thermal Bridging Mitigation: Foam board’s continuous layer dramatically reduces thermal bridges. Moisture Control: Foam board can act as a thermal break, minimizing internal condensation risks
– BuildwithHalo, Foam Board vs. Batt Insulation Guide
The performance data speaks for itself. A standard 2×6 wall with R-22 batts might only have an effective R-value of R-15. By adding two inches of R-10 exterior foam, you not only add R-10 but also mitigate the thermal bridging, raising the effective R-value to R-25—a massive improvement for a moderate cost increase and a much faster return on investment than a full foam solution.
This comparative data shows the superior return on investment for a layered system in a Canadian market like Toronto.
| Wall Assembly | Effective R-Value | Cost per sq ft (Toronto) | Thermal Bridge Mitigation | ROI Period |
|---|---|---|---|---|
| 2×6 with R-22 batts only | R-15 | $2.50 | None | Baseline |
| 2×6 with R-40 spray foam | R-38 | $8.00 | Excellent | 12-15 years |
| 2×6 R-22 batts + 2″ R-10 exterior foam | R-25 | $4.50 | Very Good | 5-7 years |
Ultimately, insulating an older home is an investment in comfort, durability, and long-term energy savings. By applying these system-based principles, you can ensure your project delivers the maximum possible performance for every dollar spent. To apply these concepts to your specific situation, the next logical step is to get a detailed energy audit to identify the most critical areas for improvement.