The highest return on investment for Canadian siding projects comes not from the material itself, but from mastering the complete building envelope system.
- Proper insulation and moisture management (rainscreen) offer greater long-term value than simply choosing a premium material.
- Installation details, like pest-proof starter strips and climate-engineered material choices, directly protect your home’s asset value.
Recommendation: Prioritize your budget on the ‘unseen’ system—thicker exterior insulation and a vertical strapping rainscreen—before finalizing your aesthetic cladding.
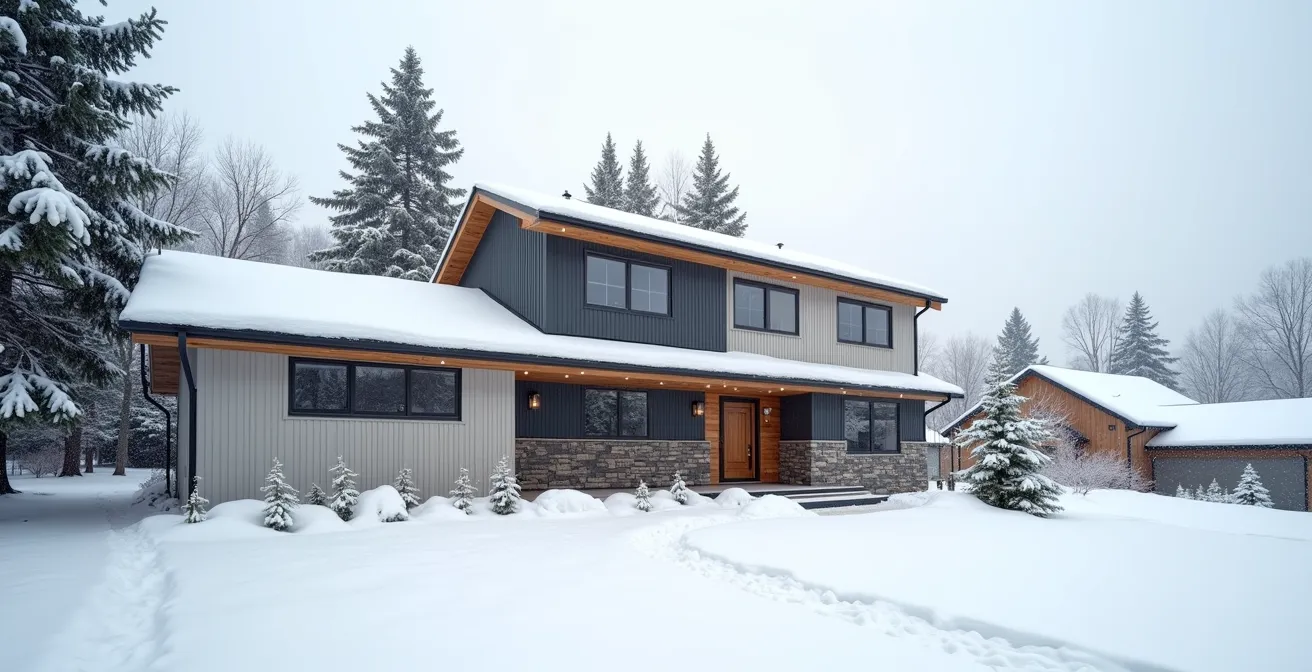
For Canadian homeowners, a façade renovation is one of the most significant investments you can make, profoundly impacting both curb appeal and resale value. The conversation often begins and ends with a simple question: vinyl, engineered wood, or fiber cement? While this choice is important, it’s only the visible tip of the iceberg. The market is filled with advice focusing on colour palettes and upfront costs, overlooking the critical systems hidden beneath the surface that truly drive long-term financial return and durability in a demanding climate.
Many homeowners fixate on the material, assuming a higher-priced product automatically guarantees better performance. This leads to costly mistakes, like installing premium siding over an under-insulated or poorly protected wall. The real secret to a successful siding project—one that pays dividends for decades—lies in a more holistic approach. It’s about understanding the science of the building envelope, from thermal resistance to moisture-wicking and pest prevention.
But what if the key to maximizing your ROI wasn’t just choosing the right board, but engineering the right wall assembly behind it? This guide moves beyond the surface-level debate. We will dissect the technical decisions that truly define a high-performance exterior in Canada. We’ll explore the practical limits of insulation, the non-negotiable role of moisture management, and the specific material science that allows certain products to endure punishing 40°C temperature swings. Prepare to think like a building scientist to make the best financial decision for your home.
This article provides a comprehensive look at the critical components of a modern siding system. The following sections will guide you through the technical considerations and strategic decisions needed to ensure your investment is beautiful, durable, and financially sound.
Summary: Maximizing Your Home’s Siding Investment in Canada
- How Much Rigid Foam Can You Fit Under New Siding Without Extending the Roof?
- Why Vertical Strapping is Crucial for Long-Lasting Siding?
- CanExel vs. Hardie Board: Which Stands Up Better to Canadian Winters?
- The Starter Strip Mistake That Lets Mice Under Your New Siding?
- Vinyl vs. Engineered Wood: Which Siding Survives 40°C Swings Better?
- XPS vs. EPS vs. Polyiso: Which Board Belongs Under Your Siding?
- When to Book a Siding Crew: Why Spring Slots Fill Up by January?
- How Prefabricated Panels Can Reclad a Building in 2 Weeks?
How Much Rigid Foam Can You Fit Under New Siding Without Extending the Roof?
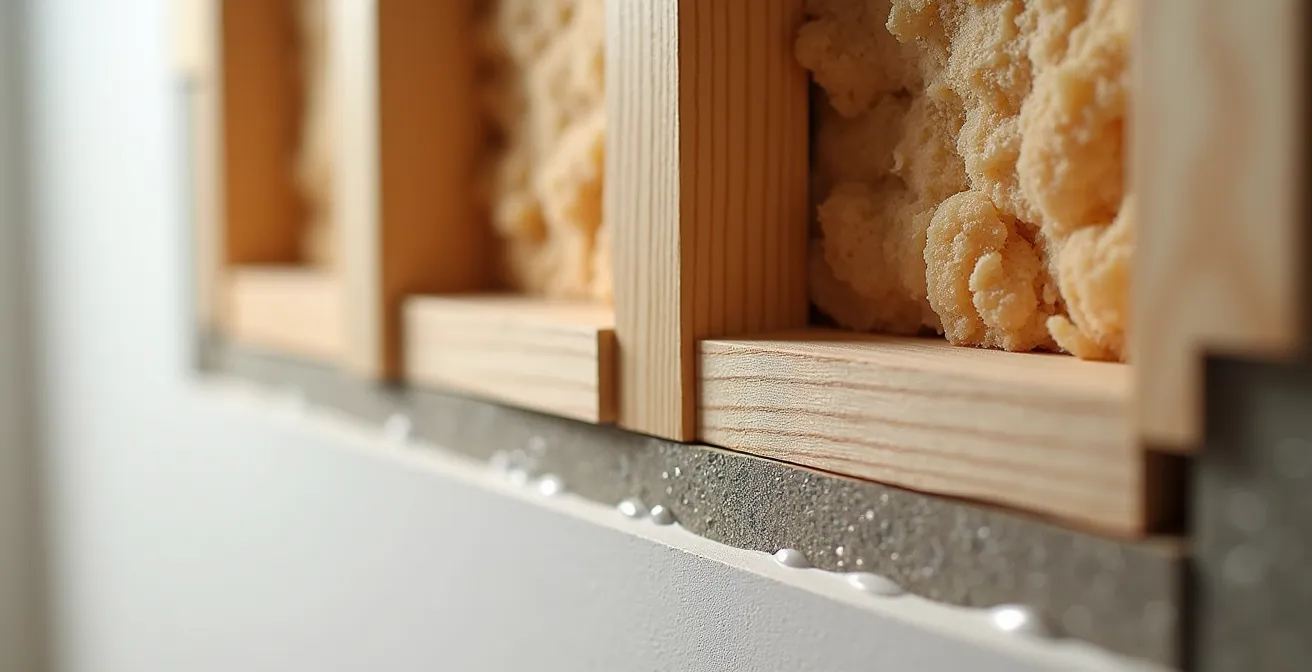
One of the greatest financial benefits of a siding renovation is the opportunity to add exterior insulation, drastically improving your home’s energy efficiency. However, a common physical constraint is the roof overhang. Adding too much thickness to the walls can leave windows and doors looking recessed and, more critically, push the siding past the protective drip edge of the roofline, exposing the wall assembly to water infiltration. For most homes, a maximum of 2 to 4 inches of rigid foam is the practical limit before costly roofline extensions become necessary.
This thickness directly translates to thermal performance, measured in R-value. While specific requirements vary by region, many Canadian building codes and energy programs suggest targets of R-20 to R-30 for walls to achieve significant energy savings. Understanding the R-value per inch of different insulation types is therefore crucial for maximizing performance within your spatial constraints. This decision is fundamental to the entire building envelope system.
The following table breaks down the performance of common rigid foam insulations, helping you calculate the maximum R-value achievable within your home’s structural limits.
| Insulation Type | R-Value per Inch | Typical Application |
|---|---|---|
| XPS (Extruded Polystyrene) | R-5 | Consistent in cold climates |
| Polyiso | R-6 to R-8 | Degrades in severe cold |
| Closed-cell spray foam | R-6 to R-8 | Ideal where space is limited |
Ultimately, the goal is to add as much R-value as possible without compromising the weather-proofing function of your roof and window flashing. A detailed assessment by your contractor is essential to determine the precise maximum thickness for your specific property, balancing thermal goals with structural integrity.
Why Vertical Strapping is Crucial for Long-Lasting Siding?
While insulation manages heat, vertical strapping manages moisture—the single biggest threat to the longevity of your home’s structure. Strapping (or “furring”) consists of thin strips of wood or metal installed vertically over the weather-resistant barrier, creating a small air gap between the insulation and the back of the siding. This simple feature, known as a rainscreen system, is arguably the most important element for durability in Canada’s wet and varied climates.
This air cavity serves two critical functions. First, it provides a drainage plane for any wind-driven rain that penetrates the siding, allowing it to safely exit at the bottom of the wall instead of being trapped. Second, it promotes convective drying, allowing the entire wall assembly to breathe and dry out. This prevents moisture buildup, which can lead to rot, mold, and premature paint failure, especially in regions with punishing freeze-thaw cycles.
In fact, the performance of this system is so critical that in high-precipitation regions like coastal British Columbia, a rainscreen cavity is a mandatory part of the building code. According to Natural Resources Canada, this gap is essential for managing moisture and allowing the wall assembly to dry. Skipping this step to save a small amount on labour and materials is a false economy that puts the entire investment at risk.
CanExel vs. Hardie Board: Which Stands Up Better to Canadian Winters?
When it comes to premium siding, engineered wood (like Maibec CanExel) and fiber cement (like James Hardie) are top contenders. Both offer superior aesthetics to vinyl, but their performance in the face of Canadian winters is where the real comparison lies. The key factor is how they handle moisture and extreme temperature fluctuations.
James Hardie has invested heavily in climate-specific engineering. Their HZ5 product line is specifically formulated to resist damage from freezing temperatures, snow, and ice. The material is dimensionally stable, meaning it won’t crack or warp during rapid freeze-thaw cycles. An analysis by distributors confirms that the James Hardie HZ5 product line is specifically designed for the extreme seasonal variations found across Canada, giving homeowners peace of mind regarding its structural integrity.
CanExel, an engineered wood product, takes a different but equally rigorous approach. It relies on a highly durable, baked-on finish to protect the wood composite core from the elements. This multi-layer finish is designed to resist cracking and peeling even in extreme cold. As the manufacturer, Maibec, highlights, the product’s resilience is a result of extensive testing.
CanExel undergoes rigorous paint and substrate testing with prolonged exposure to UV rays, freezing cold and intense heat to ensure it can stand up to extreme outdoor climates
– Maibec, Maibec CanExel Product Information
The choice often comes down to aesthetic preference and installer familiarity. Fiber cement is heavier and requires specialized tools for cutting, while engineered wood offers a deep, rich wood-grain texture. Both are excellent, durable choices, but their long-term performance is entirely dependent on a proper installation that includes the rainscreen system discussed previously.
The Starter Strip Mistake That Lets Mice Under Your New Siding?
After investing thousands in a beautiful new façade, the last thing any homeowner wants is to discover that their home has become a haven for pests. A common and costly installation error involves the starter strip—the very first piece installed at the base of the wall. When installed improperly or when the wrong type is used, it can create a perfect, sheltered entry point for mice and insects to get behind the siding and into your wall cavities.
The starter strip’s job is to lock in the first course of siding and set a straight line. However, in rural and suburban areas across Canada, it must also serve as a pest barrier. Standard starter strips can leave a gap between the strip and the foundation. To prevent intrusion, a perforated metal starter strip or a dedicated pest screen should be used. These components allow for drainage but are designed with openings too small for rodents to pass through, typically under 6mm. Furthermore, any gaps between the foundation and the strip must be meticulously sealed with caulking.
Overlooking this small detail can lead to significant future costs, including pest removal services and repair of damaged insulation and wiring. It is a critical point of installation integrity that distinguishes a professional, long-lasting job from a subpar one. Ensuring your contractor understands and uses these pest-control measures is essential for protecting your investment.
Checklist for a Pest-Proof Starter Strip Installation
- Verify perforated metal starter strips are being installed at the base of all exterior walls.
- In rural or heavily wooded areas, confirm if a dedicated, secondary pest screen is being used for added protection.
- Inspect the connection between the starter strip and the foundation, ensuring all gaps are sealed with high-quality, exterior-grade caulking.
- Confirm there are no visible openings larger than 6mm (1/4 inch) that could permit rodent entry.
- Check that the starter strip is securely fastened and perfectly level to ensure the first course of siding locks in correctly without creating unintended gaps.
This checklist is a powerful tool to use during a pre-installation walkthrough with your contractor, ensuring the foundation of your siding system is secure from the ground up.
Vinyl vs. Engineered Wood: Which Siding Survives 40°C Swings Better?
The Canadian climate is defined by extremes, with many regions experiencing temperature swings of 40°C or more between summer highs and winter lows. This massive thermal expansion and contraction puts incredible stress on siding materials. While vinyl is often chosen for its affordability, its performance in these conditions can be a concern, whereas engineered wood is specifically designed for stability.
Standard vinyl siding has a high coefficient of thermal expansion. In extreme cold, it can become brittle and susceptible to cracking from impact (like from a misplaced shovel or severe hail). In intense summer heat, it can soften and warp if not installed with enough room to expand, leading to a wavy, buckled appearance. However, modern, high-quality vinyl has improved, and in some climates, it’s preferred. As one homeowner from the Prairies notes, its flexibility can be an asset:
Vinyl is the material of choice on the Prairies because of the severe hail storms we get. Aluminum dented all to hell. Vinyl doesn’t. Wood siding is a definite no no because of expansion and contraction and the dry climate sucks the moisture out of the wood causing a ton of shrinkage.
– Prairie homeowner, Canadian Woodworking & Home Improvement Forum
Engineered wood, such as CanExel, is constructed by compressing wood fibres with wax and resin under intense heat and pressure. This process creates an incredibly dense and dimensionally stable board that expands and contracts far less than both vinyl and traditional wood. This stability prevents gapping in the cold and buckling in the heat, maintaining a pristine look for decades. In fact, it’s not uncommon for these products to last over a generation, with some homeowners reporting their CanExel siding has lasted for more than 32 years in the Canadian climate.
For homeowners prioritizing long-term aesthetic stability and durability against thermal cycling, engineered wood often provides a superior return on investment, despite its higher initial cost. It maintains its integrity and appearance, directly contributing to sustained curb appeal and resale value.
XPS vs. EPS vs. Polyiso: Which Board Belongs Under Your Siding?
Once you’ve determined the maximum thickness for your exterior insulation, the next crucial decision is selecting the right *type* of rigid foam. The three main contenders—Extruded Polystyrene (XPS), Expanded Polystyrene (EPS), and Polyisocyanurate (Polyiso)—are not interchangeable, especially in the cold Canadian climate. Their performance, particularly their ability to maintain R-value as temperatures drop, varies significantly.
Polyiso boasts the highest R-value per inch in lab conditions (R-6 to R-8), making it seem like the best choice for thin wall assemblies. However, its crucial weakness is that the thermal performance of Polyisocyanurate degrades significantly in severe cold. For a Canadian winter, this means you might not be getting the thermal protection you paid for when you need it most. EPS is a lower-cost option but is more permeable to moisture and has a lower R-value per inch (around R-4).
This is where XPS (the familiar pink, blue, or green board) often shines for exterior insulation projects in Canada. It offers a consistent and reliable R-5 per inch that holds up well in cold temperatures. Its closed-cell structure also makes it semi-impermeable, providing an excellent balance of thermal resistance and moisture management. As one analysis of building materials for Prairie winters concluded, XPS’s reliable performance in severe cold and its ability to prevent interstitial condensation make it a more suitable and dependable choice for “outsulation” projects under National Building Code of Canada (NBCC) principles.
Choosing XPS means you are installing a predictable and stable layer of insulation that will perform as expected during the coldest months, ensuring a better long-term return on your energy-saving investment. It is the workhorse of the building envelope system for cold-climate construction.
Key Takeaways
- Siding ROI is driven by the entire wall system (insulation, rainscreen, installation), not just the visible material.
- A vertically strapped rainscreen is non-negotiable for long-term durability and moisture management in Canadian climates.
- Material choice should be based on climate-specific engineering (e.g., Hardie HZ5, CanExel) and installation precision, especially pest-proofing starter strips.
When to Book a Siding Crew: Why Spring Slots Fill Up by January?
In the world of exterior renovation, timing is a critical financial lever. The best siding contractors are often fully booked for the spring and summer season by the time the snow begins to melt. For homeowners looking to complete a project, this means planning must begin in the dead of winter. Waiting until April or May to start calling for quotes will likely result in either settling for a less reputable crew or being pushed to the back of the line, potentially delaying your project until the fall.

This booking rush has been intensified by government incentive programs. For example, the Canada Greener Homes Grant requires homeowners to have firm quotes from contractors *before* they can complete their mandatory EnerGuide pre-retrofit evaluation. This forces proactive homeowners to secure commitments from contractors months in advance, further accelerating the booking timeline. If you plan to leverage these valuable grants, you must act early.
The ideal window to finalize your contractor choice and sign a contract is between November and February for a spring or summer start date. This not only secures you a spot with a top-tier team but also provides ample time for material orders, which can have long lead times, especially for custom colours or premium products. Planning your siding project in the winter is not just a good idea; it’s an essential strategy for controlling your timeline, budget, and quality of workmanship.
How Prefabricated Panels Can Reclad a Building in 2 Weeks?
The final consideration in maximizing the financial return of your siding project is the installation timeline itself. Labour is a significant portion of the total cost, and a longer project means more disruption. While most standard siding installations on a single-family home can be completed within a timeline of 2-5 days, emerging technologies are pushing the boundaries of efficiency even further, particularly for larger buildings or extensive renovations.
Prefabricated siding panels are at the forefront of this evolution. These are large, custom-manufactured sections of a wall that are built off-site in a controlled factory environment. These panels can arrive on-site with the insulation, weather-resistant barrier, strapping, and even the final siding material already assembled. This approach, known as panelization, dramatically reduces on-site labour time and weather-related delays.
Using this method, a crew can potentially reclad an entire home or small building in a fraction of the traditional time—sometimes in as little as one to two weeks from start to finish. While the upfront material cost for prefabricated panels can be higher, the savings in on-site labour, reduced project duration, and superior quality control from factory assembly can lead to a comparable or even lower total project cost. It represents a shift from traditional construction to modern manufacturing principles, focused on efficiency and predictable outcomes.
As you plan your renovation, asking potential contractors about their experience with panelized or prefabricated systems can be a valuable question. It indicates a forward-thinking approach and could present an opportunity to complete your project faster and with greater precision, ultimately enhancing the return on your investment through efficiency.
Ultimately, a successful siding project is a masterclass in systems thinking. By focusing on the interplay between insulation, moisture management, and meticulous installation, you transform a simple cosmetic upgrade into a strategic financial investment. To ensure every detail is accounted for, the next logical step is to create a detailed project specification sheet to share with potential contractors, ensuring every quote is based on the same high-performance standards.