
True thermal stability isn’t about patchwork fixes; it’s about mastering your facility as a single, interconnected system where every component has a costly, often unseen, consequence.
- An energy-efficient LED retrofit can unexpectedly increase your winter heating costs by removing a “free” source of heat.
- A simple gap under a dock plate is a major profit leak, while a misplaced vapor barrier can lead to multi-million dollar structural failures.
Recommendation: Stop chasing individual component ROIs. The only path to real savings is a full systemic audit to identify and resolve these hidden thermodynamic conflicts.
For operations managers of Canadian fulfillment centers, maintaining temperature stability is not just a line item—it’s a constant battle. The daily challenge of protecting temperature-sensitive goods, from pharmaceuticals to fresh produce, is often met with a predictable playbook: upgrade the insulation, install faster doors, or tweak the HVAC. While these measures seem logical, they represent a dangerously fragmented approach. They treat the symptoms of thermal instability without ever addressing the root cause: the building itself is a complex, dynamic system.
The common wisdom focuses on isolated components. You’re told to seal drafts or add insulation, but rarely are you warned about the “thermodynamic cascade” these changes can trigger. An improvement in one area frequently creates a new, unexpected problem in another. The real cost of thermal instability isn’t just the energy bill; it’s in the product loss, the premature equipment failure, and the spiraling maintenance budgets that result from treating the facility like a collection of parts rather than a cohesive whole.
This critical analysis moves beyond the platitudes. We will dissect the unseen interactions within your building’s envelope, from the walls to the loading dock. By adopting a systemic viewpoint, you can finally stop plugging leaks and start engineering a truly stable, efficient, and profitable environment. This guide provides the framework to diagnose these hidden conflicts and make strategic decisions that deliver real, sustainable returns in the harsh Canadian climate.
For those who prefer a visual overview, the following video provides a summary of why energy efficiency is a critical consideration for any large-scale facility.
To help you navigate this systemic approach, this article is structured to dissect each critical subsystem of your warehouse. The following summary outlines the key areas we will cover, from the building envelope itself to the operational and financial implications of your choices.
Summary: A Systemic Guide to Warehouse Thermal Stability
- Sandwich Panels vs. Interior Batt: Which is Best for Concrete Tilt-Ups?
- The Gap Under the Dock Plate: How to Seal It Against Rodents and Cold?
- LED Retrofits: How Lowering Heat Load Impacts HVAC Sizing?
- How to Pressurize the Office to Stop Warehouse Dust and Cold?
- Vapor Barriers for Freezers: Why They Must Be on the Outside?
- How Air Curtains Pay for Themselves at Busy Loading Docks?
- The Paperwork You Need to Save 15% on Your Commercial Property Insurance
- How to Stop Stratification in a 40-Foot High Warehouse?
Sandwich Panels vs. Interior Batt: Which is Best for Concrete Tilt-Ups?
The first line of defense in the war against thermal instability is the building envelope itself. For concrete tilt-up constructions common in Canada, the choice of insulation is a foundational decision with long-term consequences. The standard approach involves installing interior batt insulation, a seemingly cost-effective solution. However, this method is fundamentally flawed. It creates numerous thermal bridges through studs and fasteners, and its performance degrades significantly if moisture penetrates the assembly. It’s a solution that looks good on paper but fails in practice.
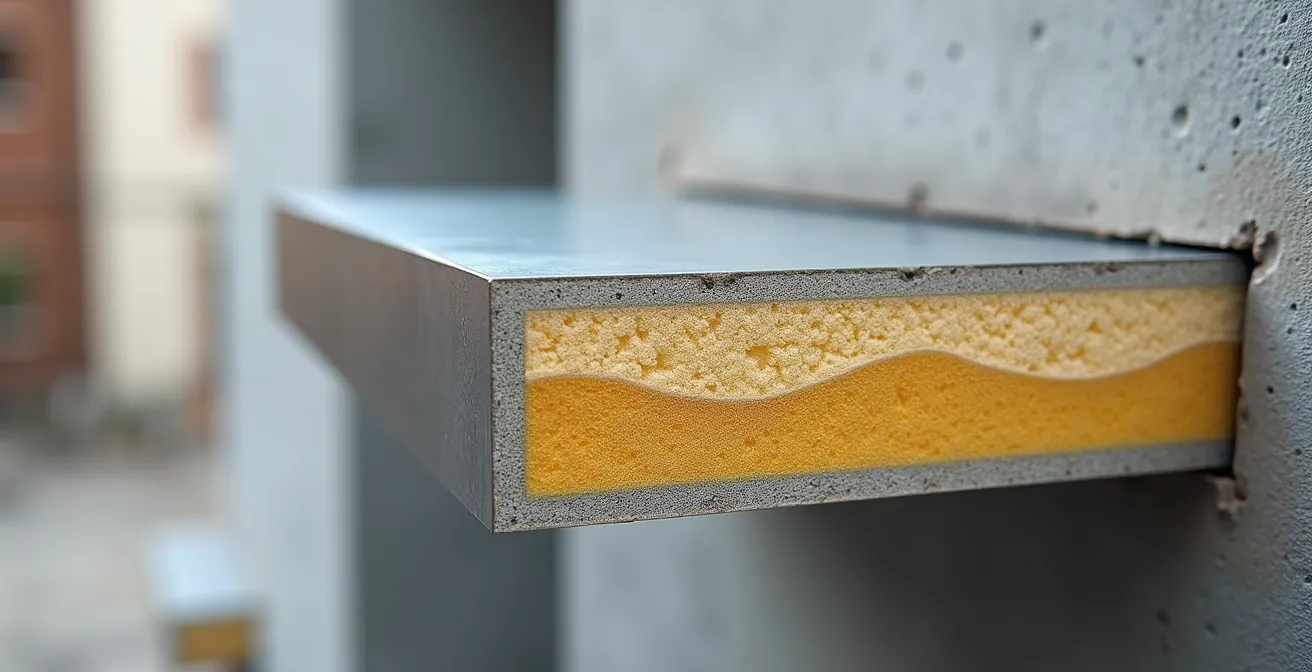
A far superior, systems-based approach is the use of exterior insulated sandwich panels. These composite units, consisting of two metal faces bonded to an insulating core, create a continuous, unbroken thermal barrier on the outside of the structure. This eliminates thermal bridging and protects the concrete mass, allowing it to act as a thermal battery that stabilizes interior temperatures. In fact, recent data shows that panelized building constructions are typically 48% more energy-efficient than traditional methods. While the upfront material cost may seem higher, the systemic benefits—faster installation, superior moisture control, and long-term energy performance—offer a dramatically lower total cost of ownership.
This comparative analysis highlights the stark performance differences between the two systems. The data makes it clear that interior batt is a short-term, cost-centric choice, whereas sandwich panels are a long-term, performance-based investment.
| Feature | Sandwich Panels | Interior Batt |
|---|---|---|
| Installation Time | 50% faster | Standard |
| R-value per inch | 4.1-7.0 | 3.0-3.8 |
| Moisture Resistance | Excellent | Moderate |
| Cost (labour savings) | 55% reduction | Baseline |
Choosing sandwich panels isn’t just an insulation upgrade; it’s a strategic decision to treat the building envelope as the high-performance system it needs to be, especially in a demanding Canadian climate.
The Gap Under the Dock Plate: How to Seal It Against Rodents and Cold?
Even in a warehouse with a perfectly insulated envelope, the loading dock remains the single largest point of thermal vulnerability and a major source of profit leakage. The seemingly insignificant gap beneath the dock leveler is a superhighway for cold air, moisture, dust, and pests. Standard dock seals and shelters only address the sides and top of the trailer, leaving this critical gap wide open. This oversight directly compromises temperature control, air quality, and regulatory compliance (e.g., CFIA standards for food and pharma facilities).
Effective sealing requires a multi-pronged approach. The primary solution is an under-leveler seal, a durable curtain or set of brushes that creates a physical barrier in the pit. For Canadian winters, it is critical to select materials like cold-rated EPDM that remain flexible at -40°C. A rigid or brittle seal will fail on the first frigid day. Secondary measures, such as inflatable dock shelters that create a more complete seal around the trailer, offer an additional layer of protection for high-traffic docks or extreme weather conditions. Ignoring this gap is equivalent to leaving a window open 24/7—a constant drain on your HVAC system and an open invitation for costly contamination.
Case Study: Greater Toronto Area Distribution Center
A major distribution center in the GTA, facing high winter heating costs and pest control challenges, implemented a comprehensive dock sealing program. By installing specialized EPDM under-leveler seals rated for Canadian winters and combining them with air curtains at all loading docks, the facility achieved a 25% reduction in heating costs. This translated to annual savings of over $45,000 while simultaneously bringing the facility into full CFIA compliance for pest control, demonstrating a clear, dual-benefit ROI.
Ultimately, treating the dock as an integrated part of the thermal envelope, rather than a hole in the wall, is essential for any serious temperature control strategy. The investment pays for itself not just in energy savings, but in risk mitigation and product integrity.
LED Retrofits: How Lowering Heat Load Impacts HVAC Sizing?
An LED lighting retrofit is one of the most common energy efficiency projects undertaken in warehouses. The benefits are clear: lower electricity consumption and longer lifespan. However, from a systemic viewpoint, this “improvement” introduces a critical, often-overlooked consequence: the thermodynamic cascade. Old metal-halide or high-pressure sodium lights were incredibly inefficient, radiating enormous amounts of heat. This heat, while wasteful, provided a “free” source of warmth during Canada’s long heating season, supplementing the HVAC system.
When you switch to cool-running LEDs, you eliminate this internal heat source. The immediate result is a reduced cooling load in the summer. But the counter-intuitive effect is an increased heating demand in the winter. Your HVAC system, which previously benefited from the lighting’s waste heat, must now work harder and run longer to maintain the setpoint temperature. This effect is significant; in a facility where the envelope is already compromised, the increased heating cost can erode a substantial portion of the electricity savings promised by the LED retrofit. In fact, it’s worth noting that properly insulated buildings have shown to use up to 40% less HVAC energy, which highlights how the building envelope remains the primary factor.
A truly strategic approach requires analyzing this net energy impact *before* the retrofit. Operations managers must calculate the baseline heat contribution of the old lights, project the reduced summer cooling load, and, most importantly, model the increased winter heating demand. This systemic analysis may reveal that a concurrent upgrade to the building envelope’s insulation is necessary to realize the full financial benefit of the LED project. Without this holistic view, a seemingly straightforward efficiency upgrade can lead to unforeseen operational costs.
Failing to account for the thermodynamic cascade turns a smart investment into a financial gamble, proving that no component in a warehouse operates in a vacuum.
How to Pressurize the Office to Stop Warehouse Dust and Cold?
The battle to keep warehouse dust, fumes, and cold air out of adjacent office spaces is often fought with door sweeps, weatherstripping, and stern memos about keeping doors closed. These are tactical bandaids on a strategic problem. The only definitive way to win this battle is through positive pressurization, an HVAC strategy that turns the office into a fortress of clean, conditioned air. This is a clear example of what can be called “pressure differential warfare.”

The principle is simple: by supplying slightly more conditioned air into the office space than is being exhausted, you create a higher air pressure relative to the warehouse. This positive pressure differential means that whenever a door is opened, clean air from the office flows *out* into the warehouse, actively pushing back dust, cold drafts, and contaminants. It makes infiltration physically impossible. This is typically achieved using a dedicated make-up air (MUA) unit for the office zone, which is precisely calibrated to maintain a constant, low-level positive pressure (e.g., 5-7 Pascals).
As HVAC specialists from The Severn Group note in their efficiency guide, this strategy provides benefits far beyond just cleanliness.
Proper pressurization not only keeps conditioned air inside but also prevents the infiltration of outdoor pollutants and allergens, leading to a healthier and more productive work environment.
– The Severn Group HVAC Specialists, Commercial HVAC Efficiency Guide
This approach transforms the office from a passive victim of its environment into an actively controlled zone. It improves employee comfort and health, protects sensitive office equipment from dust, and reduces the cleaning and maintenance burden. It is the definitive systemic solution to a problem that can never be solved by simply sealing cracks.
Instead of endless defensive patching, positive pressurization offers a permanent and proactive solution that enhances both the physical environment and human productivity.
Vapor Barriers for Freezers: Why They Must Be on the Outside?
Nowhere is a systemic understanding of thermodynamics more critical than in the design of freezer and cold storage facilities. A common and catastrophic error is the incorrect placement of the vapor barrier. Physics dictates that moisture vapor moves from a warm, high-pressure area to a cold, low-pressure area. In a Canadian warehouse, this means that in the summer, warm, humid exterior air is constantly trying to drive its way into the cold, dry freezer space. The vapor barrier’s one and only job is to stop this inward drive of moisture *before* it reaches a surface cold enough to cause condensation—the dew point.
Therefore, the vapor barrier must always be installed on the warm side of the insulation. In a freezer, this is the exterior side. Placing it on the interior (the cold side) is a recipe for disaster. When the warm, moist air penetrates the insulation and hits the cold-side vapor barrier, it has nowhere to go. The moisture condenses into water, soaking the insulation and drastically reducing its R-value. In winter, this trapped water freezes into ice, physically destroying the insulation and potentially causing structural damage through frost heave.
Case Study: Montreal Freezer Facility Failure
A Montreal cold storage facility provided a stark lesson in this principle. With vapor barriers incorrectly installed on the interior walls, summer conditions (30°C exterior, -18°C interior) drove massive amounts of moisture into the wall cavities. This led to catastrophic ice formation within the insulation, reducing its effective R-value by over 60%. The facility’s energy costs skyrocketed, and the damage ultimately required a complete remediation costing $2.3 million. The incident is now a textbook example used in demonstrating proper external vapor barrier placement as required by the National Building Code of Canada (NBCC).
The rule is absolute: the vapor barrier protects the insulation from the warm, humid environment. In a freezer, that environment is always the outside world.
How Air Curtains Pay for Themselves at Busy Loading Docks?
For high-traffic loading docks where doors are constantly open, even the best physical seals have their limits. This is where air curtains (or air doors) provide a powerful, dynamic solution. An air curtain is not a heater; it is a device that uses a powerful fan to create a high-velocity, invisible barrier of air across an open doorway. This “curtain” of air effectively separates the indoor and outdoor environments, drastically reducing the infiltration of cold or hot air, dust, and insects without impeding the flow of traffic.
The return on investment for air curtains is rapid and multi-faceted. The primary saving comes from reduced energy loss. By maintaining the thermal barrier even when the door is open, air curtains slash the load on the facility’s HVAC system. This is particularly impactful in the extreme temperatures of Canadian winters and summers. Furthermore, they improve employee comfort and safety by eliminating cold drafts near the doorway and maintaining clearer visibility. For food and pharmaceutical operations, they provide a critical, non-chemical method of pest control, helping to meet stringent CFIA and health code requirements.
When considering solutions for dock openings, managers often compare air curtains to high-speed doors. The following analysis shows how each solution fits a different operational need, with payback periods that are highly compelling for high-traffic environments.
| Solution Type | Initial Cost | Energy Savings/Year | Payback Period | Best Application |
|---|---|---|---|---|
| Heated Air Curtain | $8,000-12,000 | $3,500-5,000 | 2-3 years | High traffic, extreme cold |
| High-Speed Door | $15,000-25,000 | $4,000-6,000 | 3-5 years | Security priority |
| Combined System | $20,000-35,000 | $7,000-10,000 | 2.5-4 years | 24/7 operations |
In a systemic view of the warehouse, an air curtain is not an accessory. It is an active component of the building’s envelope management system, one that pays for itself quickly while improving safety and compliance.
The Paperwork You Need to Save 15% on Your Commercial Property Insurance
A systemic approach to thermal management and risk mitigation does more than just lower energy bills; it directly impacts your commercial property insurance premiums. Canadian insurers like Intact and Aviva are increasingly using sophisticated risk models that reward proactive facility management. Simply put, a well-documented, well-maintained building is a lower risk, and it can command a lower premium—often by as much as 15%. However, you cannot get this discount on good faith alone. You need a robust paper trail.
The key is to move from a reactive maintenance model to a proactive documentation strategy. Insurers want to see objective proof that you are actively identifying and mitigating risks associated with the building envelope and its systems, especially those exacerbated by Canada’s climate. This documentation is your primary leverage during renewal negotiations. As the Canadian Commercial Insurance Underwriters Association states, “Documentation serves as proof of a proactive risk management strategy, which can be leveraged…to argue for a lower risk profile and better premiums.”
This isn’t about creating more bureaucracy. It’s about systematically logging the high-value maintenance and inspection activities that prove you are a best-in-class operator. The following checklist outlines the essential documentation that underwriters are looking for.
Your Essential Risk Mitigation Documentation Checklist
- Annual Thermal Imaging Reports: Conduct and file annual thermographic scans of the entire building envelope to identify heat loss, moisture intrusion, and insulation failures. This is a hard requirement for many top-tier insurers.
- Quarterly Dock Seal Maintenance Logs: Document regular inspections of all dock seals, shelters, and leveler seals. Include photos showing their condition, especially before and after repairs, to prove proactive upkeep.
- Sprinkler System Winterization Certificates: Provide certificates proving your fire suppression system has been professionally winterized before the October deadline to prevent freezing and bursting, a major source of claims.
- Ice Dam Prevention and Roof Maintenance: Document regular inspections and clearing of roof drains and scuppers, especially on flat roofs, along with any measures taken to prevent ice dam formation.
- Vapor Barrier Integrity Verification: For freezer and cold storage facilities, keep records of any integrity tests (e.g., thermal imaging, blower door tests) performed on the vapor barrier system, especially after any wall penetrations or repairs.
This paperwork is not a cost center; it is a profit center, turning your best practices in facility management into tangible financial returns.
Key Takeaways
- True thermal stability comes from a systemic view, not from isolated, single-component fixes.
- Every “improvement,” like an LED retrofit, can have unintended negative consequences on other systems like HVAC if not analyzed holistically.
- Critical but often-overlooked details, like vapor barrier placement and under-dock gaps, represent the largest points of financial and structural risk.
How to Stop Stratification in a 40-Foot High Warehouse?
In any high-ceiling warehouse, one of the most significant and invisible energy-wasters is thermal stratification. Heat naturally rises, creating a massive temperature differential between the floor where your people and products are, and the ceiling 40 feet above. It’s not uncommon in a Canadian winter to have a comfortable 18°C at floor level while the air trapped at the ceiling is a useless, energy-sucking 33°C or higher. Your heating system works overtime to warm the floor, while a massive bubble of expensive, heated air does nothing but heat your roof.
The traditional solution—using the HVAC system’s fans to force this air down—is incredibly inefficient and often creates uncomfortable drafts. The definitive systemic solution is to de-stratify the air using High-Volume, Low-Speed (HVLS) fans. These massive fans, with diameters up to 24 feet, move enormous volumes of air very slowly. They create a gentle, floor-to-ceiling air column that continuously mixes the air, breaking up the stratified layers and equalizing the temperature throughout the entire space. This brings the trapped heat from the ceiling back down to the floor where it’s needed.
Case Study: Brampton, Ontario HVLS Implementation
A logistics hub in Brampton with 40-foot ceilings faced this exact problem. By installing a system of HVLS fans linked to automated thermostats, the facility documented a 25% reduction in its winter heating bills. Temperature sensors confirmed that the floor-to-ceiling temperature differential dropped from a staggering 15°C to a mere 3°C. By bringing the heat back down to the operational level, the heaters ran significantly less, providing a clear and rapid ROI while dramatically improving employee comfort.
By conquering stratification, you are no longer just heating your space; you are optimizing the energy you’ve already paid for. This is the ultimate expression of a systemic approach: making every BTU work for you, from the foundation to the ceiling. To truly capitalize on these insights, the next logical step is to initiate a comprehensive thermal audit of your own facility.