Achieving a high-performance wall in Canada is not about maximizing R-value, but about mastering hygrothermal control to prevent moisture damage.
- The placement and ratio of foam-to-batt insulation are dictated by your Canadian climate zone to keep the wall’s condensing surface warm.
- Hybrid systems like “flash-and-batt” provide superior air sealing and structural integrity that justify their initial cost, especially with available grants.
Recommendation: Base your insulation strategy on managing the dew point within the wall assembly, not just on the advertised R-value of individual products.
For the advanced renovator in Canada, the pursuit of the “perfect wall” often leads to a complex question: is it better to use one thick layer of a single insulation type, or to combine materials like foam and batt? The common approach is to simply stack R-values, assuming that a higher number automatically equates to better performance. This is a dangerous oversimplification. While high R-values are important, the real enemy in a cold climate is uncontrolled moisture. A poorly designed layered wall can trap condensation, leading to mould, rot, and catastrophic structural failure.
The fundamental flaw in many insulation strategies is the failure to account for the dew point—the temperature at which water vapour in the air condenses into liquid. When warm, moist indoor air infiltrates a wall cavity and hits a cold surface (like the sheathing), it can condense. The secret to a durable, high-performance layered wall isn’t just stopping heat flow; it’s a calculated exercise in hygrothermal engineering. It involves creating an assembly where the primary condensing plane always stays above the dew point, even on the coldest winter days.
This guide moves beyond simplistic R-value discussions. We will dissect the building science behind multi-layered assemblies, focusing on the critical interplay between heat, air, and moisture control. By understanding these principles, you can engineer a wall that doesn’t just insulate, but actively manages moisture, ensuring its longevity and performance for decades. We will explore code-compliant strategies, compare the technical merits of different combinations, and provide actionable protocols for a truly resilient building envelope tailored to Canada’s demanding climate.
This article provides a technical deep-dive into the critical considerations for creating a durable and efficient layered wall system. Explore the sections below to master each component of a successful assembly.
Summary: The Perfect Wall Assembly: Why Layering Insulation Outperforms Monolithic Systems in Canada
- The “Sandwich” Mistake: How to Layer Insulation Without Rotting the Wall?
- Flash-and-Batt: Is the 20% Cost Increase Worth the Performance Boost?
- How to Stagger Seams in Rigid Foam to Eliminate Air Leaks?
- Which Layer Goes First: Vapor Barrier or Insulation in Double-Stud Walls?
- Can You Add New Batt Insulation Over Old Wood Shavings?
- Flash-and-Batt: How Combining Foam and Wool Boosts Wall Performance?
- Air Barrier vs. Vapor Barrier: What is the Difference and Where Do They Go?
- Which Insulation Gives the Highest R-Value per Inch for Thin Walls?
The “Sandwich” Mistake: How to Layer Insulation Without Rotting the Wall?
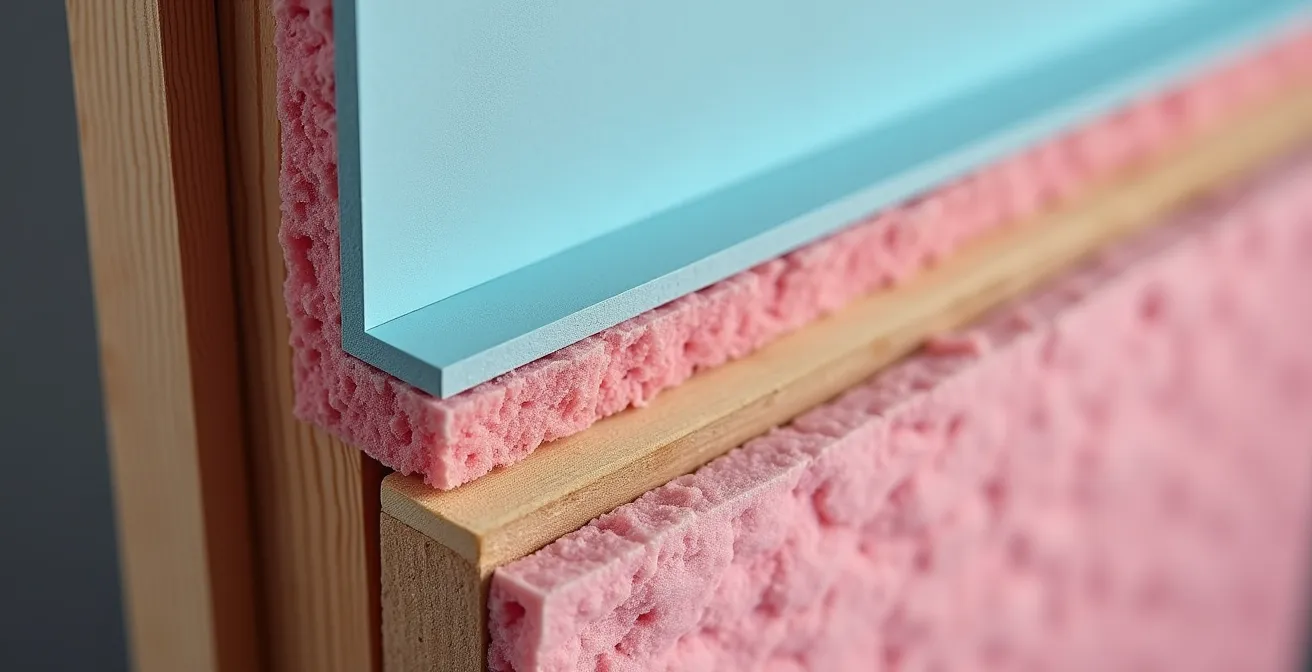
The most critical error in layered insulation is creating a “moisture sandwich,” where vapour-impermeable layers trap condensation within the wall assembly. This occurs when warm, moist interior air bypasses the interior insulation and condenses on the cold back side of the exterior sheathing. Without a path to dry, this trapped moisture leads to rot, mould, and structural degradation. The key to prevention is ensuring the sheathing temperature remains above the dew point throughout the heating season. This is achieved by placing a sufficient amount of vapour-impermeable insulation, like rigid foam or closed-cell spray foam, on the *exterior* of the sheathing.
The National Building Code of Canada (NBC) provides a prescriptive path for this. The amount of exterior foam required is not arbitrary; it’s a calculated percentage of the total wall’s R-value, and it varies significantly based on your location. According to guidance from Natural Resources Canada, the ratios are tied to climate zones defined by heating degree days (HDD). For example, a mild climate like Vancouver (Zone 4) requires at least 27% of the total R-value from exterior foam, while a cold climate like Winnipeg (Zone 7-8) demands a minimum of 48%. Following these ratios ensures the primary condensing surface—the sheathing—stays warm enough to prevent moisture issues.
Failing to meet these climate-specific minimums can have disastrous consequences, as seen in a well-documented case of wall failure in the US Midwest.
Midwest Wall Failure from Insufficient Flash Coating
A contractor applied a mere one-inch layer of closed-cell spray foam in a custom home. During a five-day cold snap where temperatures remained below -12°C (10°F), the thin foam was insufficient to keep the condensing surfaces warm. The result was catastrophic: water began “raining” inside the walls and seeping from the baseboards. The thin sections of foam became cold condensing planes, leading to massive moisture accumulation. The only solution was to add another inch of foam throughout the entire structure, underscoring the non-negotiable importance of meeting or exceeding climate zone minimums for exterior insulation.
Ultimately, preventing the “sandwich” mistake is a matter of respecting building science. The exterior insulation layer serves a dual purpose: it adds R-value and, more importantly, it acts as a thermal blanket for the structure, keeping critical components warm and dry.
Flash-and-Batt: Is the 20% Cost Increase Worth the Performance Boost?
The “flash-and-batt” system, which combines a thin layer (the “flash”) of closed-cell spray foam (ccSPF) with a thicker layer of batt insulation (fiberglass or mineral wool), is a premier strategy for achieving a high-performance wall. While it can be around 20% more expensive than using standard batt insulation alone, the premium is often justified by a significant boost in overall assembly performance. The ccSPF layer is not primarily for R-value; its main function is to create a monolithic, gap-free air barrier and vapour retarder on the interior side of the wall cavity. This drastically reduces air leakage, which is a major source of energy loss and moisture problems.
The performance gains are quantifiable across several metrics. The spray foam perfectly seals the myriad of small gaps around wiring, plumbing, and framing that are impossible to fully seal with batt insulation alone. This creates a much tighter building envelope. Furthermore, the adhesive nature of ccSPF bonds to the studs and sheathing, dramatically increasing the wall’s structural integrity. The cost of this superior performance, however, can be a barrier. Fortunately, the higher upfront investment can be mitigated. For Canadian homeowners, up to $5,000 in federal grants are available through the Canada Greener Homes Initiative for eligible insulation upgrades, which can help offset the premium for a flash-and-batt system.

As the visualization suggests, the reduction in heat loss (left) by a properly sealed assembly (right) translates into tangible long-term energy savings. The decision to invest in flash-and-batt should be viewed through a lens of lifecycle cost, not just initial price. The improved durability, air quality, and comfort are significant benefits that compound over the life of the building.
The following table provides a clear comparison of how a typical flash-and-batt assembly elevates performance beyond standard fiberglass insulation, based on an in-depth analysis of the method.
| Feature | Standard Fiberglass | Flash-and-Batt | Improvement |
|---|---|---|---|
| Wall R-Value | R-21 (6″ cavity) | R-24 (2″ foam + batt) | +14% |
| Air Leakage | Standard | Much tighter assembly | Significant reduction |
| Structural Strength | Baseline | 200%+ increase in racking strength | 2x stronger |
| Sound Control | Good | Enhanced with fiberglass layer | Better STC rating |
How to Stagger Seams in Rigid Foam to Eliminate Air Leaks?
When using multiple layers of rigid foam board for continuous exterior insulation, the single most important detail for performance is the management of seams. Even tiny gaps can create thermal bridges and pathways for air infiltration, compromising the integrity of the entire assembly. A single layer of foam, no matter how well taped, is vulnerable to gaps caused by board movement or imperfect installation. The professional standard is to use at least two layers of foam with all seams offset, or “staggered.” This simple technique creates a shiplap-like effect that effectively eliminates a direct path for air to travel through the insulation layer.
The principle is straightforward: the seams of the second layer of foam must not align with the seams of the first layer. A minimum offset of 16 inches horizontally is a standard best practice, ensuring that any potential air leak from a seam in the first layer is blocked by the solid body of a board in the second layer. This meticulous approach extends to every part of the assembly, including corners, window openings, and service penetrations. These are the most vulnerable points for air leakage and require careful cutting and sealing to maintain a continuous, unbroken plane of insulation.
Sealing the seams themselves is also a critical step. All joints on the outermost layer of foam should be sealed with a high-quality, compatible construction tape or adhesive designed for that specific foam product. This provides the final line of defence against air and bulk water intrusion. Adhering to a strict protocol for seam staggering and sealing is what separates a standard installation from a true high-performance envelope.
Your Action Plan: Seam Staggering and Sealing Protocol
- First Layer Installation: Install the first layer of rigid foam board, typically with seams running vertically. Secure it according to manufacturer specifications.
- Offset Second Layer: Apply the second layer of foam so that its seams are offset from the first layer by a minimum of 16 inches. Ensure joints do not align vertically or horizontally.
- Seal All Seams: Meticulously seal all seams of the *outermost* foam layer using a compatible construction tape or specified adhesive to create a monolithic air barrier.
- Address Penetrations: Ensure continuous coverage around all corners, windows, doors, and service penetrations. Cut foam boards to fit tightly and seal all edges.
- Verify Continuity: Before installing siding, conduct a visual inspection of the entire exterior foam surface to confirm that all seams are staggered and properly sealed, with no visible gaps.
Which Layer Goes First: Vapor Barrier or Insulation in Double-Stud Walls?
In high-performance construction, particularly with double-stud walls common in cold Canadian climates, the placement of the vapour barrier is a subject of intense technical debate. A double-stud wall creates a very thick cavity for insulation, which dramatically changes the temperature gradient and moisture dynamics compared to a standard 2×6 wall. The primary rule remains: in a cold climate, the vapour barrier (a material with low vapour permeance) should be on the warm side of the insulation. However, in a double-stud wall, the question becomes *where* on the warm side?
There are two main strategies. The first, and most traditional, is placing a polyethylene sheet directly behind the drywall. This functions as a dedicated vapour and air barrier. The second, more modern approach, involves placing the vapour barrier on the exterior of the *interior* stud wall, effectively sandwiching it within the wall assembly. This protects the membrane from damage by trades (e.g., electricians) and occupants (e.g., hanging pictures). However, this placement creates a small, uninsulated cavity between the vapour barrier and the drywall, which must be considered. The choice depends on the specific assembly and climate.

Regardless of placement, the building code provides strict guidelines. As the National Research Council of Canada clarifies, the governing principle is clear: “NBC Article 9.25.1.2 specifies where low air and vapour permeance materials can be located in assemblies depending on thermal insulation position and climate. These provisions evolved from earlier Code requirements aimed at addressing moisture condensation concerns.” This means your decision must be informed by the code and your specific climate zone. The code also assumes a controlled indoor environment; its tables for vapour barrier placement apply when the indoor relative humidity is maintained below a 35% maximum over the heating season.
NBC Article 9.25.1.2 specifies where low air and vapour permeance materials can be located in assemblies depending on thermal insulation position and climate. These provisions evolved from earlier Code requirements aimed at addressing moisture condensation concerns.
– National Research Council Canada, NBC 9.25.1.2 Building Code Development
For a double-stud wall, placing the vapour barrier on the exterior of the interior wall is often the most robust solution, provided the rest of the assembly is designed correctly. It protects the critical control layer and simplifies the air sealing process.
Can You Add New Batt Insulation Over Old Wood Shavings?
In many older Canadian homes, wall cavities are filled with loose materials like wood shavings, sawdust, or early forms of cellulose. When renovating, the question arises whether it’s acceptable to simply add new batt insulation over this existing material. The expert consensus is an emphatic no. Leaving old, settled, and often-compromised loose-fill insulation in a wall cavity is a significant risk. These materials have a low R-value, are prone to settling (creating large voids), and can hold moisture. More critically, they may contain contaminants or, in the case of some older vermiculite insulation, asbestos.
The first and most critical step before any work begins is to have the material tested. As Natural Resources Canada warns, materials containing asbestos are a serious health hazard and were prohibited from being sold as consumer products in Canada as of 2018. If asbestos is present, removal must be handled by certified professionals. Even if the material is benign, it must be completely removed to allow for a proper air sealing and insulation job. A high-performance wall relies on a continuous air barrier, which is impossible to install correctly over a cavity filled with debris.
The proper protocol involves a complete clean-out of the wall cavity. This ensures you can inspect the sheathing for any existing moisture damage and meticulously air seal all penetrations—a step that provides a massive return on investment for energy efficiency. Only then can you install new, high-performance insulation. The process should be systematic:
- Test old material for asbestos before any disturbance.
- Set up dust containment with plastic sheeting and negative air pressure to protect the rest of the home.
- Use a HEPA-filtered vacuum to completely remove all old material from the cavities.
- Dispose of the old material according to local municipal regulations for construction waste.
- Once the cavity is clean, air seal all penetrations, cracks, and joints with appropriate sealants or tapes.
- Install the new insulation system (e.g., flash-and-batt or full-cavity mineral wool).
While removing old insulation is labour-intensive, it is a non-negotiable step for a quality renovation. An effective alternative for refilling these cleaned-out cavities is dense-packing cellulose. This method fills all voids and provides both good thermal resistance and superior air-sealing properties. The cost per RSI value for loose-fill materials like cellulose is often lower, making it a cost-effective and high-performance upgrade strategy for heritage homes.
Flash-and-Batt: How Combining Foam and Wool Boosts Wall Performance?
While a standard flash-and-batt system uses spray foam with fiberglass batts, substituting mineral wool (often called rock wool or stone wool) for the fiberglass can elevate the assembly’s performance to another level. This combination leverages the unique properties of each material to create a wall that excels not only in thermal resistance but also in fire safety, sound control, and moisture management. The closed-cell spray foam “flash” provides the indispensable air and vapour control layer, while the mineral wool batt offers distinct advantages over fiberglass.
The most significant advantage of mineral wool is its exceptional fire resistance. Made from volcanic rock and slag, it is naturally non-combustible and can withstand temperatures exceeding 1000°C (1800°F) without melting, smoking, or producing toxic off-gassing. Fiberglass, in contrast, will melt at much lower temperatures. This makes a foam-and-wool combination a superior choice for party walls, mechanical rooms, or anywhere enhanced fire safety is a priority. Additionally, mineral wool’s denser, more rigid structure provides superior soundproofing qualities, effectively dampening airborne noise transmission between rooms and from the exterior.
In terms of moisture, mineral wool is also a top performer. It is naturally hydrophobic, meaning it repels water and will dry out completely if it gets wet, retaining its original R-value. Fiberglass can retain moisture longer, potentially leading to reduced thermal performance and a risk of mould growth. Combining the air-sealing of closed-cell foam with the fire, sound, and moisture-resistant properties of mineral wool creates a robust, multi-faceted wall assembly. This strategy achieves not just higher R-values through a superior fit, but a holistically better-performing and safer wall.
| Property | Fiberglass Batt | Mineral Wool |
|---|---|---|
| Fire Resistance | Melts at 1000°F | Does not burn, off-gas, smoke or ignite |
| Made From | Spun glass fibers | Volcanic rock and slag from steelmaking |
| Sound Control | Good | Superior soundproofing qualities |
| Moisture Handling | Can retain moisture | Naturally hydrophobic, dries quickly |
Air Barrier vs. Vapor Barrier: What is the Difference and Where Do They Go?
In building science, the terms “air barrier” and “vapour barrier” are often used interchangeably, but they describe two distinct functions that are critical to a wall’s performance and durability. Confusing them can lead to serious building failures. An air barrier’s job is to stop the movement of air through the wall assembly. A vapour barrier’s (or more accurately, vapour retarder’s) job is to slow the diffusion of water vapour through materials. Uncontrolled air movement can carry massive amounts of moisture into a wall cavity, while diffusion is a much slower process. Therefore, a continuous, robust air barrier is arguably the most important control layer in any assembly.
A material’s ability to stop air is different from its ability to stop vapour. For example, fibrous insulation like fiberglass can slow air movement but is not an air barrier. Drywall is a decent air barrier if detailed correctly, but it is vapour-permeable. A polyethylene sheet, on the other hand, is both an excellent air barrier and a strong vapour barrier. The National Building Code of Canada (NBC) recognizes this distinction. It specifies that an assembly must have a continuous air barrier system, and it separately dictates the required permeance and location of the vapour barrier based on the climate and wall design. One material *can* serve both functions, but the primary focus must be on creating a perfect air barrier.
The placement of these layers is dictated by climate. In a cold climate like Canada’s, the rule is: the air barrier can be located anywhere in the assembly as long as it’s continuous, but the vapour barrier must be on the warm-in-winter side of the insulation. This prevents warm, moist indoor air from reaching a cold surface inside the wall and condensing. As building science evolves to account for climate change, tools are being developed to help builders plan for the future.
The Design Value Explorer tool provides future HDD and technical projections for Table C-2 in the National Building Code of Canada. Future values were developed through NRC collaboration with Environment and Climate Change Canada.
– National Research Council of Canada, Projected Building Climate Zones
This forward-looking approach underscores the importance of getting these fundamental layers right. Your wall assembly must be designed not just for today’s climate, but for the conditions it will face over the next 50 years.
Key Takeaways
- Dew Point is King: The primary goal of a layered wall in Canada is to keep the condensing plane (sheathing) warm, not just to achieve a high total R-value.
- Follow Climate Zone Rules: The ratio of exterior-to-interior insulation is a non-negotiable, code-driven requirement based on your specific Canadian climate zone to prevent moisture failure.
- An Assembly is a System: Treat the wall as a complete hygrothermal system where the air barrier, vapour control layer, and thermal layers work in concert. A failure in one compromises all.
Which Insulation Gives the Highest R-Value per Inch for Thin Walls?
In many renovation projects, especially in urban areas with masonry buildings or homes where interior space is at a premium, wall thickness is a major constraint. In these scenarios, maximizing thermal performance within a limited depth is paramount. The metric that matters most here is R-value per inch. Different insulation materials have vastly different efficiencies in this regard, and choosing the right one is critical when every inch counts.
Unquestionably, closed-cell spray polyurethane foam (ccSPF) offers the highest commercially available R-value per inch, typically delivering around R-7 per inch. Its ability to form a continuous, monolithic layer that also acts as an air and vapour barrier makes it an all-in-one solution for thin walls. It completely fills the cavity, adheres to the substrate, and provides exceptional thermal resistance in a minimal profile. The next best performers are rigid foam boards, particularly polyisocyanurate (polyiso), which can provide R-6 to R-6.5 per inch. These are excellent for continuous exterior insulation but are harder to install perfectly without gaps in an interior application.
Materials like open-cell spray foam, fiberglass, and mineral wool offer significantly lower R-values per inch, typically in the range of R-3.5 to R-4.2. While they are excellent materials in thicker wall assemblies where space is not a concern, they are simply not efficient enough for applications demanding high thermal resistance in a thin profile. For example, to achieve an R-21 wall, you would need approximately 3 inches of ccSPF, but nearly 6 inches of fiberglass or mineral wool. This 3-inch difference can be a dealbreaker in a small room or hallway.
The following table provides a direct comparison of common insulation materials, highlighting their efficiency for space-constrained projects in the Canadian market.
| Insulation Type | R-Value per Inch | Best Application |
|---|---|---|
| Closed-Cell Spray Foam | R-7 | Thin walls, maximum performance |
| Polyisocyanurate Board | R-6 to R-6.5 | Continuous exterior insulation |
| Open-Cell Spray Foam | R-3.5 to R-3.6 | Sound control priority |
| Fiberglass Batt | R-3.5 | Budget-conscious projects |
| Mineral Wool Batt | R-3.3 to R-4.2 | Fire resistance required |
Your next project’s success depends not on the materials you choose, but on how you assemble them. Apply these building science principles to engineer a wall that performs for decades, ensuring a durable, efficient, and healthy home.
Frequently Asked Questions on Air and Vapor Barriers
Is an air barrier mandatory in Canada?
Yes, Part 9 of the National Building Code (NBC) requires air barrier systems. The specific requirements depend on the position of the thermal insulation and the climate of the building site.
Can one material serve as both barriers?
A material can have properties of low air permeance and low vapour permeance (like polyethylene sheeting), allowing it to function as both. However, the NBC treats the systems separately; the properties of the materials, rather than their intended function, are what’s important for compliance.
Where should vapor barriers be placed?
In a cold climate, the vapour barrier must be placed on the warm side of the majority of the insulation. NBC Article 9.25.1.2 provides specific rules for its location based on the wall assembly design and the local climate zone.