The choice isn’t just about interior vs. exterior; it’s about mastering Canadian building science to prevent costly structural and health failures.
- Exterior insulation is the only method that effectively controls soil moisture and frost forces, protecting the foundation itself.
- Interior insulation is a viable alternative but demands meticulous moisture management to prevent creating a catastrophic mold problem inside your walls.
Recommendation: Your final decision should be based on a thorough assessment of your property’s specific site conditions—drainage, accessibility, and soil type—not just the initial project cost.
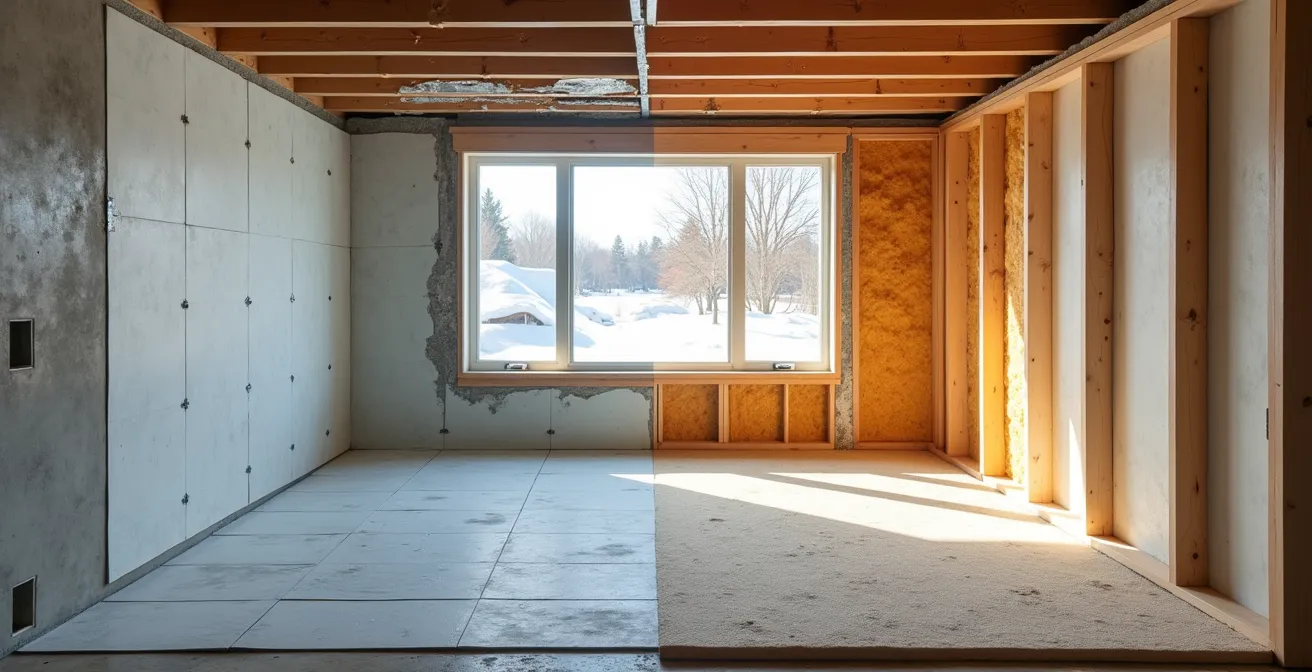
For Canadian homeowners, the basement is a frontier of opportunity and risk. It’s often a source of significant energy inefficiency, where finishing the space can add valuable square footage. Yet, the decision of whether to insulate from the outside via a major excavation or from the inside as part of a finishing project is far more complex than a simple cost comparison. This isn’t just about comfort; it’s a high-stakes battle against the fundamental physics of a cold climate.
The common advice often revolves around budget and disruption. Exterior insulation is expensive and tears up your landscaping, while interior is cheaper and less invasive. While true, this view dangerously overlooks the powerful, invisible forces at play: relentless moisture drive from the soil, immense frost heaving pressures, and constant thermal bridging. Choosing the wrong method or, more importantly, executing it incorrectly doesn’t just lead to a chilly basement; it can lead to catastrophic mold, rotted framing, and even damage to the foundation itself.
This guide reframes the question. Instead of asking “inside or outside?”, we will ask, “How do I correctly manage the forces of moisture, cold, and heat flow for my specific situation?” We will analyze the building science behind each component, from the type of insulation used to the critical placement of the vapor barrier. By understanding these structural principles, you can make a decision that not only saves energy but also protects the long-term health and integrity of your home.
To visualize one of the key components in an exterior solution, the following video provides an overview of a rigid foam board system designed to be installed against the foundation wall, forming a critical part of the building envelope.
To navigate this critical decision, we’ve structured this analysis around the core building science questions you need to answer. This framework will equip you to understand the “why” behind each recommendation, ensuring your investment enhances your home’s value and durability for decades to come.
Table of Contents: A Structural Guide to Basement Insulation
- Why Putting Fiberglass Against Concrete is a Recipe for Mold?
- Retrofitting Slab Insulation: Is It Worth Losing 2 Inches of Headroom?
- Spray Foam or Rigid Board: Which is Best for the Header Space?
- How Deep Must Exterior Insulation Go to Prevent Frost Jacking?
- When to Install the Vapor Barrier in a Basement Assembly?
- Rock Wool vs. Cellulose: Which One Must Be Trashed After a Pipe Burst?
- How Is Stone Spun into Fiber to Create Fire-Resistant Batts?
- Why Did Your Deck Post Lift 3 Inches This Winter?
Why Putting Fiberglass Against Concrete is a Recipe for Mold?
The most common and dangerous mistake in basement finishing is placing conventional fiberglass batt insulation directly against a concrete foundation wall. While it seems logical, this assembly creates a perfect storm for mold growth, a problem rooted in the basic physics of moisture. Concrete is inherently porous and constantly wicks moisture from the surrounding soil. Even a foundation that appears perfectly dry is transmitting significant amounts of water vapor. According to a report from Natural Resources Canada, basements can account for up to 25% of a home’s total heat loss, making insulation crucial, but the right type is non-negotiable.
When you place fiberglass insulation against this damp surface, it acts like a sponge. The insulation traps the moisture, preventing it from drying. The paper facing on many fiberglass batts and the wood studs of the framing wall then provide an ample food source for mold spores. Warmed by the home’s interior, this damp, dark, and nutrient-rich cavity becomes a mold incubator. This is a primary example of moisture drive, where vapor moves from the damp soil, through the concrete, and gets trapped in the wall assembly.
The solution is to use only moisture-impermeable insulation directly against the concrete. Materials like closed-cell spray foam or rigid foam board (XPS/EPS) do not absorb water and act as a combined insulator and vapor barrier, stopping the moisture from ever reaching the interior framing. This fundamental principle is the first line of defense in any successful interior basement insulation project.
Action Plan: Preventing Moisture in Basement Wall Assemblies
- Ensure proper exterior drainage: The ground around the foundation must slope away at a minimum of 5% for the first 10 feet to direct surface water away.
- Install a continuous moisture barrier: Use closed-cell foam insulation (spray or rigid board) directly against the concrete before any framing or fibrous insulation.
- Avoid moisture-absorbent materials: Never use fiberglass or cellulose insulation directly in contact with the foundation wall.
- Place the poly vapor barrier correctly: Install the polyethylene vapor barrier on the warm side of the insulation only (just behind the drywall), never against the concrete.
- Control interior humidity: Maintain basement humidity below 50% using proper ventilation or a dehumidifier to manage airborne moisture from inside the home.
Retrofitting Slab Insulation: Is It Worth Losing 2 Inches of Headroom?
An uninsulated concrete slab is a massive, cold radiator that constantly saps heat from your basement, making the floor uncomfortably cold and driving up heating bills. Insulating the slab from the top is the most practical retrofit solution, but it comes at the cost of ceiling height. For many Canadian homeowners, the question is whether sacrificing 2 inches of headroom is a worthy trade-off. The building science and building codes provide a clear answer: in most cases, it absolutely is.
Adding two inches of R-10 rigid foam insulation over the existing slab can dramatically improve comfort and energy efficiency. As a case study from the Ontario Building Code illustrates, this addition is often well within legal limits. The code requires habitable basement spaces to have a minimum ceiling height of 2.0 meters (about 6’7″). For a typical basement with a 7’6″ clearance, adding 2 inches of slab insulation and a new subfloor would still leave a height of over 7’2″, easily exceeding the requirement. For this minor loss of height, the R-10 insulation value can reduce heating costs by up to 20% in colder Canadian climate zones.

As the cross-section shows, the assembly involves laying down a vapor barrier, the rigid foam boards, and then a new subfloor on top. Beyond energy savings, insulating the slab provides a crucial thermal break from the cold ground. This raises the surface temperature of the floor, making the entire space feel warmer and more comfortable, and significantly reducing the risk of condensation forming on the floor during humid summer months.
Spray Foam or Rigid Board: Which is Best for the Header Space?
The header space, also known as the rim joist or band joist, is the wooden structure that sits on top of the foundation wall, where the floor joists of the main level rest. This area is one of the most significant sources of heat loss in a home, acting as a massive thermal bridge to the outside. Insulating and air-sealing this complex, often irregular space is critical for the integrity of the building envelope. The two primary choices for this job are closed-cell spray foam and cut-to-fit rigid foam board.
Both options are vastly superior to simply stuffing fiberglass batts into the cavities, which fails to provide an effective air seal. Spray foam’s advantage is its ability to expand and perfectly seal every crack and crevice, creating a monolithic air and vapor barrier. Rigid foam board is more DIY-friendly and less expensive but requires meticulous cutting and sealing of all edges with canned foam or high-quality caulk to achieve a comparable air seal. As a direct comparison shows, each has distinct structural and financial implications.
This data, drawn from an analysis of Canadian basement insulation methods, highlights the key differences.
| Feature | Closed-Cell Spray Foam | Rigid Foam Board (XPS/EPS) |
|---|---|---|
| R-Value per inch | R-6 to R-7 | R-5 (XPS), R-4 (EPS) |
| Air Sealing | Excellent – fills all gaps | Good – requires additional caulking |
| Installation Cost | $1.50-$2.50 per sq.ft | $1.00-$1.50 per sq.ft |
| Fire Code Compliance | Requires thermal barrier | Requires thermal barrier |
| Professional Required | Yes – CUFCA certified installer | No – DIY possible |
While spray foam offers superior performance, it comes with a critical caveat. As the experts at Quik-Therm Insulation Solutions note, professional application is not just recommended; it’s essential for safety and effectiveness.
Spray foam must be installed properly under the right conditions or bad things can happen. Installed improperly, spray foam can off-gas powerful odours and toxins.
– Quik-Therm Insulation Solutions, Insulating Basement Walls in Canada Guide
How Deep Must Exterior Insulation Go to Prevent Frost Jacking?
When insulating a basement from the outside, the primary goal extends beyond just thermal performance; it is a structural defense against one of the most powerful forces of nature in Canada: frost heave. Frost jacking, or heave, occurs when water in the soil freezes, expands, and pushes foundations upward with immense force. To prevent this, exterior insulation must extend below the regional frost line, creating a barrier that keeps the soil beside the foundation from freezing.
The required depth varies significantly across Canada, reflecting the diverse climatic conditions. In Southern Ontario, for instance, Part 9 of the Ontario Building Code mandates foundations extend to a 1.2m (4 feet) minimum depth. However, this is just a starting point. In colder regions like Calgary or Edmonton, depths of 1.5-1.8m (5-6 feet) are necessary, while in the prairies around Winnipeg, it can be up to 2.4m (8 feet). Conversely, the milder climate of coastal British Columbia may only require a depth of 0.6m (2 feet). Failing to respect these regional depths renders the exterior insulation project structurally ineffective.
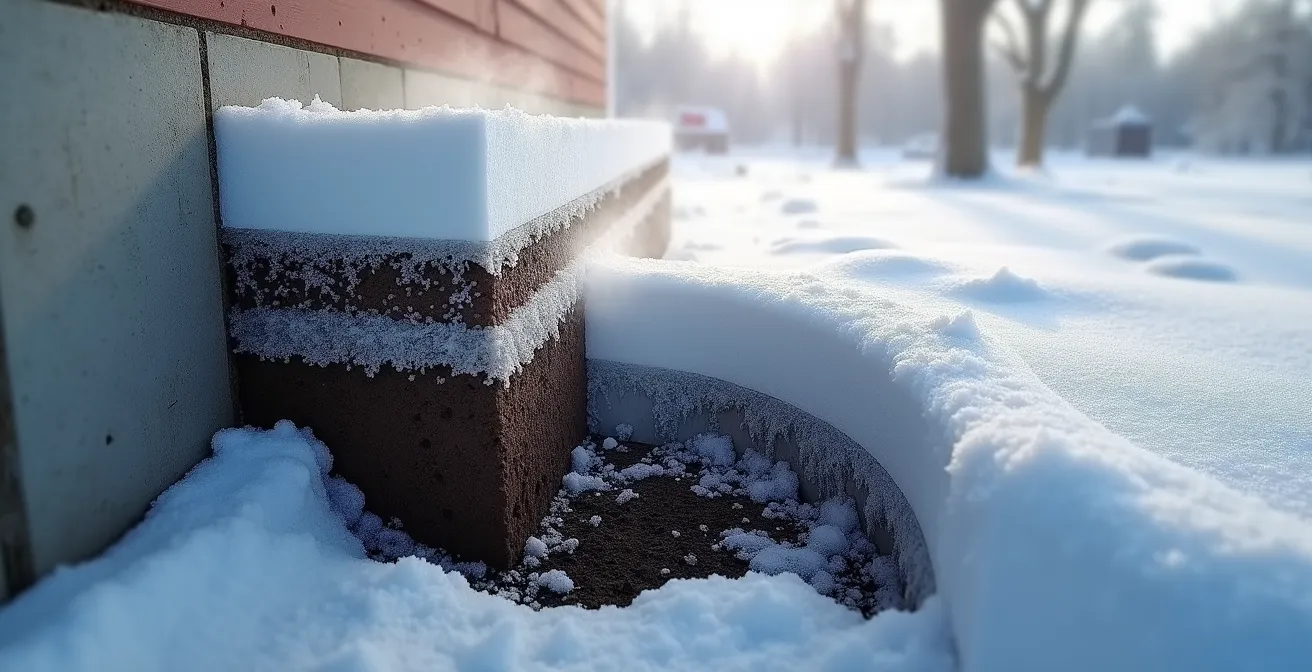
As this diagram illustrates, the rigid foam insulation acts as a thermal blanket for the foundation. By extending well below the frost line, it ensures the ground immediately adjacent to the footings remains above freezing, preventing the formation of the ice lenses that cause heaving. This not only protects the foundation from upward movement but also prevents lateral pressure from frozen soil that can crack basement walls. This is why exterior insulation is considered the superior method for foundation longevity.
When to Install the Vapor Barrier in a Basement Assembly?
In the science of basement insulation, few elements are as critical, or as frequently misunderstood, as the vapor barrier. Its purpose is to stop warm, moist interior air from reaching a cold surface where it can condense. The cardinal rule of vapor barrier placement in a cold climate like Canada is simple and absolute: it must always be installed on the warm side of the insulation.
For an interior basement insulation project, this means the polyethylene sheet should be installed directly behind the drywall, after the insulation and framing are in place. This rule is non-negotiable, as confirmed by Canada’s leading building science authorities.
With interior insulation, the vapor barrier MUST be installed on the warm side of the insulation (just behind the drywall) to prevent interior moisture from reaching the cold foundation wall.
– Natural Resources Canada, Keeping the Heat In – Basement Insulation Guide
The most catastrophic error is creating a “double vapor barrier.” This happens when a homeowner installs a moisture-impermeable insulation like spray foam against the concrete (which is correct) but then also adds a polyethylene vapor barrier against the concrete before framing. This traps any moisture that gets into the wall cavity—from a small leak or even from the wood framing itself—between two non-permeable layers with no way to escape, guaranteeing mold and rot.
Case Study: The Double Vapor Barrier Trap
A common failure reported by Canadian Home Inspection Services involves homeowners trapping moisture within basement walls. By installing vapor barriers on both the concrete side and the drywall side of the insulation, they create a sealed envelope. With Ontario’s extreme seasonal humidity swings from dry winters (30% RH) to humid summers (70% RH), this “double vapor barrier” trap prevents any incidental moisture from escaping, leading to significant mold growth within just 2-3 years.
Rock Wool vs. Cellulose: Which One Must Be Trashed After a Pipe Burst?
In the unfortunate event of a basement flood or a burst pipe, the type of insulation in your walls will determine whether you’re facing a minor cleanup or a major demolition and replacement project. When it comes to water damage, the difference between rock wool and cellulose insulation is stark and absolute: cellulose insulation must be completely removed and replaced, while rock wool can often be dried in place and saved.
The reason lies in their fundamental composition. Cellulose insulation is made from recycled paper products (ground-up newspaper). While treated with fire retardants, it is still an organic, paper-based material. When it becomes saturated with water, it compacts, permanently losing its fluffy, air-trapping structure and its insulating R-value. More critically, as an organic material, wet cellulose becomes a perfect, dense food source for mold and bacteria, posing a serious health risk. It cannot be effectively dried out within a wall cavity and must be torn out.
Rock wool, by contrast, is hydrophobic, meaning it repels water. Made from spun stone fibers, it does not absorb moisture. Water will drain through it. Because it is inorganic, it provides no food source for mold. If a rock wool-insulated wall gets wet, the drywall and studs can be opened up, and high-volume fans can be used to dry the entire assembly. The rock wool batts will not slump, decompose, or lose their insulating properties once dry. This makes rock wool a far more resilient and long-term choice for below-grade applications where the risk of moisture is always present.
How Is Stone Spun into Fiber to Create Fire-Resistant Batts?
The remarkable properties of rock wool insulation—its resistance to fire, water, and mold—stem directly from its unique manufacturing process. It begins not with chemicals or paper, but with solid rock. The process transforms basalt rock and recycled slag into a fibrous material with an incredibly high melting point, making it an exceptional fire barrier.
The manufacturing process is a fascinating display of thermal and mechanical engineering, taking place right here in Canada at facilities in locations like Milton, Ontario, and Grand Forks, British Columbia.
Case Study: The Rockwool Manufacturing Process in Canada
At Canadian Rockwool plants, a mixture of basalt rock and recycled slag is superheated in a furnace to an astonishing 1,500°C (2,732°F), turning it into a molten lava-like substance. This molten material is then spun at high speeds, a process often compared to making cotton candy. The centrifugal force throws off tiny droplets that are stretched into fine, durable fibers. These fibers are collected, compressed into dense mats, and then cut into batts. This process results in a mineral wool product with a fire resistance rating of up to 1,177°C (2,150°F), far exceeding the ULC S-101 standards required in Canada for materials used near heat sources like furnaces and electrical panels, which are commonly found in basements.
This extreme heat origin is what gives rock wool its inherent fire resistance. Unlike organic or plastic-based insulations that will melt or burn, rock wool simply will not support combustion. This provides a critical layer of passive fire protection for a home, particularly in a basement where mechanical systems are often located. It is a prime example of a material’s physical origin defining its ultimate performance and safety characteristics in a building assembly.
Key Takeaways
- Never place fiberglass insulation directly against concrete; it is a guaranteed formula for mold due to moisture wicking.
- Exterior insulation is the only method that protects the foundation from frost heave, and its depth must go below your region’s specific frost line.
- The vapor barrier in an interior insulation assembly always goes on the warm side of the insulation (behind the drywall) to prevent condensation.
Why Did Your Deck Post Lift 3 Inches This Winter?
If you’ve ever seen a deck post, fence post, or even a small shed heave out of the ground during a cold Canadian winter, you have witnessed a small-scale demonstration of the most powerful force acting on your home’s foundation. This phenomenon, known as frost heave, is the single biggest reason why deep exterior foundation insulation is considered the superior structural solution. The heaved deck post is not just an inconvenience; it’s a critical lesson in soil physics.
The lifting is not caused by pressure from below, but by a process called adfreezing. As a Canadian building contractor explains it, this happens when freezing moisture in the soil grips the sides of the post and, as the ground expands, pulls it upwards. Once lifted, the post cannot settle back into its original position because soil collapses into the void beneath it. The forces involved are astronomical; adfreezing forces in Canadian clay soils can generate up to 50,000 pounds per square foot of lifting pressure.
The heaving is caused by a phenomena called Ad-freezing. This happens when frost attaches itself to the sides of the posts and lifts them. Once lifted, they cannot go back down the hole.
– Canadian Building Contractor, TrustedPros Construction Forum
Now, imagine that same force not on a 4×4 post, but gripping the entire perimeter of your home’s foundation. If the foundation is not protected by insulation that extends below the frost line, this adfreezing process can and will lift and crack multi-ton concrete structures over time. The 3-inch lift on your deck post is a warning sign from the earth itself. It demonstrates precisely why managing frost with deep exterior insulation is a non-negotiable part of building or renovating resiliently in a northern climate.
Whether you choose an extensive exterior excavation or a meticulous interior retrofit, the decision must be grounded in these principles of building science. Protecting your foundation is not just about saving on heating bills; it’s about ensuring the structural stability and health of your home for the long term. Before committing to a project of this scale, the next logical step is to have your specific site conditions evaluated by a qualified building science professional or structural engineer.