For a whole-house radiant system in Canada, hydronic isn’t just the better option—it’s the only one that integrates with high-efficiency sources like geothermal for true long-term value.
- System success depends on a “thermal budget,” balancing floor R-values with robust under-slab insulation (R-10 minimum).
- While electric is ideal for small rooms, only hydronic systems (powered by boilers or heat pumps) offer the scalable, cost-effective performance for an entire Canadian home.
Recommendation: Design your radiant heat as a complete thermal system—heat source, insulation, and flooring—not as separate components.
For Canadian homeowners planning a new build or a significant renovation, the promise of radiant floor heating is one of ultimate comfort: silent, even warmth that radiates from the ground up, eliminating cold spots and the drafts of forced-air systems. The immediate question, however, is which type to choose. The common advice often simplifies the choice to “electric for bathrooms, hydronic for everything else.” While not entirely wrong, this view misses the most critical point for a whole-house application.
The real decision isn’t just about picking a technology; it’s about designing an integrated thermal system. The efficiency and luxurious comfort you’re seeking don’t come from the PEX tubing or the electric mat alone. They are the result of a carefully balanced equation involving your heat source, your home’s insulation, and even your final flooring choice. Thinking like a heating designer means moving beyond a simple “A vs. B” comparison and understanding how these elements work in synergy.
This article will guide you through that system-design process. We will deconstruct the key components, from the R-value of your chosen hardwood to the crucial insulation beneath your foundation, and explore how modern technologies are solving the traditional challenges of radiant heat. The goal is to equip you to make a decision based not on platitudes, but on the principles of whole-home efficiency and long-term value in the Canadian climate.
This comprehensive guide will walk you through the critical decisions involved in designing a radiant heating system. We’ll explore flooring choices, insulation requirements, system responsiveness, installation methods, heat sources, and the long-term financial viability of advanced options like geothermal, all contextualized for the Canadian homeowner.
Summary: A Designer’s Guide to Hydronic vs. Electric Systems in Canada
- Tile, Wood, or Carpet: Which Flooring Kills Radiant Heat Efficiency?
- Why You Need R-10 Under the Slab to Make Radiant Heating Work?
- The Lag Time Problem: Why Radiant Floors Can’t React to Quick Weather Shifts?
- Grooved Subfloor Panels: How to Add Radiant Heat Without Pouring Concrete?
- Boiler vs. Tankless: What Drives a Hydronic System Best?
- Retrofitting Slab Insulation: Is It Worth Losing 2 Inches of Headroom?
- Can You Retrofit Geothermal into a House with Ductwork?
- Is Geothermal Heating Worth the $30,000 Price Tag in Canada?
Tile, Wood, or Carpet: Which Flooring Kills Radiant Heat Efficiency?
The first interaction your radiant system has with your living space is through the floor covering. This is not just a decorative choice; it’s a critical component of your heating system’s performance. Every material has a thermal resistance, or R-value. The higher the R-value, the more it insulates, and the harder your radiant system must work to push heat through to the room. Thinking of it as an “R-value budget” is helpful: a high R-value floor “spends” your budget, demanding more energy from the system.
Materials like ceramic and porcelain tile have very low R-values, making them excellent conductors. They transfer heat quickly and efficiently, allowing the system to run at lower water temperatures, which saves energy. Engineered hardwood and luxury vinyl plank are also good performers. Solid hardwood can work well, but its thickness and natural tendency to expand and contract require careful system design. The main culprit in radiant inefficiency is thick carpeting and padding. With a high combined R-value, carpet can reduce heat efficiency by up to 50% compared to tile. This forces the system to run longer and at higher temperatures, increasing operating costs.
This doesn’t mean you can’t have carpets in a home with radiant heat. However, it requires a systems-thinking approach. As demonstrated in successful installations across Canada, it simply means the system must be designed to compensate. This may involve closer tubing spacing or higher water temperatures specifically in carpeted zones like bedrooms. The key is to make this decision upfront, so the system can be engineered accordingly.
| Flooring Type | R-Value Range | Heat Transfer Efficiency | Best Application |
|---|---|---|---|
| Ceramic/Porcelain Tile | 0.2-0.5 | Excellent (95%) | Bathrooms, Kitchens |
| Engineered Hardwood | 0.7-0.9 | Good (75-80%) | Living Areas |
| Luxury Vinyl Plank | 0.15-0.25 | Very Good (85-90%) | All Areas |
| Solid Hardwood | 0.68-0.92 | Moderate (70-75%) | Main Floors |
| Carpet with Pad | 2.0-2.5 | Poor (40-50%) | Bedrooms Only |
Why You Need R-10 Under the Slab to Make Radiant Heating Work?
If flooring is the final gateway for heat into your home, under-slab insulation is the non-negotiable gatekeeper that prevents it from escaping into the ground. A common and costly mistake is to install a radiant system in or on a concrete slab without adequate insulation beneath it. Without this thermal break, a significant portion of the energy produced by your system will radiate downwards, effectively heating the earth beneath your house instead of your living space. This leads to dramatically higher energy bills, slower response times, and a system that can never truly reach its peak performance.
An R-value of 10 is considered the absolute minimum for insulation under a heated slab. This layer of rigid foam board creates the essential barrier that directs heat upwards. However, it’s important to note that many regional building codes in Canada demand even higher values. For instance, Canadian building code requirements can specify R-13 to R-16 for below-grade slabs and even higher for slab-on-grade applications depending on the climate zone. This isn’t just about code compliance; it’s about system efficiency. The more insulation you have below, the less energy you need to consume above.
The insulation works in concert with a vapour barrier to protect the system and the home from ground moisture. This entire sub-slab assembly is the foundation—literally and figuratively—of an efficient radiant system. Skimping here to save a small amount on upfront construction costs will result in paying a penalty every month on your energy bills for the life of the home.

The Lag Time Problem: Why Radiant Floors Can’t React to Quick Weather Shifts?
One of the defining characteristics of traditional hydronic radiant systems, especially those embedded in a thick concrete slab, is their high thermal mass. This mass is great for storing and releasing heat steadily, creating a uniquely stable and comfortable environment. However, it also creates what’s known as “lag time”—the delay between when the thermostat calls for heat and when the room actually feels warmer. In a Canadian climate with rapid temperature swings, this can be a frustration. A sunny afternoon can overheat a room, while a sudden cold front can leave you chilly for hours as the system slowly catches up.
This lag is a matter of physics. Experts in radiant heating installation note that thick concrete slabs require 2-4 hours to respond to temperature changes. This is a stark contrast to forced-air systems that deliver heat almost instantly. Historically, this has been a valid criticism of radiant heating. However, modern system design and controls have turned this “problem” into a manageable characteristic. Instead of fighting thermal mass, we now work with it.
The solution lies in proactive control rather than reactive commands. Smart thermostats with learning algorithms can anticipate heating needs based on weather forecasts and past usage patterns, starting the heating cycle hours in advance. Outdoor temperature sensors provide the system with live data, allowing it to ramp up or down before the indoor temperature is affected. By combining these technologies with proper system zoning, you can create a system that intelligently manages its thermal mass, providing stable comfort without the dramatic over- and under-shooting of the past.
Action Plan: Managing Radiant Floor Lag Time in the Canadian Climate
- Install outdoor temperature sensors to anticipate weather changes before they impact indoor comfort.
- Use programmable thermostats with learning capabilities to predict heating needs based on Canadian weather patterns.
- Consider hybrid systems: hydronic for base heating with electric mats in sun-facing rooms for rapid response.
- Zone your system to allow different response times for various areas of the home.
- Maintain a consistent base temperature rather than using dramatic setbacks to minimize the impact of lag.
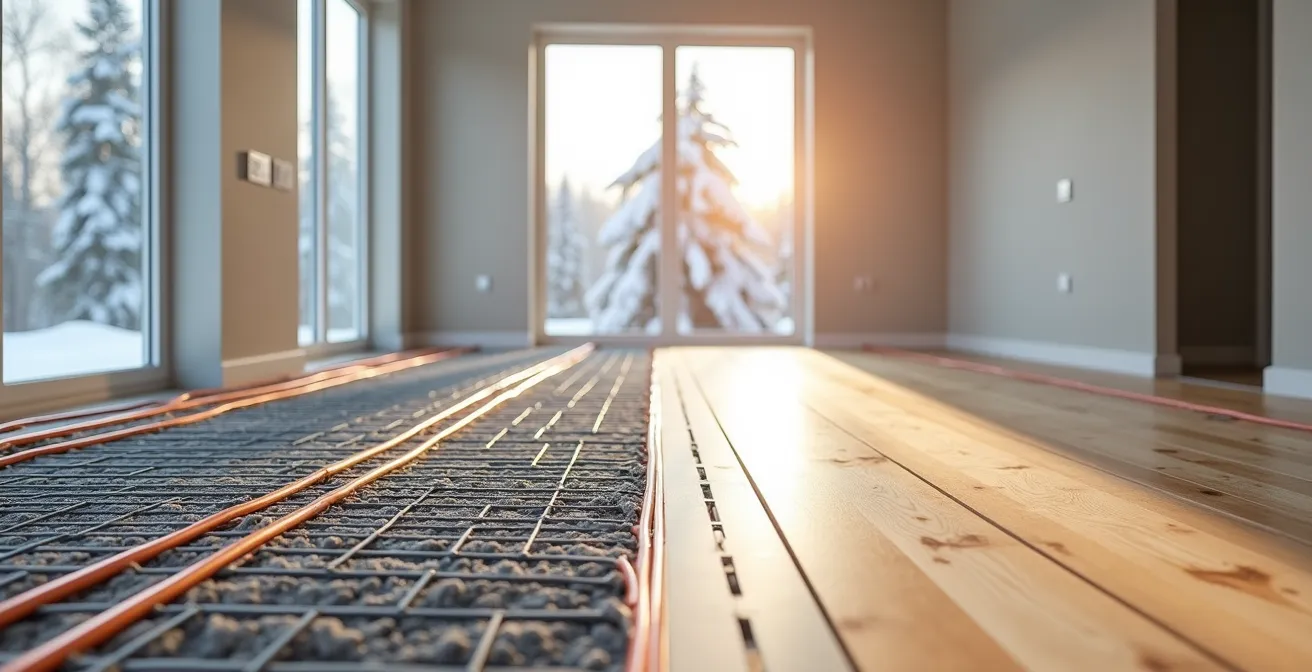
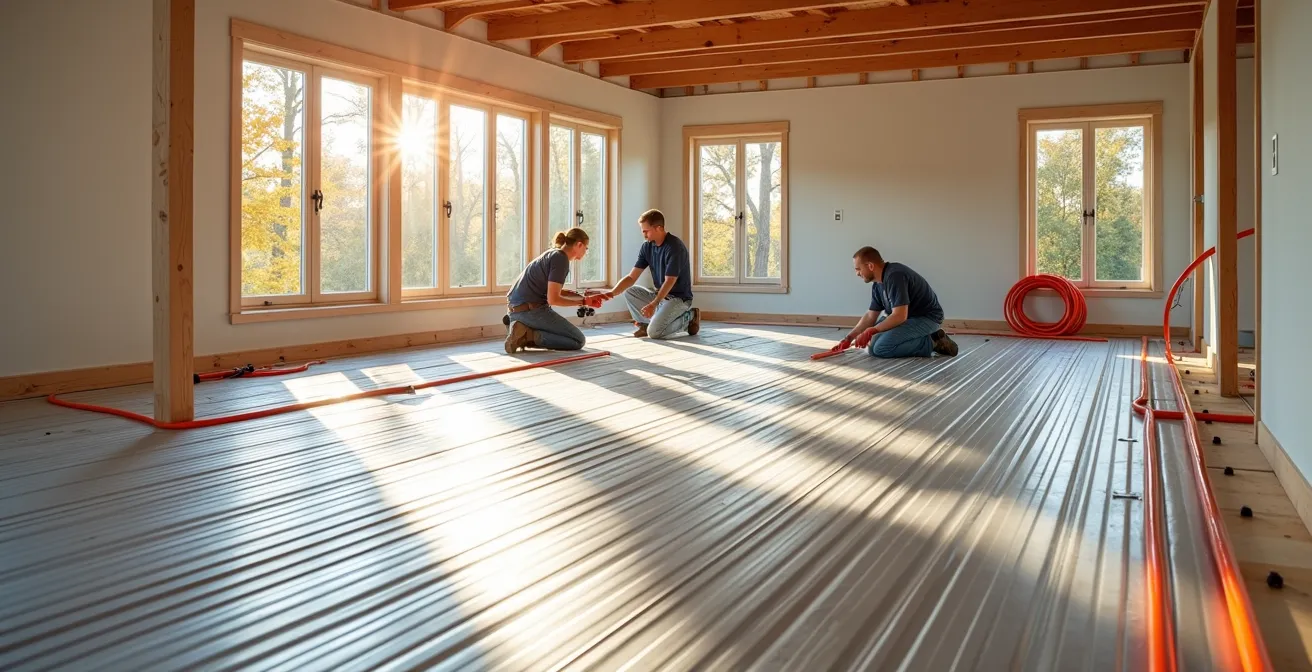
Grooved Subfloor Panels: How to Add Radiant Heat Without Pouring Concrete?
The challenge of high thermal mass and long lag times discussed previously has a direct engineering solution: low-mass radiant systems. For decades, the standard for hydronic radiant was embedding PEX tubing in a thick layer of concrete. This is structurally sound and provides excellent heat distribution but brings the associated weight, installation time, and response lag. For retrofits or wood-framed new construction, a more agile solution is often needed. This is where grooved subfloor panels, also known as heat transfer plates, have revolutionized the industry.
These panels are typically made of plywood, OSB, or high-density foam, with pre-cut channels or grooves on the surface. A thin layer of aluminum is bonded to the panel to ensure rapid and even heat distribution. The PEX tubing for the hydronic system is simply pressed into these grooves. This “dry” installation method completely eliminates the need for a concrete pour. The benefits are substantial: a dramatically lower profile (adding less than an inch of floor height), significantly less weight on the structure, and a much faster installation process. For retrofitting older Canadian homes, where structural limits and ceiling heights are a concern, this technology is a game-changer.
Perhaps the most significant advantage is the impact on performance. By placing the tubing directly beneath the finished floor and using conductive aluminum to spread the heat, these low-mass systems respond much more quickly to thermostat changes—often in 30-45 minutes instead of several hours. This effectively solves the lag time problem, offering the comfort of radiant heat with the responsiveness closer to that of a conventional system.
| Factor | Grooved Panels | Concrete Pour |
|---|---|---|
| Installation Time | 2-3 days | 7-10 days (including cure) |
| Floor Height Addition | 0.75-1.25 inches | 2-4 inches |
| Weight per sq.ft. | 2-3 lbs | 15-20 lbs |
| Response Time | 30-45 minutes | 2-4 hours |
| Cost per sq.ft. (CAD) | $8-12 | $6-10 |
| Retrofit Suitability | Excellent | Limited |
Boiler vs. Tankless: What Drives a Hydronic System Best?
If the tubing is the distribution network, the heat source is the engine of your whole-house hydronic system. For a small area like a bathroom, an electric system drawing power from your panel is feasible. But for an entire home, the energy demand makes electric resistance heating prohibitively expensive in most Canadian provinces. A hydronic system, which uses heated fluid, offers the flexibility to choose a much more efficient and cost-effective engine.
The traditional choice is a high-efficiency boiler, typically powered by natural gas. These units are powerful, reliable, and, in provinces with low natural gas prices like Alberta, can be very economical to run. Another option is a tankless water heater, which can sometimes be sized to handle both domestic hot water and a small radiant zone. However, for a whole-house system, ensuring a tankless unit can meet the combined demand without sacrificing performance requires careful engineering.
The most compelling modern option, however, is the air-to-water heat pump. These devices work like an air conditioner in reverse, extracting heat from the outside air (even in cold Canadian winters) and transferring it to the water in your hydronic system. They are incredibly efficient, and their adoption has been supercharged by federal and provincial incentive programs. According to Natural Resources Canada’s 2024 update, 82,000 Canadian households have already used the Canada Greener Homes Grant to install heat pumps. In provinces with high electricity rates like Ontario, these grants are critical to making the upfront investment viable, while in Quebec, with its low-cost hydropower, heat pumps and even electric boilers can be the most economical choice year-round.
Retrofitting Slab Insulation: Is It Worth Losing 2 Inches of Headroom?
For homeowners with an existing home and an uninsulated basement slab, the idea of adding radiant heat can seem daunting. The primary challenge is the need to insulate. Is it really worth sacrificing precious ceiling height to add foam boards and a new layer of flooring on top of your existing concrete? From an efficiency and comfort standpoint, the answer is an unequivocal yes.
As established, installing radiant heat on an uninsulated slab is a recipe for high energy bills. By adding a proper thermal break, you ensure the heat you generate stays in your living space. The return on this investment is significant; based on Ontario home retrofit studies, radiant heating can reduce energy costs by up to 40% compared to traditional forced-air methods, largely due to its targeted efficiency. The 1.5 to 2 inches of height lost to insulation and a thin concrete or self-leveling compound pour is a small price to pay for turning a cold, damp basement into a warm, comfortable living area and substantially lowering your home’s overall energy consumption.
The process itself is straightforward for a professional. It begins with a polyethylene vapour barrier over the existing slab. Then, a minimum of R-10 rigid foam insulation boards rated for floor applications are laid down. The PEX tubing is then secured to the foam, typically with a 9-12 inch spacing. Finally, a thin layer (minimum 1.5 inches) of self-leveling compound or concrete is poured over the tubing to create the new, heated floor base. While you do lose some headroom, you gain a highly efficient, comfortable, and valuable living space that was previously underutilized.
Can You Retrofit Geothermal into a House with Ductwork?
As we move up the ladder of high-performance heating, we arrive at geothermal energy. Many Canadian homeowners with existing forced-air systems wonder if they can tap into this ultra-efficient technology. The answer is yes; a water-to-air geothermal system can connect directly to existing ductwork, replacing your furnace and air conditioner. However, this misses an opportunity for an even greater leap in comfort and efficiency.
The true “ultimate pairing” is a water-to-water geothermal system powering a hydronic radiant floor. This combination achieves a level of synergy that is unmatched. Geothermal systems are at their most efficient when they only need to produce low-temperature water. Radiant floors, as we’ve seen, are designed to work perfectly with this low-temperature water (around 30-35°C). In contrast, a system connected to ductwork needs to produce hotter air, which requires the geothermal unit to work harder, reducing its efficiency. As Canadian HVAC design expert Adam Carter, C.E.T. RASDT, RHDT, puts it:
While you can connect geothermal to ductwork, the ultimate pairing for efficiency and luxury comfort is a water-to-water geothermal system powering a hydronic radiant floor
– Adam Carter, C.E.T. RASDT, RHDT, Canada HVAC Design
The science backs this up. The efficiency of a heat pump is measured by its Coefficient of Performance (CoP). A CoP of 4 means it produces 4 units of heat for every 1 unit of electricity consumed. Data from Natural Resources Canada shows a CoP of 4-5 achieved when operating at 30-35°C for radiant floors, versus a lower efficiency when forced to produce hotter water or air. This pairing represents the pinnacle of home heating: the most efficient source powering the most comfortable distribution method.

Key Takeaways
- Radiant heat is a system, not a product. Success hinges on integrating flooring, insulation (min. R-10), and the heat source.
- For whole-house applications in Canada, hydronic systems offer superior efficiency and lower operating costs, especially when paired with a heat pump or high-efficiency boiler.
- Modern solutions like grooved panels and smart controls mitigate traditional drawbacks like installation height and response time, making hydronic systems viable for both new builds and retrofits.
Is Geothermal Heating Worth the $30,000 Price Tag in Canada?
The primary barrier to geothermal adoption for most Canadian homeowners is the significant upfront cost, which can easily exceed $30,000. When a new high-efficiency furnace and A/C combo costs a fraction of that, is the investment truly justifiable? When viewed through the lens of lifetime cost and total cost of ownership, the answer is a resounding yes.
A conventional HVAC system has a lower initial price, but its story is one of higher annual operating costs and a shorter lifespan, typically around 15 years. A geothermal system, especially when paired with a durable hydronic floor, is a long-term investment. The underground loop field, the most expensive component, can last for 50 years or more, while the indoor heat pump unit has a lifespan of 25+ years. The operating costs are drastically lower year after year. Furthermore, the Canada Greener Homes Grant provides up to $5,000 to help offset the initial installation cost, making the financial case even stronger.
Let’s look at the 25-year picture. The geothermal system, despite its high initial cost, ends up being significantly cheaper when you factor in its minimal operating expenses and longevity. The conventional system, on the other hand, will likely require a full replacement within that timeframe, adding another large capital expense to its already high running costs. As demonstrated by numerous installations in provinces from the Maritimes to B.C., a geothermal system isn’t an expense; it’s an investment in decades of low-cost, stable, and sustainable home comfort.
| Cost Factor | Geothermal + Radiant | Furnace/AC Combo |
|---|---|---|
| Initial Cost | $30,000 | $8,000 |
| Canada Greener Homes Grant | -$5,000 | $0 |
| Net Initial Cost | $25,000 | $8,000 |
| Annual Operating Cost | $600 | $1,800 |
| System Lifespan | 25 years (50+ for loops) | 15 years |
| 25-Year Total Cost | $40,000 | $61,000 |
To determine the ideal radiant system for your home, the next step is to consult with a certified heating designer who can perform a detailed heat loss calculation and model the lifetime costs for your specific region in Canada.