
Effective soundproofing on a budget has little to do with expensive foam panels and everything to do with understanding the physics of sound.
- Your primary enemies are airborne vibrations (traffic, voices) and structural vibrations (bass, footsteps).
- Success lies in a three-pronged strategy: adding Mass, creating Damping, and achieving Decoupling.
Recommendation: Invest your $1,000 budget strategically in high-density mineral wool, resilient channels for decoupling, and non-hardening acoustic sealant. These offer the highest return on investment for actual noise reduction.
For the remote worker in a bustling Canadian city like Toronto or Montreal, the constant drone of traffic, sirens, and construction is more than an annoyance—it’s a barrier to deep work. The search for a quiet space often leads down a path of common but ineffective solutions. Many people invest in acoustic foam panels, only to find they reduce a bit of echo but do nothing to block the low rumble of a passing streetcar. Others buy thick curtains that barely make a dent in the noise from the street below. These solutions fail because they misunderstand the fundamental nature of sound transmission.
The truth is, creating a genuinely peaceful home office is less about brute force and more about smart science. It revolves around three core principles: adding Mass to block sound waves, using Damping compounds to convert sound energy into heat, and—most critically—Decoupling structures to stop vibrations from passing through them. A high thermal R-value, for instance, means almost nothing for soundproofing, yet it’s a common point of confusion. True sound isolation is a system, where every component works together. The weakest link, be it a tiny gap around a door or an unsealed electrical outlet, can undermine the entire effort.
This guide moves beyond the generic advice. We will break down the specific, technical choices that deliver the greatest acoustic performance for your dollar. By focusing on the right materials and, more importantly, the right techniques, you can achieve a significant reduction in street noise and create the focused environment you need, all while staying within a practical $1,000 budget.
To navigate this project effectively, we will explore the critical mistakes to avoid and the professional techniques that make a real difference. This article is structured to build your understanding step-by-step, from foundational principles to the final, crucial details.
Summary: Your Roadmap to a Quiet Home Office
- Why R-Value Has Nothing to Do with Blocking Traffic Noise?
- How to Mute the Sound of Flushing Toilets in Open Concept Homes?
- Resilient Channels or Extra Drywall: Which Stops Bass Frequencies Better?
- The Venting Mistake That Allows Noise to Bypass Insulated Walls
- When to Install Acoustic Batts: Before or After Rough-In Wiring?
- The Two-Bead Rule: How to Caulk Drywall for Maximum Sound Blocking?
- Can You Put Batt Insulation Directly on Top of Suspended Ceiling Tiles?
- Acoustic Sealant vs. Regular Caulk: Why the Black Stuff Matters?
Why R-Value Has Nothing to Do with Blocking Traffic Noise?
One of the most persistent myths in home improvement is that insulation designed for heat is also effective for sound. Homeowners often believe that doubling up on high R-value fiberglass or spray foam will create a silent sanctuary. This is fundamentally incorrect. The R-value measures an insulation’s resistance to heat flow, not its ability to block sound waves. While some thermal insulations offer minor acoustic benefits, their primary design is to trap air, which does little to stop the low-frequency energy of traffic noise.
The metric that truly matters for soundproofing is the Sound Transmission Class (STC). This rating indicates how well a barrier (like a wall) attenuates airborne sound. For example, while closed-cell spray foam boasts an impressive R-6.0 per inch, its STC rating is often lower than less thermally efficient materials. This is because soundproofing relies on mass and density, not trapped air. This is a crucial distinction, especially under regulations like the Ontario Building Code requirements for attic insulation, which focus purely on thermal performance and can mislead those seeking acoustic peace.
The most effective and budget-friendly insulation for soundproofing is mineral wool (often known by the brand name Rockwool). Its dense, non-directional fiber structure is inherently better at absorbing sound waves and reducing transmission compared to fluffy fiberglass batts. While its R-value is slightly lower than some competitors, its STC performance is significantly higher, making it the clear choice for an acoustic project.
This table from a Canadian home improvement retailer clearly illustrates the difference. Notice how mineral wool provides a superior STC rating compared to products with a higher R-value per inch.
| Product Type | R-Value per inch | STC Rating | Best Use |
|---|---|---|---|
| Fiberglass Batts | R-3.2 | STC 39 | Thermal insulation |
| Mineral Wool (Rockwool) | R-3.0 | STC 45+ | Acoustic & thermal |
| Closed-cell Spray Foam | R-6.0 | STC 37 | Thermal & air seal |
| Open-cell Spray Foam | R-3.5 | STC 39 | Thermal insulation |
Therefore, when allocating your budget, prioritize materials based on their STC rating, not their R-value. For blocking street noise, dense mineral wool is a far smarter investment than expensive, high-R-value foams.
How to Mute the Sound of Flushing Toilets in Open Concept Homes?
While your primary goal may be blocking external street noise, a truly quiet office must also address internal sound sources. In modern open-concept homes and condos, the sound of plumbing, particularly a flushing toilet, can travel surprisingly easily. This noise is often structure-borne, meaning it vibrates through the wall studs and floor joists. The solution involves a combination of adding absorptive mass and sealing air gaps, which can often be done without major demolition, making it ideal for renters in cities like Toronto.
The core principle is to disrupt the path of the sound. If you are building a wall, insulating the interior wall cavity around the bathroom with mineral wool is highly effective. However, for those in existing spaces, the focus shifts to surface treatments and creative barriers. You don’t need to tear down walls to make a significant difference. The key is to add soft, dense materials that absorb sound energy before it can fill your workspace. Simple, non-permanent solutions can be surprisingly effective at creating a buffer zone.
For renters or those on a tight budget, focusing on tactical, reversible solutions is key. These methods rely on adding mass and absorption without altering the structure of your home, providing immediate relief from common household noises.
Action Plan: DIY Sound Muting for Renters
- Add Mass with Furniture: Position a large, dense bookshelf against the shared wall with the noise source. An IKEA KALLAX unit filled completely with books acts as an excellent, low-cost mass barrier.
- Deploy Acoustic Panels Strategically: Instead of covering a whole wall, place a few thick acoustic foam or fabric panels (at least 2 inches thick) directly on the wall areas closest to your ears.
- Seal the Doorway: Sound is like water; it will find any crack. Apply high-quality, self-adhesive weatherstripping around the entire perimeter of your office door frame to create an airtight seal.
- Block the Underside of the Door: Add a heavy-duty door sweep or a draft stopper to the bottom of the door. This is often the largest and most significant air gap.
- Absorb Floor Vibrations: Place a thick area rug with a dense felt pad on the floor. This is especially important in rooms with hard surfaces like wood or laminate, as it absorbs both airborne sound and impact vibrations.
By combining these strategies, you can create a multi-layered defense against internal noise that significantly improves your ability to focus, without requiring a single construction permit.
Resilient Channels or Extra Drywall: Which Stops Bass Frequencies Better?
When dealing with the low-frequency rumble of traffic and buses, simply adding more mass—like a second layer of drywall—yields diminishing returns. While it helps, it’s not the most efficient use of your budget. The professional’s secret weapon for combating low-frequency noise is decoupling. This means mechanically separating the drywall from the wall studs so that vibrations cannot travel directly through the structure. The most common tool for this is the resilient channel.
A resilient channel is a thin metal strip designed in a “Z” shape that acts like a spring or a shock absorber for sound. You attach the channel to the studs and then screw the drywall into the channel, not the studs. This creates an air gap and allows the drywall to vibrate independently, dissipating sound energy before it can pass through the wall. The effect is dramatic, particularly for the stubborn bass frequencies that mass alone struggles to stop. As one study shows, properly installed resilient channels can improve a wall’s STC rating from 17 to over 50, a massive leap in performance.
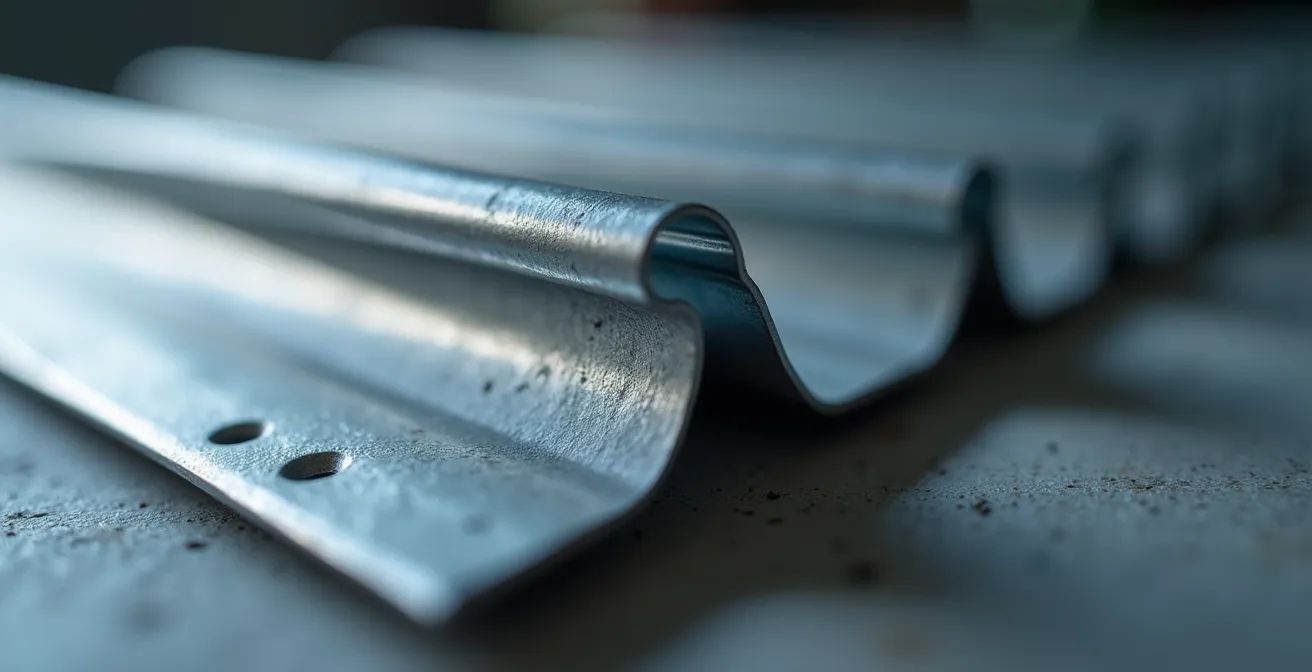
As seen in the detail above, the channel’s profile creates a flexible connection point that is crucial for acoustic isolation. However, installation is critical: a single screw driven through the channel and into a stud will “short-circuit” the entire system, creating a rigid bridge for sound and rendering the channel useless. This is a common and costly DIY mistake.
So, which is better on a budget? For a typical wood-stud wall in a Canadian home, a single layer of drywall on resilient channels will outperform two layers of drywall screwed directly to the studs, especially against traffic noise. Combining the two—one layer of drywall, resilient channels, and then a second layer of drywall—creates a high-performance system known as a “damped mass” assembly, but resilient channels alone provide the best bang for your buck.
For anyone serious about blocking urban rumble, investing a portion of the $1,000 budget in resilient channels is a far more effective strategy than simply buying more drywall.
The Venting Mistake That Allows Noise to Bypass Insulated Walls
You can build a theoretically perfect wall with mineral wool, decoupled drywall, and acoustic sealant, only to find that noise is still leaking into your room. Often, the culprit is not the wall itself but the holes that have been punched through it. These are known as flanking paths, and the most common offenders are heating and cooling (HVAC) vents, as well as back-to-back electrical outlets.
Metal ducts in forced-air systems are essentially sound-transmitting tubes. They act as a direct, uninsulated pathway for noise to travel from one room to another, or even from outside, completely bypassing your carefully constructed walls. An open vent in your home office is like leaving a window open acoustically. The problem is compounded in many residential builds where outlets for two different rooms are placed in the same stud bay, creating a direct hole through the wall.
Unfortunately, modifying existing metal ductwork is a large, often impractical project for a homeowner. Lining them with fiberglass or replacing them entirely is expensive and disruptive. However, you can significantly mitigate the noise leakage at the point of entry into your room. The strategy is to seal all air gaps around the penetration and, where possible, create a dampened barrier.
For electrical outlets, the solution is simpler and highly effective. Because they are holes in the drywall, they break the “mass” barrier. Sealing them is a non-negotiable step in any serious soundproofing project. You can use special putty pads, which are dense, moldable, fire-rated squares that you press onto the back of the electrical box inside the wall cavity. These pads add mass and seal the box, dramatically reducing sound leakage. When possible during construction, offsetting back-to-back outlets so they are not in the same stud bay is a crucial design choice.
Ignoring these flanking paths is the most common reason why expensive soundproofing projects fail. Before you spend a dollar on drywall, inspect your room for these acoustic weak points and plan to address them.
When to Install Acoustic Batts: Before or After Rough-In Wiring?
In any construction or renovation project, the sequence of operations is just as important as the materials used. When it comes to soundproofing, a critical question is the timing of insulation installation relative to electrical and plumbing work. The answer is unequivocal: all rough-in wiring, plumbing, and HVAC work must be completed and inspected *before* a single piece of insulation is installed.
Attempting to install insulation first creates a cascade of problems. Electricians would have to cut and tear the batts to run wires, creating voids and compressed areas that severely compromise acoustic performance. Insulation is most effective when it fills a cavity completely but without being compressed. A compressed batt loses its ability to trap air and absorb sound. Furthermore, in jurisdictions like Ontario, the Electrical Safety Authority (ESA) requires an inspection of the rough-in wiring before it is covered. If you install insulation first, you will be required to remove it for the inspection, wasting time and money.
The correct professional sequence for soundproofing a new wall is as follows:
- Complete all framing, in-wall plumbing, and HVAC ductwork.
- Run all electrical wiring and install outlet/switch boxes.
- Schedule and pass the required electrical (and plumbing) inspections.
- Only now, install the acoustic batts (e.g., mineral wool). Cut them slightly larger than the stud bay (about 1/2 inch) for a snug friction fit. Ensure they are carefully cut around boxes and wires, not stuffed behind them.
- Install your vapor barrier, resilient channels (if used), and finally, the drywall.
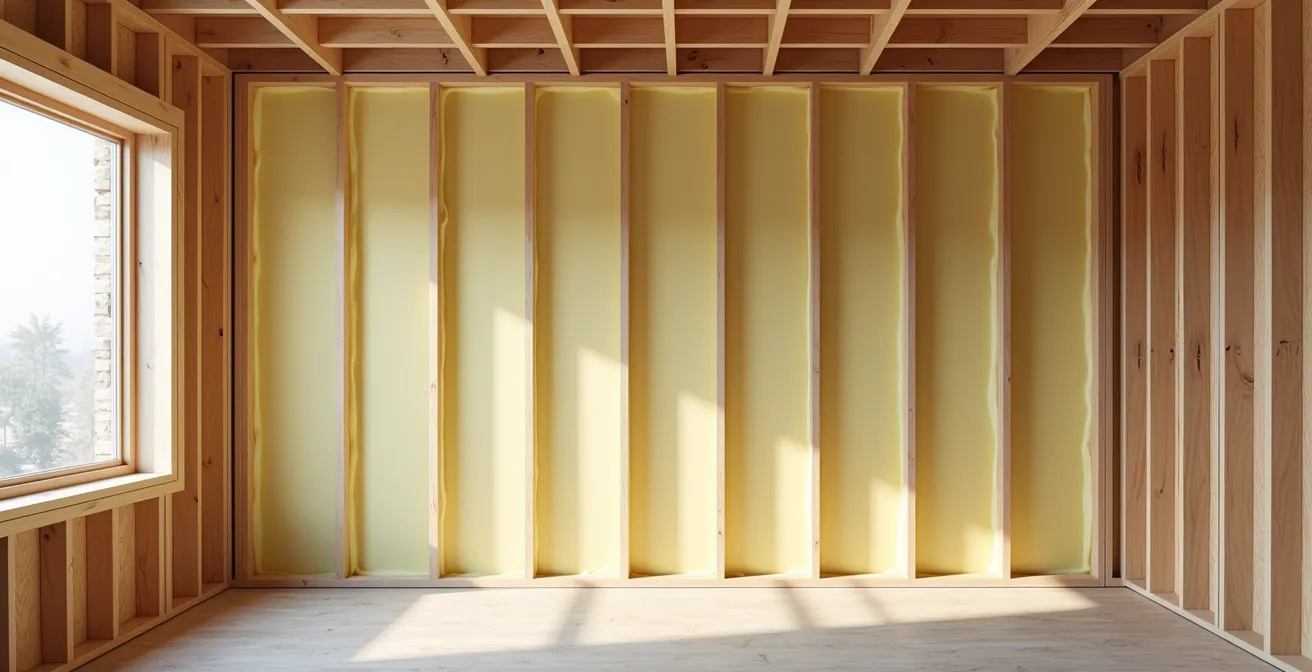
The image above demonstrates the goal: a snug, complete fill of the cavity without compressing the material. Any gaps or tightly stuffed areas become weak points in your acoustic barrier. Following the correct order ensures that your investment in high-quality acoustic insulation delivers its maximum performance.
Rushing this process or doing things out of order is a false economy that will ultimately undermine the quiet environment you are trying to create.
The Two-Bead Rule: How to Caulk Drywall for Maximum Sound Blocking?
Even with dense insulation and decoupled walls, your soundproofing system can be defeated by the smallest of gaps. The seams where drywall sheets meet each other, and where they meet the floor, ceiling, and adjacent walls, are critical flanking paths. Standard drywall mud and tape are not designed to block sound; they dry hard and brittle, readily transmitting vibrations. To solve this, you must seal every single seam with acoustic sealant.
For a high-performance system, especially when using two layers of drywall for added mass and damping, professionals use what can be called the “Two-Bead Rule.” This involves applying acoustic sealant at two distinct stages to create a truly airtight and dampened assembly. It ensures that no rigid connection exists between the layers or the surrounding structure.
The first bead is applied to the frame itself. Before the first layer of drywall goes up, you run a bead of acoustic sealant on the face of the studs. This creates a gasket that decouples the drywall sheet from the wood. The second bead is applied between the drywall layers. After the first layer of drywall is installed, you apply a bead of acoustic sealant to all its seams. Then, for maximum effect, you apply a viscoelastic damping compound like Green Glue Noiseproofing Compound in a random, serpentine pattern across the entire face of the first sheet before installing the second layer. This compound never hardens, creating a damping layer that converts sound energy into a tiny amount of heat.
Even on a single-layer upgrade, the principle holds. You must apply a continuous bead of acoustic sealant in every corner and seam—where the wall meets the floor, the ceiling, and other walls. A 1/4-inch gap should be left around the perimeter of the drywall and filled entirely with sealant. This isolates the entire wall from the building’s structure, preventing vibrations from flanking around it.
This level of detail may seem excessive, but it is often the difference between a mediocre result and a truly quiet room. The integrity of your seals is paramount.
Can You Put Batt Insulation Directly on Top of Suspended Ceiling Tiles?
In many Canadian basement home offices, a suspended or “T-bar” ceiling is a common feature, providing easy access to pipes and wiring. A frequent DIY idea to reduce noise from the floor above is to simply lay standard fiberglass or mineral wool batts directly on top of the ceiling tiles. This is a dangerous mistake and should never be done.
There are two major risks. First, standard suspended ceiling grids are not designed to bear significant weight. Heavy insulation batts can cause the grid to sag, bend, or even collapse. Second, and more critically, it creates a serious fire hazard. Recessed lighting fixtures (pot lights) generate a great deal of heat. If they are not specifically rated for direct contact with insulation (marked “IC-rated”), covering them can cause them to overheat, posing a significant risk of fire. Most older pot lights are not IC-rated.
Fortunately, there are safe and effective ways to improve the acoustic performance of a suspended ceiling without creating a hazard. The focus should be on using materials specifically designed for this application.
- Use High-Performance Tiles: Replace your standard lightweight tiles with specialty acoustic ceiling tiles. Look for products with high STC (Sound Transmission Class) and CAC (Ceiling Attenuation Class) ratings from manufacturers like Armstrong or CertainTeed. These are denser and designed to block sound.
- Use Safe Insulation Products: If you want to add insulation, use lightweight mineral wool panels specifically designed for ceilings. These can be cut to fit and placed on the back of the acoustic tiles, but you must *always* cut out space around any non-IC-rated light fixtures or electrical boxes, leaving at least three inches of clearance.
- Check Grid Loading: Before adding any weight, confirm the load rating of your T-bar grid system to ensure it can safely support the new materials.
Key Takeaways
- Standard R-value insulation is for heat, not sound. Focus on STC ratings and mass.
- Decoupling with resilient channels is more effective for low-frequency traffic noise than just adding more drywall.
- Every gap is a sound leak. Meticulous sealing with acoustic sealant is the most cost-effective step you can take.
By choosing the right products designed for the job, you can significantly reduce noise from the floor above without compromising the safety of your home.
Acoustic Sealant vs. Regular Caulk: Why the Black Stuff Matters?
In the final stages of a soundproofing project, with walls insulated and drywall in place, it can be tempting to save a few dollars by using cheap painter’s caulk to seal the remaining gaps. This is one of the most costly mistakes you can make in terms of acoustic performance. The difference between a $5 tube of regular caulk and an $18 tube of acoustic sealant is the difference between success and failure.
Regular acrylic or silicone caulk is designed to dry hard and rigid. When it cures, it forms a solid bridge between two surfaces. For sound vibrations, this hard connection is a perfect conductor. Any vibration hitting one side of the seam will travel directly through the hardened caulk to the other side, completely negating the decoupling you worked so hard to achieve. It effectively “re-connects” your isolated wall to the rest of the structure.
Acoustic sealant, on the other hand, is designed with a property called viscoelasticity. This means it never fully hardens. It remains permanently soft, flexible, and tacky. When sound vibrations hit a seam filled with acoustic sealant, the compound flexes and deforms, converting the sound energy into a minuscule amount of heat. It acts as a damper, absorbing the vibration rather than transmitting it. This property is what makes it essential for maintaining the integrity of an acoustic barrier.
Acoustic sealant is 2-3 times more expensive than painter’s caulk, but it’s the most cost-effective part of your entire project.
– Construction Expert, Home Soundproofing Guide
The price difference is small in the context of the overall project, but the performance difference is enormous. As the following comparison of products available in Canada shows, the cost is minimal for a product that is central to the project’s success.
| Product | Type | Price/Tube (CAD) | Key Feature |
|---|---|---|---|
| LePage PL Acoustic | Acoustic | $18-22 | Remains flexible |
| DAP Acoustic Sealant | Acoustic | $15-20 | High STC rating |
| Regular Painter’s Caulk | Standard | $5-8 | Dries hard – ineffective |
Skimping on sealant is like building a boat and leaving a small hole in the hull. Your entire investment is on the line. Allocating a portion of your $1,000 budget to quality acoustic sealant is the single most important finishing detail for a successful soundproofing project.