Insulating your heritage brick home with modern materials like spray foam doesn’t just lower your heating bills; it can actively destroy the historic brick it’s meant to protect.
- Heritage walls need to “breathe”—a process modern, impermeable insulation blocks, trapping moisture that leads to destructive freeze-thaw cycles in Canadian winters.
- The solution lies in vapour-permeable materials (like lime mortar and rock wool) that work with your home’s original design, not against it.
Recommendation: Prioritize moisture management over maximum R-value and always perform a full masonry assessment before any insulation work begins.
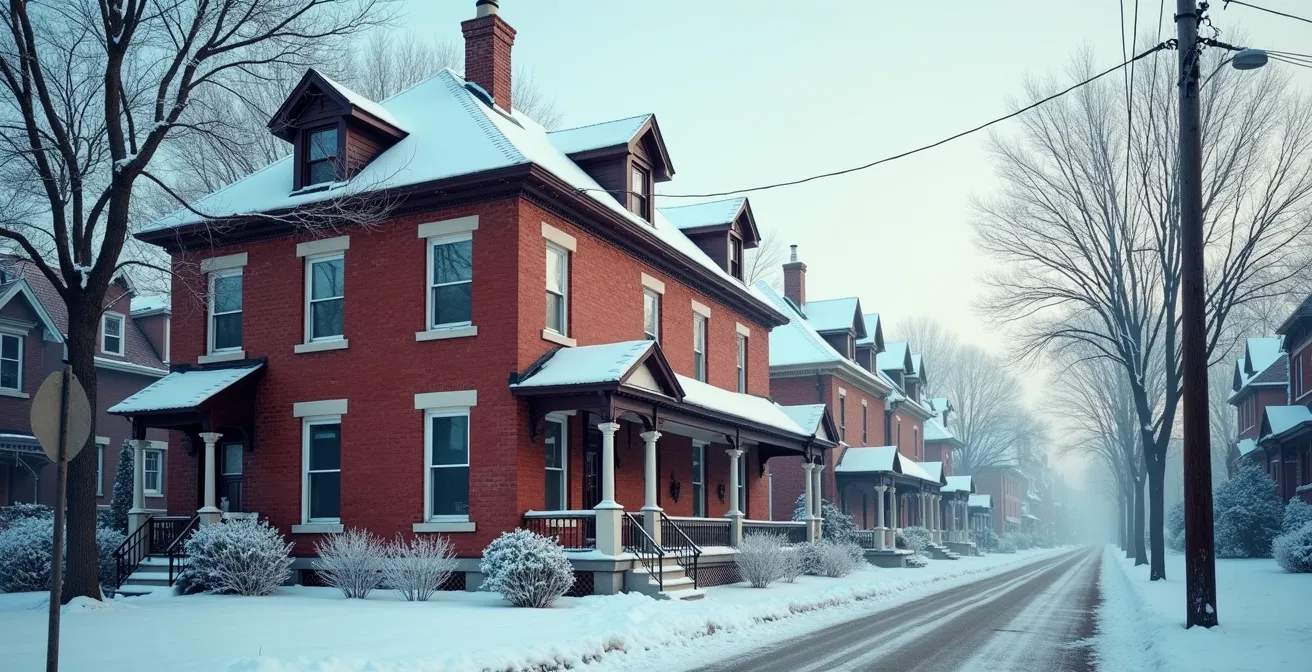
Owning a century-old brick home in a city like Toronto or Montreal is a commitment to stewardship. The intricate masonry, the solid wood framing, and the unique character are testaments to a different era of craftsmanship. As a responsible owner, improving energy efficiency is a natural goal, especially with Canada’s harsh winters. The common advice often points towards modern solutions like spray foam insulation, promising high R-values and a quick fix to drafts and high heating bills. This approach, however, can be a catastrophic mistake for a heritage structure.
The fundamental error is treating an old house like a new one. A 100-year-old home is not a sealed box; it’s a dynamic system designed to manage moisture by “breathing.” The porous brick and soft lime mortar allow moisture to enter and, crucially, to exit. When modern, impermeable insulation is applied to the interior, this delicate balance is shattered. You might solve the draft problem, but you risk creating a much more insidious one: trapped moisture that can lead to rot, mould, and the literal destruction of your home’s historic fabric from the inside out.
This guide takes a different, more respectful approach. We will move beyond the simplistic metric of R-value and delve into the essential principles of building science for heritage homes. The key isn’t to create an impenetrable barrier but to enhance the home’s natural ability to stay warm and dry. We will explore why some modern materials are the enemy of old brick, how the right mortar is crucial for longevity, and what “breathable” insulation really means for a wooden frame’s survival. By understanding the science, you can make informed, safe decisions that preserve your home’s integrity for the next century.
This article provides a detailed roadmap for navigating the complexities of retrofitting a heritage home in Canada. The following sections break down the critical considerations, from material choices to project sequencing, ensuring you can upgrade your home’s performance without compromising its soul.
Summary: A Guide to Insulating a Century Home Without Damage
- Why Interior Spray Foam Can Cause Heritage Brick to Spall and Crumble?
- Lime vs. Portland Cement: Which Mortar Allows Your Old House to Breathe?
- Wood Fiber Insulation: Is It the Best Choice for Heritage Retrofits?
- How to Add Exterior Insulation Without Losing Your Victorian Trim?
- When to Restore Masonry: Before or After Internal Insulation Work?
- How to Create Fire Blocks in Balloon-Framed Century Homes?
- Why “Breathable” Insulation Saves Wood Frames from Rotting?
- How to Renovate a 1950s Bungalow to Near Net-Zero Standards?
Why Interior Spray Foam Can Cause Heritage Brick to Spall and Crumble?
The primary danger of using closed-cell spray foam on the interior of a historic brick wall lies in how it fundamentally alters the wall’s hygrothermal performance. Originally, your home’s thick masonry walls managed moisture through slow, continuous drying to both the inside and outside, aided by heat loss from the interior. When you apply an impermeable layer like spray foam, you cut off this interior drying path. As a result, the brick assembly becomes significantly colder and wetter during Canadian winters.
This trapped moisture is the catalyst for destruction. As temperatures drop, the water absorbed by the porous, historic bricks freezes and expands, creating immense internal pressure. This process, known as freeze-thaw spalling, causes the face of the brick to pop off, crumble, and deteriorate. According to Canadian heritage building experts, heavy masonry walls insulated on the interior get both colder and damper, dramatically increasing this risk. What was intended as an upgrade becomes a direct threat to the structural and aesthetic integrity of your home’s most defining feature.
Case Study: The Barrymore Building in Toronto
A study on the 1850s Barrymore Building, a designated heritage structure in Toronto, provides a clear lesson. Analysis conducted for an interior insulation retrofit showed that wall systems designed to be “breathable” and manage moisture achieved net drying, especially on walls exposed to rain and sun. This ability to dry out prevented the bricks from reaching the critical moisture levels that initiate freeze-thaw damage, a success that would have been impossible with a non-permeable spray foam application.
Before ever considering a spray foam application, it’s crucial to challenge any contractor proposing it. Their understanding of heritage building science is paramount to your home’s survival. A knowledgeable contractor should be able to discuss the principles of deflection, drainage, and drying, and provide a hygrothermal analysis specific to your climate zone.
Your Checklist Before Considering Spray Foam in a Heritage Home
- Contractor Assessment: Has the contractor conducted a Basic Assessment for Interior Insulation Masonry Wall Retrofits as per Ontario Association of Architects guidelines?
- Climate Analysis: Can they provide a hygrothermal analysis specific to your Canadian climate zone (e.g., Zone 6 for Southern Ontario)?
- The 3 Ds: Do they understand and apply the principles of Deflection, Drainage, and Drying for heritage masonry?
- Moisture Audit: Have they checked for existing moisture issues and salt contamination *before* proposing any insulation?
- Proven Experience: Can they demonstrate experience with buildings designated by Canadian Heritage Preservation boards?
Lime vs. Portland Cement: Which Mortar Allows Your Old House to Breathe?
The mortar that holds your heritage bricks together is not just a bonding agent; it’s a vital part of the wall’s moisture management system. Homes built before the 1930s almost exclusively used lime-based mortar. This material is soft, flexible, and, most importantly, highly vapour-permeable. It acts like a wick, drawing moisture out of the surrounding bricks and allowing it to evaporate, keeping the wall assembly dry. Lime mortar is designed to be the sacrificial element of the wall—it is softer than the brick, so any stress or movement causes the mortar to crack, which is an easy repair, rather than the brick itself.
In contrast, Portland cement-based mortar, common in modern construction, is hard, rigid, and has very low permeability. Using it to repoint or repair a historic brick wall is a critical error. Because it’s stronger and less porous than the old bricks, it traps moisture within them. During a freeze-thaw cycle, this trapped water expands and destroys the face of the brick, a type of damage called spalling. Furthermore, the rigidity of Portland cement doesn’t allow for the natural expansion and contraction of the heritage wall, leading to stress fractures in the bricks themselves. For these reasons, heritage boards in cities like Toronto and Montreal mandate the use of appropriate lime-based mortars for any work on designated properties.
The choice between these two materials is not a matter of preference but of fundamental compatibility. Using the wrong mortar can cause irreversible damage, undermining the very structure you’re trying to preserve. The table below outlines the critical differences.
| Property | Lime Mortar | Portland Cement | Impact on Heritage Brick |
|---|---|---|---|
| Flexibility | Soft and flexible | Strong and stiff | Lime accommodates movement; Portland causes brick spalling |
| Moisture Permeability | High (breathable) | Low (traps moisture) | Lime allows walls to dry; Portland traps water causing freeze-thaw damage |
| Required by Heritage Boards | Mandated in Toronto, Montreal, Halifax | Prohibited for designated properties | Lime preserves historic fabric |
| Compatibility with 19th century brick | Excellent match | Incompatible | Lime bonds well; Portland damages soft historic brick |
Wood Fiber Insulation: Is It the Best Choice for Heritage Retrofits?
When searching for insulation that respects the “breathing” nature of a heritage wall, wood fibre emerges as a leading contender. Made from wood chips processed into boards or batts, wood fibre insulation is inherently vapour-permeable. This property allows it to manage moisture effectively, letting the wall assembly dry out and preventing the condensation issues that plague impermeable foams. It has excellent thermal mass, which helps buffer temperature swings, and its hygroscopic nature allows it to safely absorb and release moisture without losing its insulating properties.
However, while wood fibre is an excellent technical choice, Canadian building science experts often point to a more practical and equally effective alternative: rock wool (also known as mineral wool). As one analysis notes, rigid rock wool boards like Rockwool Comfortboard are also moisture-permeable, non-combustible, and provide excellent thermal resistance. Crucially, they are widely available in Canadian building supply stores and often come at a more competitive price point than imported wood fibre products. This makes rock wool a highly pragmatic choice for many Canadian heritage retrofits, delivering similar hygrothermal performance without the potential supply chain hurdles or premium cost of wood fibre.
Both materials align with the principles of a breathable building envelope. The decision between them may come down to budget, local availability, and specific project requirements. Importantly, upgrading your insulation with either of these materials can make you eligible for significant financial support. For instance, The Canada Greener Homes Grant offers up to $3,750 per upgrade available for home insulation improvements, helping to offset the cost of a proper, heritage-sensitive retrofit. The key is choosing a material that works with your home, not against it.
How to Add Exterior Insulation Without Losing Your Victorian Trim?
For many heritage brick homes, particularly those with solid masonry walls, adding insulation to the exterior is the most effective and least risky approach. This method keeps the entire historic brick wall warm and dry within the building’s thermal envelope, completely eliminating the risk of interior condensation and freeze-thaw damage. The primary challenge, however, is an aesthetic one: how to add several inches of insulation without losing the home’s defining character, especially the intricate Victorian wood trim around windows, doors, and rooflines.
The process is meticulous but achievable and preserves the home’s architectural integrity. A Toronto homeowner, for example, successfully insulated their 1930s double-brick home by adding two inches of rigid foam on the exterior, covering it with a new weather barrier and siding. The key to preserving the look is to carefully remove, label, and store the original trim before the insulation is installed. After the new, thicker wall assembly is in place, extension jambs or blocks are built out from the original structure. The historic trim is then reinstalled onto these extensions, perfectly recreating its original depth and shadow lines. If original pieces are too damaged, replica millwork can be commissioned to match the historic profiles.
This approach requires careful planning and skilled craftsmanship. Following a clear sequence of steps is essential to ensure a successful outcome that is both thermally efficient and architecturally respectful. Natural Resources Canada (NRCan) recommends a systematic process for such projects.
- Document and Photograph: Before any work begins, fully document all existing trim profiles and their placement with detailed photos and measurements.
- Careful Removal: Delicately remove the original trim pieces, numbering and cataloging each one for precise reinstallation.
- Install Insulation: Install the exterior insulation panels and new weather-resistive barrier over the brick.
- Build Out Extensions: Create and install wood extension blocks or jambs to account for the new wall thickness where the trim will be reattached.
- Reinstall Trim: Reinstall the original trim pieces onto the extension blocks, ensuring a secure and weather-tight fit.
- Finishing: Apply a heritage-appropriate paint and finish to the reinstalled trim, matching the original colour scheme.
When to Restore Masonry: Before or After Internal Insulation Work?
The question of sequencing is not just a matter of convenience; it is critical to the long-term success of your heritage retrofit project. The absolute, non-negotiable rule is: all exterior work on the masonry must be completed before any interior insulation is installed. This includes repointing with the correct lime mortar, repairing or replacing spalled bricks, and addressing any issues with flashing or water penetration. Sealing the exterior envelope first ensures that you are not trapping existing moisture problems inside a newly insulated wall cavity, which would create a perfect environment for mould and rot.
Furthermore, government incentive programs in Canada are structured around this logic. According to CMHC requirements for the Canada Greener Homes program, a pre-retrofit EnerGuide evaluation must be completed before any work begins. This initial assessment documents the home’s baseline performance and identifies areas for improvement, including the state of the masonry. Only after the exterior is sound can you proceed with interior upgrades that will be accurately measured for their effectiveness in a post-retrofit evaluation.
Planning your project around Canadian seasons is also a key factor for success. Exterior masonry work is highly dependent on temperature and weather, while interior work can be done year-round. A well-planned project leverages this reality to maintain momentum and ensure high-quality results.
| Season | Exterior Masonry Work | Interior Insulation | Grant Process |
|---|---|---|---|
| Spring (Apr-May) | Ideal – frost-free, moderate temps | Possible year-round | Submit pre-retrofit evaluation |
| Summer (Jun-Aug) | Optimal – warm, dry conditions | Possible year-round | Complete approved retrofits |
| Fall (Sep-Oct) | Good until first frost | Possible year-round | Complete work before winter |
| Winter (Nov-Mar) | Not recommended – freezing risk | Ideal – indoor work only | Post-retrofit evaluation |
How to Create Fire Blocks in Balloon-Framed Century Homes?
Many Victorian and Edwardian homes in Canada were built using a technique called balloon framing. In this method, exterior wall studs run uninterrupted from the foundation sill all the way to the roof rafters. While efficient to build, this creates continuous, open vertical cavities within the walls that act as a chimney in the event of a fire, allowing flames to spread rapidly from the basement to the attic in minutes. When renovating a century home, addressing this inherent fire risk by installing fire blocks is a critical safety upgrade mandated by modern building codes.
Fire blocking involves installing horizontal blocks of a fire-resistant material within these vertical stud cavities to break them up and slow the spread of fire. In a heritage retrofit, the ideal material for this is rock wool insulation. As Ontario Building Code specialists point out in the Heritage Retrofits Best Practice Guide:
Rock wool serves a dual function as an excellent fire block and thermal insulator, and its widespread availability in Canadian building supply stores makes it ideal for heritage retrofits.
– Ontario Building Code specialists, Heritage Retrofits Best Practice Guide
Unlike flammable foam insulations, rock wool is made from stone and is naturally non-combustible, able to withstand temperatures exceeding 1,000°C. By cutting rock wool batts to fit snugly between the studs at each floor level, you create an effective fire block that also improves the thermal and acoustic performance of the wall. The process must be done systematically to ensure all vertical pathways are sealed.
- Identify all vertical wall cavities that extend between floors.
- Install rock wool fire blocking, cut to fit tightly, at each floor level and at maximum 10-foot (3-metre) vertical intervals.
- Seal all penetrations for wiring, plumbing, or ductwork between floors with a fire-rated caulk or sealant.
- Document all fire-blocking installations with photographs for your records and for municipal building inspectors.
- Ensure you have obtained any necessary building permits as required by your local building code enforcement in Ontario or Quebec.
Why “Breathable” Insulation Saves Wood Frames from Rotting?
The term “breathable” in building science doesn’t refer to air movement; it refers to vapour permeability. A breathable wall assembly is one that allows water vapour (humidity) to pass through it, enabling the structure to dry out if it gets wet. This characteristic is the single most important factor in preventing rot in the wood frames of century homes. Old homes were inherently breathable, but modern renovations can inadvertently trap moisture, with devastating consequences for the original wood structure.
The physics of moisture movement are driven by temperature and humidity gradients, which are extreme in the Canadian climate. Canadian building science research shows wall assemblies experience inward vapour drive at -20°C winter conditions and outward drive at +30°C summer conditions. In winter, warm, moist indoor air tries to escape, and if it hits a cold surface inside the wall (like the back of exterior sheathing), it can condense into liquid water. In summer, hot, humid outdoor air can be driven inwards. A breathable wall allows this moisture to dry in either direction, depending on the season.
This is why traditional 6-mil polyethylene vapour barriers are a disastrous choice for heritage homes. They are completely impermeable and stop all outward drying, trapping any moisture that gets into the wall cavity. Building science experts instead recommend either a “smart” vapour retarder or a fully vapour-open assembly. A smart vapour retarder alters its permeability based on humidity, staying closed in winter to block inward-bound moisture but opening in summer to allow the wall to dry to the interior. A vapour-open assembly uses materials like rock wool or wood fibre insulation that are naturally permeable, allowing moisture to move freely and the wall to dry continuously. This approach maintains the wood framing’s drying potential, safeguarding it from the constant threat of rot.
Key Takeaways
- Never trap moisture. A “breathing” wall assembly is non-negotiable for Canadian heritage brick homes to prevent freeze-thaw damage.
- Prioritize materials compatible with heritage structures: lime mortar over Portland cement, and vapour-open insulation (wood fibre, rock wool) over closed-cell spray foam.
- Sequence is critical. Always conduct a pre-retrofit EnerGuide evaluation and restore masonry before undertaking interior insulation work.
How to Renovate a 1950s Bungalow to Near Net-Zero Standards?
While the focus of this guide is on 19th and early 20th-century brick homes, examining a deep energy retrofit of a mid-century home offers powerful lessons. The goal of a “near net-zero” renovation is to reduce a home’s energy consumption to a bare minimum, with the small remaining need often met by on-site renewable energy. Achieving this on a 1950s bungalow demonstrates that with a systematic approach, even older housing stock can be transformed into high-performance structures. The principles are universal: drastically reduce heat loss and eliminate air leakage.
For a typical Canadian bungalow, the path to near net-zero involves a comprehensive overhaul of the building envelope. This means:
- Super-insulating the attic: Bringing insulation levels up to R-60 or higher, which is significantly above standard code.
- Adding exterior insulation: Wrapping the entire home in a continuous layer of rigid insulation (R-20 or more) to eliminate thermal bridging through the wood studs.
- Meticulous air sealing: Using specialized tapes and membranes to seal every joint, crack, and penetration in the building envelope to achieve an extremely low air leakage rate.
- High-performance windows: Installing triple-pane windows.
- Upgrading mechanical systems: Replacing the old furnace with a high-efficiency cold-climate heat pump.
This level of renovation is a significant investment, but it’s strongly supported by government programs. For example, the Canada Greener Homes program provides up to $40,000 in interest-free loans, plus thousands in rebates, to help homeowners undertake these deep retrofits. The process is structured and requires working with certified professionals to ensure the targeted energy savings are met. The key takeaway for any heritage homeowner is that a holistic, building-science-led approach—focused on a continuous, well-insulated, and airtight envelope—is the proven path to exceptional energy performance, regardless of the home’s original era.
To apply these principles correctly, the next logical step is to consult with a heritage-certified building science professional or architect for a site-specific assessment of your home’s unique construction and needs.