Adding exterior rigid foam during a siding replacement is the single most effective upgrade for eliminating thermal bridges and transforming your home’s building envelope performance.
- It creates a continuous thermal blanket, keeping your structural wall sheathing warm, dry, and protected from the elements.
- Proper air sealing at the foam board seams is often more critical for overall performance than the foam’s R-value alone.
Recommendation: Prioritize Extruded Polystyrene (XPS) for its stable R-value in cold Canadian climates and follow the National Building Code’s 1/3-2/3 rule to avoid creating a harmful double vapor barrier.
If you live in Canada, you know the feeling: a persistent chill near exterior walls, even when the thermostat is set high. You may have upgraded your windows and sealed every crack, yet the cold seems to find a way in. The culprit is often hiding in plain sight within your walls: the wooden studs. Each stud acts as a thermal bridge—a “highway for heat loss”—conducting warmth out of your home and allowing cold to penetrate. This phenomenon, known as thermal discontinuity, can significantly undermine the effectiveness of the insulation stuffed between the studs.
Many homeowners believe the solution is simply to add more batt insulation. However, the most opportune moment for a truly transformative upgrade is during a siding replacement. This project opens up the exterior of your home, presenting a golden opportunity to wrap it in a continuous layer of rigid foam insulation. This strategy does far more than just add R-value; it fundamentally re-engineers your wall’s performance.
But this isn’t about just slapping foam on a wall. The real key to success lies in understanding how this system works as a complete assembly. It’s about choosing the right type of foam for our demanding climate, executing critical details like air-sealing seams and flashing windows, and managing moisture with scientific precision. The goal is to move the entire thermal control layer outside the structure, a concept building scientists call “outsulation.”
This guide will deconstruct the science behind exterior rigid foam. We will explore which materials stand up to Canadian winters, why taping seams is a non-negotiable step, and how to handle the technical details around foundations and windows. By the end, you will understand why putting your insulation on the outside is the most robust strategy for creating a warmer, drier, and more energy-efficient home.
This article provides a comprehensive overview of applying exterior rigid foam insulation. The following summary outlines the key topics we will cover, from material selection to the advanced building science principles that make this method so effective in Canada.
Summary: A Technical Guide to Exterior Rigid Foam Insulation
- XPS vs. EPS vs. Polyiso: Which Board Belongs Under Your Siding?
- Why Taping Seams is More Important Than the Board Thickness Itself?
- How to Glue Rigid Foam to Foundation Walls Without Backfill Damage?
- The Window Jamb Problem: How to Handle Extra Thickness from Rigid Foam?
- When to Avoid Double Vapor Barriers with Exterior Foam?
- How Much Rigid Foam Can You Fit Under New Siding Without Extending the Roof?
- How Exterior Insulation Keeps Your Sheathing Warm and Dry?
- Why Putting All Insulation on the Outside is the Best Strategy for Canadian Homes?
XPS vs. EPS vs. Polyiso: Which Board Belongs Under Your Siding?
Choosing the right rigid foam is the first critical decision in an exterior insulation project, especially in a climate with wide temperature swings like Canada’s. The three primary materials—Extruded Polystyrene (XPS), Expanded Polystyrene (EPS), and Polyisocyanurate (Polyiso)—all provide insulation, but their performance under real-world Canadian winter conditions varies significantly. While Polyiso boasts the highest rated R-value per inch on paper (around R-6), its thermal resistance can degrade substantially in extreme cold.
In contrast, XPS is known for its stable thermal performance. Testing confirms that SOPRA-XPS maintains a consistent R-5 per inch Long-Term Thermal Resistance (LTTR), even at very low temperatures. This reliability is why the National Building Code of Canada now mandates that XPS manufacturers report these aged R-values, giving builders and homeowners an accurate prediction of long-term performance. The data below shows how these materials compare when the temperature drops to a typical Canadian winter low.
| Foam Type | Rated R-value/inch | Effective R-value at -20°C | Cost Range (CAD/sq ft) |
|---|---|---|---|
| XPS | R-5 | R-5 (stable) | $0.42-0.65 |
| EPS Type II | R-4.2 | R-4.2 (stable) | $0.35-0.50 |
| Polyiso | R-6 | R-4.5 (25% loss) | $0.55-0.75 |
As the table illustrates, Polyiso can lose up to 25% of its insulating power in the cold, making its on-paper advantage disappear when you need it most. Both XPS and high-density Type II EPS maintain their R-value, making them the superior technical choices. Furthermore, XPS offers excellent moisture resistance and high compressive strength, making it particularly suitable for both above-grade walls and below-grade foundation applications where it will be in contact with damp soil. For a durable, high-performance building envelope in Canada, XPS or high-density EPS provide the most predictable and reliable thermal barrier.
Why Taping Seams is More Important Than the Board Thickness Itself?
It may seem counterintuitive, but the effectiveness of an exterior rigid foam system often hinges more on a roll of tape than on the R-value of the foam itself. While the foam provides the thermal resistance, the taped seams provide the primary air barrier. Uncontrolled air leakage can be a far greater source of energy loss and moisture problems than insufficient R-value. A tiny gap in the building envelope allows cold, dry winter air to be drawn in and warm, moist interior air to escape, carrying significant amounts of energy with it.
When rigid foam boards are installed on the exterior, they are perfectly positioned to act as this critical air control layer. However, they only function as a system if every joint, penetration, and perimeter is meticulously sealed. This is where specialized, high-adhesion construction tape comes in. Taping the seams transforms individual panels into a single, monolithic barrier that wraps the entire home.
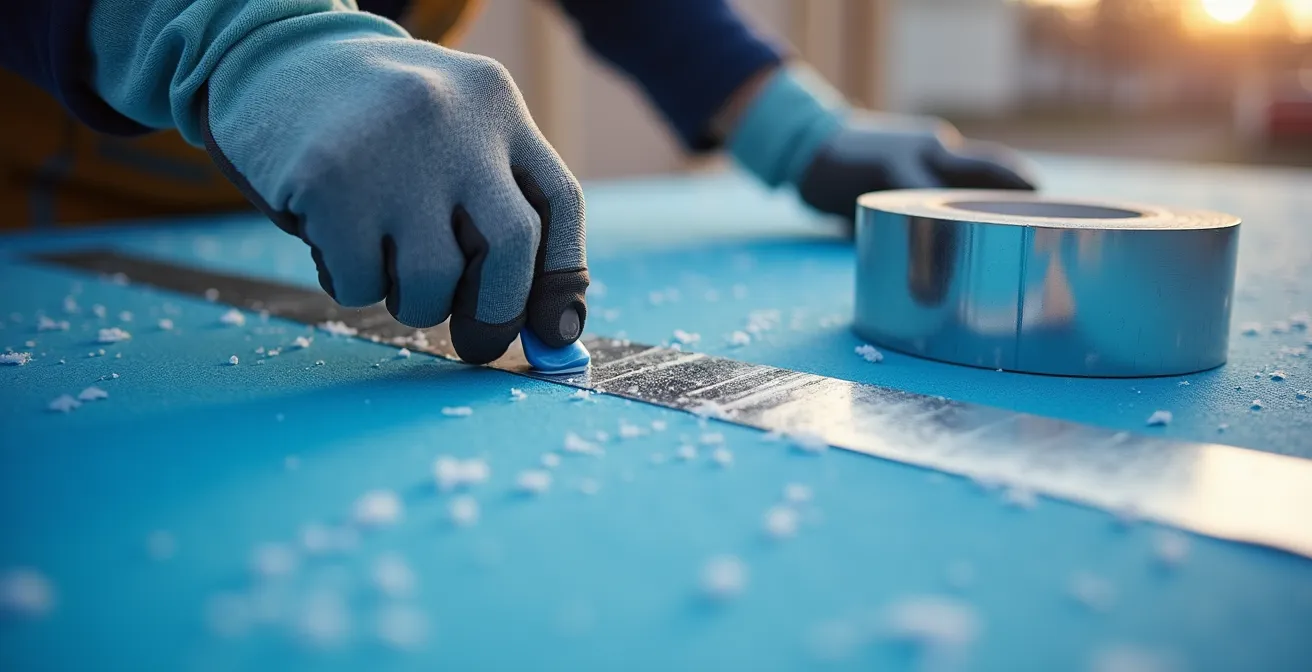
This airtight plane prevents “wind washing,” where cold air moves behind the insulation and cools the sheathing, negating much of the foam’s benefit. It effectively stops drafts at their source—on the outside of the building. Therefore, focusing on a flawless taping job is paramount. An R-10 wall with perfect air sealing will almost always outperform an R-20 wall with leaky seams. The goal is to create a continuous, unbroken air barrier that works in concert with the thermal layer, ensuring the insulation can perform to its maximum potential.
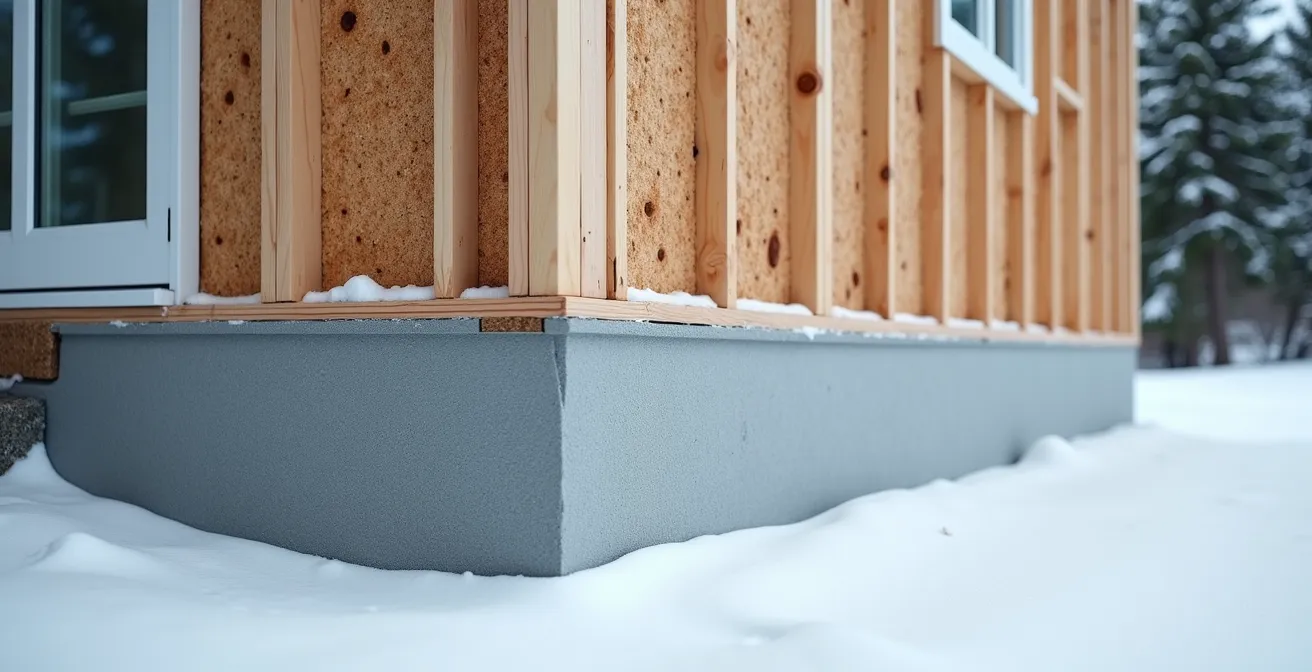
How to Glue Rigid Foam to Foundation Walls Without Backfill Damage?
Extending continuous insulation down over the foundation wall is a crucial step for creating a truly high-performance home, as an uninsulated basement can account for over 20% of a home’s total heat loss. However, this below-grade environment presents unique challenges: constant moisture from the soil, the physical pressure of backfill, and the destructive forces of Canadian freeze-thaw cycles. The installation method must be robust enough to withstand these conditions for decades.
The key is using the right materials and techniques. According to Natural Resources Canada, moisture-resistant foam like XPS or high-density Type IV EPS is required for foundation walls, with a recommended minimum of RSI 1.76 (R-10). These materials won’t degrade or lose their R-value when exposed to dampness. The adhesive used to attach the foam is just as critical. It must be a foam-compatible formulation that won’t dissolve the polystyrene. For a secure, long-lasting bond, the adhesive should be applied as a continuous bead around the full perimeter of each foam board.
This perimeter application creates a strong bond to resist backfill pressure and prevents water from migrating behind the boards. While some mechanical fasteners may be used, relying primarily on a quality adhesive bond is standard practice. It’s also important to consider regional codes, which can be more stringent. For instance, guidance based on the Ontario Building Code of 2017 often requires an RSI of 3.52 (R-20) for basement walls, double the general recommendation. This level of insulation significantly reduces heat loss and helps keep the foundation wall warm, minimizing the risk of interior condensation and creating a more comfortable and usable basement space.
The Window Jamb Problem: How to Handle Extra Thickness from Rigid Foam?
One of the most common technical hurdles when adding exterior rigid foam is dealing with existing windows and doors. Adding two, three, or even four inches of insulation to your walls means your windows will become recessed, creating a deep “tunnel” effect. More importantly, this new thickness creates a complex detailing challenge for water and air management. Simply butting the foam up to the window frame is a recipe for leaks and drafts. The professional solution is to build out the window opening with jamb extensions.
These extensions, typically made from cellular PVC or pressure-treated lumber, effectively make the window frame thicker to match the new wall depth. This allows the new siding and trim to be installed on a flat, co-planar surface for a clean, professional finish. The cross-section detail below illustrates how the layers—original framing, foam, extension, and window unit—integrate to create a weather-resistant assembly.
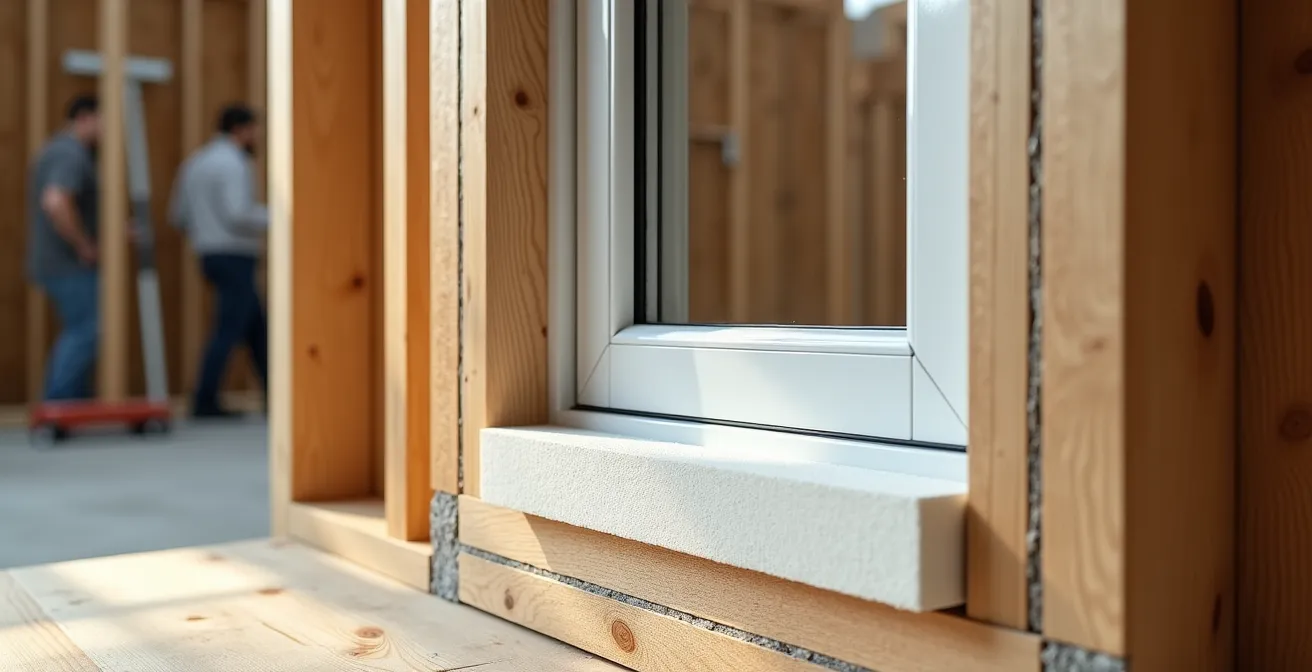
Properly installing these extensions is a multi-step process that demands precision. It involves careful measurement, creating thermal breaks, and, most critically, integrating with a robust water management system using liquid flashing and pan flashing at the sill. This ensures that any water that gets behind the siding is safely directed back out, protecting the wall structure from moisture damage—a critical consideration for durability in regions with wind-driven rain and snow.
Action Plan: Canadian-Durable Jamb Extension Installation
- Measure the exact foam thickness plus any furring strips to determine the required jamb extension depth.
- Cut the extension material (cellular PVC or pressure-treated lumber are recommended) to the precise width; avoid interior-grade wood products.
- Install a thermal break, such as 1-inch foam strips, around the rough opening before installing the jamb extensions to prevent heat loss.
- Apply liquid flashing to the sheathing and over the jamb extensions to create a continuous water and air seal, following CSA A440.4 standards.
- Secure the extensions firmly with corrosion-resistant screws at approximately 12-inch intervals.
- Install a sill pan flashing at the bottom of the opening to capture and drain away any water that penetrates, protecting against ice damming and wind-driven rain.
When to Avoid Double Vapor Barriers with Exterior Foam?
One of the most significant building science advantages of exterior insulation is its ability to manage moisture, but it requires rethinking a long-standing practice: the interior polyethylene vapor barrier. In a traditional Canadian wall, a poly sheet is installed on the “warm side” of the insulation to stop interior moisture from reaching the cold exterior sheathing, where it could condense. However, when you add a thick layer of exterior foam, you fundamentally change the physics of the wall.
With exterior insulation, the sheathing is no longer cold; it’s now on the warm side of the primary insulation layer. This keeps it well above the dew point, eliminating the risk of condensation from interior moisture. In this scenario, the interior poly vapor barrier becomes redundant and potentially dangerous. If any moisture does find its way into the wall cavity (e.g., through a small leak), a poly sheet on the inside and low-permeance foam on the outside can create a “double vapor barrier,” trapping the moisture with no way to dry out. This can lead to mould and rot. To prevent this, the National Building Code of Canada provides the 1/3-2/3 rule: guidance from Natural Resources Canada confirms that placing at least two-thirds of the total insulation’s R-value outside the sheathing allows you to safely omit the interior polyethylene vapor barrier. The wall can now dry to the inside if it ever gets wet.
For the highest-performance assemblies, building science experts often recommend an even more advanced approach. As one expert noted:
Smart vapor retarders adapt their permeability to be ‘closed’ in winter and ‘open’ in summer, offering the best of both worlds for high-performance assemblies.
– Building Science Expert, Fine Homebuilding – Detailing Walls with Rigid Foam
These “smart” barriers provide vapor control in winter but become vapor-open in summer, allowing for maximum drying potential in either direction. This makes them an excellent choice when using exterior rigid foam, providing an extra layer of safety and resilience to the wall assembly.
How Much Rigid Foam Can You Fit Under New Siding Without Extending the Roof?
A primary practical concern for homeowners is how much insulation can be added before the home’s proportions start to look strange or major structural changes are required. The main limiting factor is often the depth of the roof’s eaves and soffits. If the new, thicker wall extends out past the roofline, it creates an aesthetic problem and a weak point for water management. Fortunately, most Canadian homes have sufficient overhang to accommodate a significant insulation upgrade.
Industry experience from Canadian renovation contractors shows that homes with standard 12- to 16-inch soffits can typically accommodate 2 to 4 inches of rigid foam plus the necessary rainscreen strapping (typically 3/4-inch thick) without requiring any modifications to the roofline. This amount of insulation (providing R-10 to R-20) is enough to make a massive improvement in thermal performance and effectively control thermal bridging. Pushing beyond 4 inches of foam is certainly possible and offers even greater energy savings, but it will likely necessitate extending the eaves and gable ends to maintain proper roof overhang and water protection—a significantly more complex and costly undertaking.
Another critical detail tied to thickness is fastener length. The new siding and any furring strips must be secured through the foam and into the structural wood framing of the house. Building codes typically require a minimum fastener embedment of 1.25 inches into the structure to ensure the siding is held securely against wind loads. This means you must calculate the total thickness of your assembly to choose the right fastener. For example, if you install 2 inches of foam and 3/4-inch furring strips, you’ll need fasteners that are at least 4 inches long (2″ foam + 0.75″ furring + 1.25″ embedment = 4″). Using standard siding nails will not be sufficient and could lead to siding failure.
How Exterior Insulation Keeps Your Sheathing Warm and Dry?
The single most important benefit of continuous exterior insulation—the core reason it represents such a profound upgrade over cavity insulation alone—is its effect on the wall’s structural sheathing. In a conventional wall, the wood sheathing (plywood or OSB) is on the cold side of the insulation. This makes it a prime surface for condensation, as warm, moist air from inside the house can find its way through imperfections in the vapor barrier and hit this cold plane.
Exterior insulation completely reverses this dynamic. By wrapping the house in a thermal blanket, it moves the sheathing to the “warm side” of the insulation. The sheathing now stays at a temperature much closer to the interior of the house, regardless of how cold it gets outside. This keeps it safely above the dew point temperature, making condensation physically impossible. The impact of this is not trivial; it’s a game-changer for building durability.
The numbers are dramatic. As building science calculations show, on a frigid -30°C day, the sheathing in a standard 2×6 wall might be a chilling -10°C. In the same house with just 2 inches of exterior rigid foam, that same sheathing would be sitting at a comfortable +15°C. This is the fundamental “why” behind the strategy. By keeping the structural components of your wall warm and dry, you are drastically reducing the risk of mould, mildew, and rot. You are not just adding insulation; you are creating a more resilient, durable, and healthier building envelope that is built to last through decades of harsh Canadian winters.
Key Takeaways
- The primary function of exterior foam is creating a continuous thermal and air barrier, which is more critical than R-value alone.
- Extruded Polystyrene (XPS) or high-density EPS offer the most stable R-value performance and moisture resistance in cold Canadian climates.
- Following the National Building Code’s 1/3-2/3 rule allows for the safe removal of the interior polyethylene vapor barrier, preventing moisture traps and promoting wall drying.
Why Putting All Insulation on the Outside is the Best Strategy for Canadian Homes?
After exploring the technical details—from material choice to moisture management—the big picture becomes clear. Applying continuous exterior insulation is not just another way to insulate; it is the most robust, scientifically sound strategy for upgrading a home’s building envelope in a cold climate. It simultaneously addresses the three biggest enemies of performance and durability: heat loss (thermal bridging), air leakage, and moisture damage. No other single upgrade can achieve all three of these goals so effectively.
By wrapping the entire structure, you create a monolithic thermal blanket that eliminates the cold highways of your wall studs. By meticulously taping the seams, you create a superior air barrier. And by keeping the structure warm, you eliminate the risk of condensation and create a wall assembly that can dry out if it ever gets wet. This “outsulation” approach transforms a standard wall into a high-performance system. It’s an investment that pays dividends in lower energy bills, improved comfort, and a healthier living environment. As one expert on Canadian energy efficiency states:
This isn’t just a renovation; it’s an investment that aligns your home with the 2030 building standards, maximizing future resale value.
– Canadian Energy Efficiency Expert, Metal Pro Buildings – Canada’s R-Value Insulation Chart
Furthermore, the Canadian government recognizes the value of this approach. Programs like the Canada Greener Homes Initiative provide grants and financial support for homeowners who undertake these deep energy retrofits, making this premium upgrade more financially accessible. By requiring pre- and post-retrofit EnerGuide evaluations, the program helps quantify the real-world improvements in your home’s energy performance. This turns a siding replacement project from a simple aesthetic update into a forward-thinking investment in your home’s future.
By adopting a continuous exterior insulation strategy during your next siding project, you are not just fighting the cold; you are future-proofing your home. To ensure your project is a success, the next logical step is to consult with a building science professional or a certified contractor who can perform an assessment and develop a detailed plan tailored to your specific home and climate zone.