Increasing attic insulation to R-60 is not just an energy upgrade; it’s a structural load increase that can exceed the design limits of older Canadian homes.
- Dry R-60 cellulose alone (~1.8 psf) can surpass the load rating of standard 1/2-inch drywall (~1.2 psf) it rests on.
- This new “dead load” combines with Canada’s heavy, region-specific snow “live loads,” creating a cumulative stress your roof trusses were likely not designed to bear.
Recommendation: Before proceeding, perform a pre-assessment of your home’s structural capacity using the National Building Code (NBCC) and consult a Professional Engineer (P.Eng.).
For homeowners in Canada, the push to increase attic insulation to R-60 is driven by compelling factors: rising energy costs, a desire for improved home comfort, and past government incentives like the Canada Greener Homes Grant. The common advice often seems straightforward—simply add more blown-in cellulose to achieve the modern standard. However, this perspective overlooks a critical engineering principle: mass has structural consequences. In older homes, particularly those built before the 1990s with engineered wood trusses, this added weight can introduce a significant structural deficit.
The core issue is one of cumulative load. The weight of the new insulation is a permanent “dead load,” but it doesn’t exist in a vacuum. It is added to the variable “live load” of snow and ice, a major factor across most of the country. Your roof system was designed based on calculations made decades ago, often to a lower standard. Treating an R-60 upgrade as a simple top-up, without first conducting a structural load analysis, is a gamble against physics. The question is not whether your home will be warmer, but whether your trusses, joists, and even drywall ceilings can support the combined new weight under a worst-case Canadian winter scenario.
This guide provides a methodical, engineering-based framework for homeowners. It will walk you through the fundamental differences between load types, how to calculate the real weight of your proposed insulation, and how to read the structural codes that govern safety. We will examine the specific warning signs of a structure under stress and provide the tools to perform a pre-emptive assessment, empowering you to have an informed conversation with a professional engineer before you commit to the project.
This article provides a detailed breakdown of the structural considerations for your insulation project. Explore the sections below to understand the calculations, identify risks, and learn how to proceed safely.
Summary: Assessing Your Roof’s Capacity for R-60 Insulation
- Dead Load vs. Live Load: What is the Difference for Residential Roofs?
- Does Wet Cellulose Weigh Enough to Sag Your Drywall Ceiling?
- How to Sister Joists to Increase Capacity for a Finished Attic?
- The Drywall Cracks That Signal Your Roof is Under Too Much Stress
- How to Read Span Tables in the National Building Code?
- Why Removing That “Small Wall” for Open Concept Compromises Your Second Floor?
- Flat vs. Steep Pitch: Which Roof Shape Survives Arctic Blizzards Best?
- Can Your Roof Trusses Support the Weight of R-60 Blown-In Insulation?
Dead Load vs. Live Load: What is the Difference for Residential Roofs?
In structural engineering, all forces acting on a building are categorized. Understanding this distinction is the first step in assessing your roof’s capacity. Dead loads are permanent, static forces that are part of the building’s structure itself. This includes the weight of the trusses, sheathing, shingles, drywall, and existing insulation. When you add R-60 cellulose, you are permanently increasing the dead load.
Live loads, by contrast, are temporary, variable forces. For a Canadian roof, the primary live load is environmental: snow, ice, and rain. It can also include temporary loads from workers performing maintenance. The critical calculation for safety involves ensuring the structure can handle the sum of the maximum expected live load *plus* the total dead load. A common mistake is to consider only the insulation’s weight in isolation.
The problem is compounded by moisture. Dry cellulose is one thing, but if moisture enters the attic through air leaks or roof issues, its weight can skyrocket. In fact, saturated cellulose can weigh 4-5 times more than dry cellulose, transforming a calculated dead load into a catastrophic one. Furthermore, Canadian live loads from snow are not uniform. They are determined by regional climate data codified in the National Building Code of Canada (NBCC).
This table illustrates how specified snow loads vary dramatically across the country, directly impacting the total live load your roof must be designed to withstand. An R-60 upgrade in St. John’s carries a fundamentally higher risk than the same upgrade in Vancouver.
| City | Specified Snow Load (kPa) | Dead Load Impact |
|---|---|---|
| Vancouver | 1.9 | Moderate |
| Winnipeg | 2.2 | High |
| St. John’s | 3.8 | Critical |
| Whistler Area | 4.0+ | Extreme |
Does Wet Cellulose Weigh Enough to Sag Your Drywall Ceiling?
The short answer is yes, even when dry. The ceiling drywall is the first structural element that directly supports the weight of attic insulation. It is not merely a cosmetic surface; it has a defined load capacity. The critical oversight in many insulation projects is comparing the insulation’s weight directly against this capacity. The numbers reveal a slim, and sometimes negative, margin of safety.
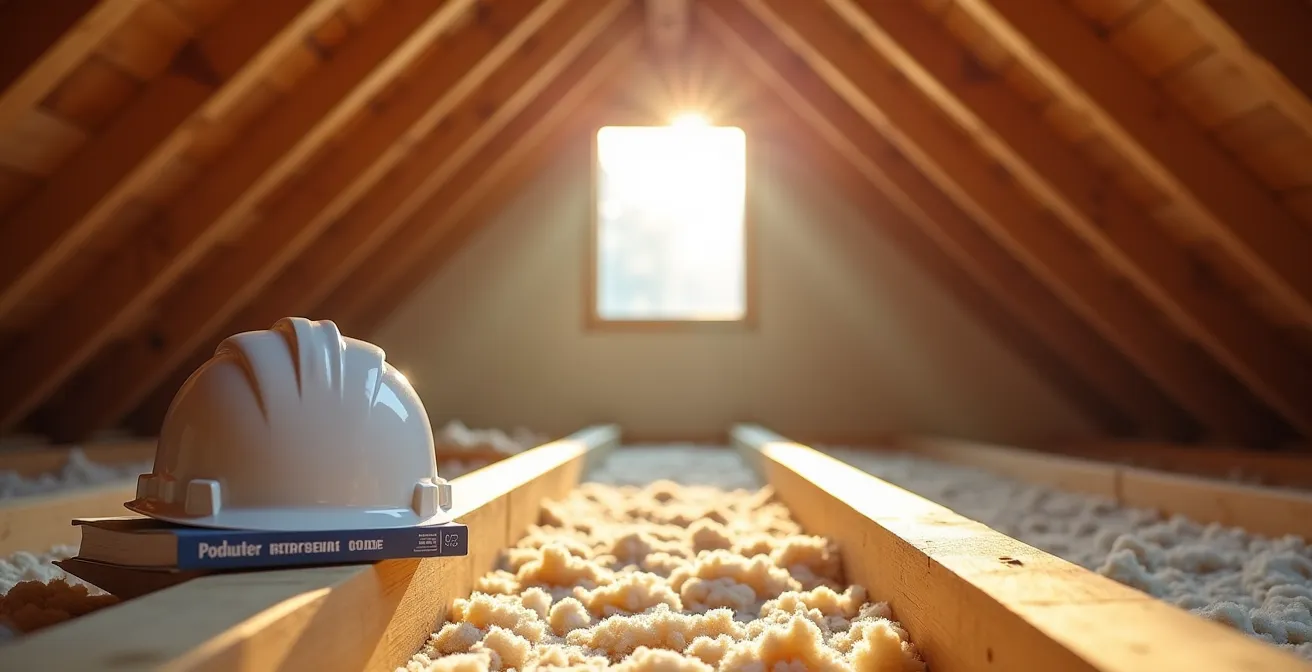
Standard building practice often uses 1/2-inch drywall for ceilings. Canadian building standards reveal that this material has a load capacity of approximately 1.2 pounds per square foot (psf). A properly installed layer of R-60 blown-in cellulose (approximately 15-20 inches deep) has a dry density of about 1.8 psf. From a purely mathematical standpoint, the weight of the insulation alone already exceeds the rated capacity of the drywall by 50%. This doesn’t cause immediate collapse, as building codes include safety factors, but it does mean the system is already over-stressed from day one.
This is where moisture becomes a critical accelerator of failure. As highlighted in a documented project by Reitzel Insulation, preventing moisture accumulation is paramount. In their R-60 cellulose upgrade, a key focus was installing soffit baffle vents to ensure proper airflow. This is because, without adequate ventilation, warm, moist air from the living space below can migrate into the cold attic and condense. This condensation saturates the cellulose, dramatically increasing its weight and leading to the classic signs of failure: sagging drywall, visible seams, and eventually, ceiling collapse.
Ontario Home R-60 Cellulose Installation Project
Reitzel Insulation documented a Canadian home upgrade to R-60 cellulose (19-22 inches depth) in 2021, emphasizing proper ventilation installation with soffit baffle vents to prevent ice damming. The project highlighted that 40% of energy loss occurs through air leakage, making proper vapour barrier installation crucial for preventing moisture accumulation that could lead to ceiling failure.
How to Sister Joists to Increase Capacity for a Finished Attic?
When the existing ceiling structure is deemed insufficient to carry new loads—either from deep insulation or plans for a finished attic space—the most common engineering solution is “sistering” the joists. This process involves bolting or nailing an identical piece of lumber parallel to each existing joist, effectively doubling its thickness and dramatically increasing its strength and stiffness to prevent deflection (sagging).
However, a critical warning must be issued first: never, under any circumstances, attempt to cut, drill, or otherwise modify an engineered wood truss. These are complex structural components designed as a complete system. The stamped metal connector plates are non-negotiable points of force transfer. Altering any part of a truss without an engineer’s explicit design voids its structural integrity. Sistering is a technique applicable to conventional ceiling joists (solid lumber beams), not the individual chords of a prefabricated truss system.
For a valid sistering project on conventional joists, the process must be methodical and code-compliant. First, you must obtain a building permit from your local Canadian municipality, as this is a structural modification. A Professional Engineer (P.Eng.) must be hired to perform an assessment and provide a stamped drawing specifying the requirements. Typically, you will use SPF (Spruce-Pine-Fir) lumber, the standard in Canadian construction, matching the dimensions of the existing joists (e.g., 2×8 with 2×8). The engineer’s plan will detail the fastening schedule—the size, type, and spacing of bolts or nails—which is crucial for ensuring the two pieces of wood act as a single, unified beam.

As the image illustrates, a proper connection is vital for the load to be shared between the old and new joist. This reinforcement must comply with provincial building codes, like the Ontario Building Code, which dictates span requirements for specific loads and lumber dimensions.
The Drywall Cracks That Signal Your Roof is Under Too Much Stress
Your home’s interior finishes are the first visual indicators of structural distress. While some minor cracking is normal, it is essential to learn to differentiate between harmless seasonal movement and the warning signs of excessive roof load. In the Canadian climate, seasonal cracks are common; these are typically hairline-thin and appear at the joints between drywall sheets due to thermal expansion and contraction. They often appear in winter and may close up in summer.
Structural cracks are different and demand immediate attention. These are often wider than the edge of a toonie, run diagonally from the corners of walls or door frames, and, most importantly, they are active—meaning they grow in length or width over time. A key diagnostic step is to correlate the appearance of these cracks with weather events. Did a new, significant crack appear after a major “Snowmageddon” event or during the spring thaw, when the snowpack on your roof is saturated and at its absolute heaviest? This timing data is crucial information for a structural engineer.
To properly monitor potential stress cracks, you must be systematic. Use a pencil to mark the date and the crack’s endpoint directly on the wall. Take a clear photograph with a ruler next to it for scale. Measure the width and length monthly throughout the winter. If you document progressive growth, it is a clear signal that the structure is deflecting under a load it cannot adequately support.
The increasing frequency of these events is a major concern for building safety, as noted by engineering authorities. This is not a theoretical risk; it’s a documented trend in a changing climate.
Record snowfalls have been occurring more frequently, and the depth of ground snow has been met or exceeded in the past 10 years in most Canadian locations
– Engineers and Geoscientists British Columbia, Structural Design Guidelines for Part 9 Buildings
How to Read Span Tables in the National Building Code?
Span tables are the engineering cheat sheets of the construction world. Found within the National Building Code of Canada (NBCC) and its provincial variations, these tables provide the maximum allowable distance (span) that a joist or rafter of a certain size, species, and grade can cover without excessive deflection under a specified load. Understanding how to use them is the key to making a preliminary assessment of your attic’s structural adequacy.
Reading a span table is a process of cross-referencing known information about your home’s construction. You need to identify four key physical properties of your ceiling joists: the lumber species, its grade, its dimensions, and its on-center spacing. For most Canadian homes, the species is SPF (Spruce-Pine-Fir). You can find the grade (typically “No. 1” or “No. 2”) on a stamp located on the side of the joists. The dimensions are the nominal size (e.g., 2×6, 2×8), and the spacing is the distance from the center of one joist to the center of the next (usually 12, 16, or 24 inches).
With this data, you locate the correct table in the code—it is critical to use the “Ceiling Joist” table and not the “Rafter” table, as they are calculated for different loads. You then find the row corresponding to your lumber’s size and grade and the column for its spacing. The number at that intersection is the maximum allowable span in feet and inches for a standard prescribed load. If your joists’ actual span is greater than this number, they do not meet the code for that load.
Alberta SPF 2×8 Ceiling Joist Span Example
For an Alberta house using No. 2 grade SPF 2×8 ceiling joists at 16-inch spacing, the National Building Code 2023 Alberta Edition demonstrates maximum allowable spans based on specified loads. The key is understanding that SPF (Spruce-Pine-Fir) dominates Canadian construction, with Grade Stamps (No. 1/No. 2) and spacing (o.c.) being physical properties that directly impact load capacity.
Your Action Plan: Using NBCC Span Tables
- Identify Lumber Species: Go into your attic and locate your ceiling joists. In Canada, they are overwhelmingly likely to be SPF (Spruce-Pine-Fir).
- Find Grade Stamp: Inspect the sides of several joists for an ink stamp. Identify the grade, which is typically “No. 1” or “No. 2”. No. 1 is stronger.
- Measure On-Center Spacing: Use a tape measure to determine the distance from the center of one joist to the center of the next. Common spacings are 12″, 16″, or 24″.
- Locate Correct Table: In the NBCC, find the section for wood-frame construction and select the specific table for “Ceiling Joists” that will not support a floor above.
- Cross-Reference Data: Find your joist size (e.g., 2×8), grade, and spacing in the table to determine the maximum allowable span for the specified design load.
Why Removing That “Small Wall” for Open Concept Compromises Your Second Floor?
The trend towards open-concept living has led many homeowners to remove interior walls to create large, airy spaces. While non-load-bearing partition walls can be removed with little consequence, taking out a “small” but critical load-bearing wall can severely compromise your home’s entire structural system, especially the roof.
The key principle at play is the load path. This is the continuous route that all the weight from the roof (dead and live loads) follows as it travels down through the walls and columns to the foundation and into the ground. In many older homes, a central wall on the main floor isn’t just dividing rooms; it’s a vital link in this chain. It often sits directly beneath the midpoint of long-spanning roof trusses or joists, providing essential support and preventing them from sagging or failing over time.
As the Canadian Wood Council points out, this design was particularly common in the types of homes that now make up a large portion of Canada’s housing stock.
In 1960s bungalows and 1980s subdivision homes common across Canada, central walls were often integral to supporting roof structures over wider spans
– Canadian Wood Council, Residential Structural Design Guide
When you remove this support, the load path is broken. The trusses or joists above are now spanning a distance twice as long as they were designed for, subjecting them to immense bending forces. This can lead to a cascade of problems: sagging second-story floors, cracked ceilings and walls, and in a worst-case scenario, roof failure. The problem is often invisible at first, manifesting slowly as the structure settles into its new, unsupported state.
Replacing a load-bearing wall requires installing a properly sized beam or header, supported by new posts that carry the load down to the foundation. This is not a DIY project; it is a major structural intervention that requires a professional engineering design and a building permit.
Flat vs. Steep Pitch: Which Roof Shape Survives Arctic Blizzards Best?
The geometry of your roof, specifically its pitch or slope, is a primary factor in how it manages environmental loads, particularly snow. Roof pitch is expressed as a ratio of rise (vertical distance) over run (horizontal distance), such as 6:12. Different roof shapes are prevalent across Canada, each an adaptation to regional climate challenges, and each interacts with the added weight of R-60 insulation differently.
Steep-pitch roofs (e.g., 8:12 to 12:12), common in Eastern Canada and Quebec, are designed to shed snow effectively. The steep angle encourages snow to slide off before it can accumulate to dangerous depths and weights. This design feature provides a natural advantage when considering an R-60 upgrade, as it helps mitigate the maximum potential live load. The vertical space in these attics also makes it physically easier to achieve the required depth of insulation.
Low-slope roofs (e.g., 4:12 to 6:12), often found in the Prairies, are designed with a different priority: resisting wind uplift. However, their gentle slope means they are poor at shedding snow. They are designed to *bear* the full weight of the region’s specified snow load. Adding 1.8 psf of R-60 insulation to a roof already designed to hold several feet of snow can easily push it past its design limit. For these homes, achieving R-60 often requires using raised-heel trusses to create enough vertical space at the eaves without compromising ventilation.
The National Building Code’s approach to these loads is based on probability. For instance, the updated National Building Code 2024 specifies that snow loads are based on a 1-in-50-year event, representing a much rarer and more extreme scenario than wind loads. This underscores the seriousness with which snow accumulation is treated in Canadian structural design.
This table from the National Research Council Canada shows how regional priorities influence typical roof designs and impact the feasibility of deep insulation retrofits.
| Region | Typical Roof Pitch | Design Priority | R-60 Feasibility |
|---|---|---|---|
| Eastern Canada/Quebec | Steep (8:12 to 12:12) | Snow shedding | Good vertical space |
| Prairies/Calgary | Lower slope (4:12 to 6:12) | Wind uplift resistance | May need raised heel trusses |
| Atlantic Canada | Moderate (6:12 to 8:12) | Balance snow/wind | Adequate with planning |
| Northern Territories | Variable | Extreme load capacity | Engineering required |
Key Takeaways
- The weight of R-60 cellulose insulation (~1.8 psf) plus a regional snow load can exceed the structural capacity of older roof trusses.
- Drywall ceilings, rated for ~1.2 psf, are often the first point of failure as they are immediately over-stressed by the insulation’s dead load alone.
- A structural assessment by a Professional Engineer (P.Eng.) is not an optional expense but a critical safety requirement before adding significant weight to your roof system.
Can Your Roof Trusses Support the Weight of R-60 Blown-In Insulation?
We have established that adding R-60 insulation is a structural engineering question, not a simple energy upgrade. The final determination rests on a simple, yet critical, calculation: does your roof’s existing capacity exceed the proposed new cumulative load? The formula is: Total Dead Load (structure + R-60) + Maximum Live Load (regional snow) ≤ Truss Design Capacity.
For the average homeowner, performing this calculation with engineering precision is not feasible. However, you are now equipped to perform a robust pre-assessment. By identifying your joist dimensions, grade, and spacing, you can use NBCC span tables to get a preliminary idea of their capacity. By inspecting for active cracks and sagging, you can spot existing signs of stress. This initial investigation allows you to determine if your project is low-risk (Green), requires professional analysis (Yellow), or should be halted immediately (Red).
This due diligence is the most important step in the process. While incentives like the Canada Greener Homes Initiative (which had a deadline for new applicants in early 2024 but allows retrofits until the end of 2025 for existing applicants) are powerful motivators, they do not supersede the laws of physics or the requirements of the building code. The cost of a professional assessment is a minor investment compared to the potential cost of a structural failure.
Professional Engineering Assessment Costs in Canada
Typical structural assessment costs in Canada range from $500-$1000 for a basic evaluation by a Professional Engineer (P.Eng.). Provincial engineering regulatory bodies include PEO in Ontario, APEGA in Alberta, and Engineers and Geoscientists BC. These assessments are critical before proceeding with R-60 insulation upgrades, especially in high snow load regions where specified loads can exceed 4 kPa.
The only way to answer the question with certainty is to move from estimation to professional validation. The next logical step is to commission a formal structural assessment by a licensed Professional Engineer in your province. They will perform the definitive calculations and provide a stamped report that either clears your project to proceed or specifies the necessary structural upgrades required for safety and code compliance.